background image

6

airFiber

 AF24 Quick Start Guide

Installation Requirements

•  17 mm wrench
•  13 mm socket wrench or driver
•  Clear line of sight between airFiber radios
•  Clear view of the sky for proper GPS operation
•  Mounting location with < 0.5° displacement due to twist and 

sway under wind loading 

•  Mounting point:

•  At least 1 meter below the highest point on the structure
•  For tower installations, at least 3 meters below the top of the 

tower

•  Ground wires – min. 8 AWG (10 mm

2

) and max. length: 1 meter. 

As a safety precaution, ground the airFiber radios to grounded 

masts, poles, towers, or grounding bars. 

WARNING:

 Failure to properly ground your airFiber 

units will void your warranty.

•  (Recommended) 2 Outdoor GigE PoE surge protectors

Note:

 For guidelines about grounding and lightning 

protection, follow your local electrical regulatory codes.

•  Outdoor, shielded Category 5e (or above) cabling should be 

used for all wired Ethernet connections. Category 6 is required 

for installations with long cable runs (up to 100 m).
We recommend that you protect your networks from the 

most brutal environments and devastating ESD attacks 

with industrial-grade shielded Ethernet cable from Ubiquiti 

Networks. For more details, visit www.ubnt.com/toughcable

Installation Overview

We recommend that you configure your paired airFiber radios 
before mounting. Below is an overview of the installation with 
specific details on the following pages: 
•  Connect Power over Ethernet to the DATA port, and connect an 

Ethernet cable between your computer and the CONFIG port.

•  Configure the device settings in the airFiber Configuration 

Interface. 

Summary of Contents for airFiber AF-24

Page 1: ...24 GHz Point to Point 1 4 Gbps Radio Model AF24...

Page 2: ......

Page 3: ...AF24 show you how to access the airFiber Configuration Interface and explain how to set up an airFiber link Package Contents airFiber AF24 Pole Mount Bracket Pole Clamps Qty 2 Cable Ties Qty 3 M10x15...

Page 4: ...2 airFiber AF24 Quick Start Guide Hardware Overview Side Alignment Bracket Elevation Adjustment Azimuth Adjustment Ground Bonding Point Lock Bolts Lock Bolts...

Page 5: ...3 Hardware Overview Back Lock Bolts Lock Bolts Azimuth Adjustment Lock Bolts Lock Bolts Cover Lock Elevation Adjustment Port Cover...

Page 6: ...e unit is already powered on DATA 10 100 1000 Mbps port handles all user traffic AUX Port for audio tone aiming LED Display Digital display used for power status and mode information CONFIG 10 100 Mbp...

Page 7: ...Normal Flash 4x 16QAM MIMO Long Flash 6x 64QAM MIMO LED Display RX Power dBm Number Decodable RX Signal Flashing Number Undecodable RX Signal Overload Condition Master Slave Off Slave Mode On Master...

Page 8: ...e protectors Note For guidelines about grounding and lightning protection follow your local electrical regulatory codes Outdoor shielded Category 5e or above cabling should be used for all wired Ether...

Page 9: ...to move the airFiber radios Reconnect at the site After you have mounted the airFiber radios establish and optimize the RF link Connecting Power over Ethernet 1 Turn the Cover Lock to the Unlocked ico...

Page 10: ...Connect the other end of the Ethernet cable from the DATA port to the Ethernet port labeled POE on the PoE Adapter 4 Connect the Power Cord to the power port on the PoE Adapter Connect the other end...

Page 11: ...ng options at the cost of higher latency and throughput Full duplex operation provides the highest throughput and lowest latency however you have fewer frequency management options Half Duplex default...

Page 12: ...subnet for example 192 168 1 100 3 Launch your web browser Type http 192 168 1 20 in the address field and press enter PC or return Mac 4 The login screen will appear Enter ubnt in the Username and Pa...

Page 13: ...h the Master and the Slave c For the Duplex drop down Half Duplex The default mode The TX and RX Frequencies can be the same or different to suit local interference Full Duplex The TX and RX Frequenci...

Page 14: ...z 8 Click Change and then click Apply 9 In Band Management is enabled by default so each airFiber radio must have a unique IP Address If the airFiber radios use the same IP Address then you may lose...

Page 15: ...unt Bracket to a pole Note The mounting assembly can accommodate a 2 0 4 0 pole a Orient the Pole Mount Bracket around the pole so it is aimed in the direction of the other airFiber AF24 b Insert the...

Page 16: ...Quick Start Guide 3 Loosen but do NOT remove the eight Lock Bolts located on the Alignment Bracket 4 Ensure that there is a 6 mm gap between the head of each M8x14 Serrated Flange Screw and the Alignm...

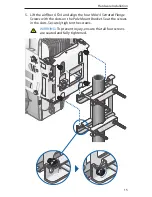
Page 17: ...iber AF24 and align the four M8x14 Serrated Flange Screws with the slots on the Pole Mount Bracket Seat the screws in the slots Securely tighten the screws WARNING To prevent injury ensure that all fo...

Page 18: ...min 8 AWG or 10 mm2 to the lug and replace the nut to secure the wire c Secure the other end of the ground wire to a grounded mast pole tower or grounding bar WARNING Failure to properly ground your a...

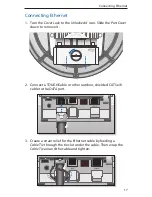
Page 19: ...on Slide the Port Cover down to remove it 2 Connect a TOUGHCable or other outdoor shielded CAT5e 6 cable to the DATA port 3 Create a strain relief for the Ethernet cable by feeding a Cable Tie through...

Page 20: ...labeled LAN on the PoE Adapter 6 Connect the Power Cord to the power port on the PoE Adapter Connect the other end of the Power Cord to a power source Note For added protection we recommend installing...

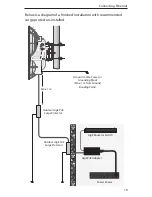
Page 21: ...installation with recommended surge protectors installed Ground to Pole Tower or Grounding Block Max 1 m from Ground Bonding Point Max 1 m Outdoor GigE PoE Surge Protector Outdoor GigE PoE Surge Prote...

Page 22: ...opes not included temporarily attached to your airFiber radios You may need to use additional hardware to compensate for issues such as the improper orientation of a mounting pole or significant eleva...

Page 23: ...he Hex Nuts b Adjust the Pole Mount Bracket and Pole Clamps c Tighten the Hex Nuts Hex Nuts 4 Slave Aim the Slave at the Master to achieve the strongest received signal level on the Slave s numeric LE...

Page 24: ...he Azimuth AZ Adjustment Bolt of the Master through its adjustment range Master Azimuth AZ Adjustment Bolt b Sweep the Elevation EL Adjustment Bolt of the Master through its adjustment range Master El...

Page 25: ...of the Master until the other installer sees the strongest received signal level displayed on the LED Display of the Slave 3 Repeat steps 1 and 2 until you achieve a symmetric link with the received...

Page 26: ...on the airFiber Configuration Interface and audio tone methods The User Guide is available at documentation ubnt com Installer Compliance Responsibility Devices must be professionally installed and it...

Page 27: ...uration Port 1 10 100 Ethernet Port Receive Sensitivity Modulation Sensitivity FDD Capacity TDD Capacity 64QAM 66 dBm 1500 Mbps 760 Mbps 16QAM 72 dBm 1000 Mbps 507 Mbps QPSK MIMO 78 dBm 500 Mbps 253 M...

Page 28: ...e of the ground wire as a part of the safety certification modification or misuse can provide a shock hazard that can result in serious injury or death c Contact a qualified electrician or the manufac...

Page 29: ...arties The warranty period of any repaired or replaced Product shall not extend beyond its original term EXCEPT FOR ANY EXPRESS WARRANTIES PROVIDED HEREIN UBIQUITI NETWORKS PRODUCTS AND SERVICES ARE P...

Page 30: ...documentation IV All Ethernet cabling runs use CAT5 or above shielded cabling Disclaimer UBIQUITI NETWORKS does not warrant that the operation of the products is error free or that operation will be...

Page 31: ...cy energy and if not installed and used in accordance with the instruction manual may cause harmful interference to radio communications Operations of this equipment in a residential area is likely to...

Page 32: ...e antennas used for this transmitter must be installed to provide a separation distance of at least 107 cm from all persons and must not be located or operating in conjunction with any other antenna o...

Page 33: ...ITI NETWORKS vakuuttaa t ten ett UBIQUITI NETWORKS device tyyppinen laite on direktiivin 1999 5 EY oleellisten vaatimusten ja sit koskevien direktiivin muiden ehtojen mukainen Fran ais French Par la p...

Page 34: ...ed intygar UBIQUITI NETWORKS att denna UBIQUITI NETWORKS device st r I verensst mmelse med de v sentliga egenskapskrav och vriga relevanta best mmelser som framg r av direktiv 1999 5 EG Espa ol Spanis...

Page 35: ......

Page 36: ...w w w u b n t c o m 2012 2013 Ubiquiti Networks Inc All rights reserved Support support ubnt com Wiki Page wiki ubnt com Support Forum forum ubnt com Downloads downloads ubnt com...

Reviews: