background image

Software Installation

Download and install the latest version of the UniFi Controller 
software at: downloads.ubnt.com/unifi

Launch the software and follow the on-screen instructions. 
Step-by-step instructions are available in the User Guide 
located on our website: documentation.ubnt.com/unifi

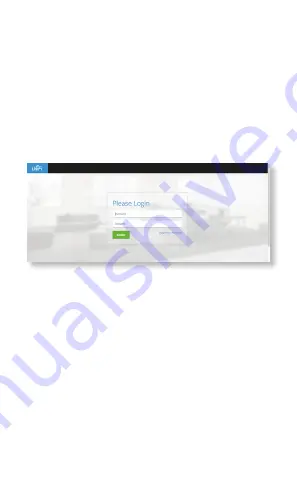
After you have installed the software and run the UniFi 
Installation Wizard, a login screen will appear for the UniFi 
Controller management interface. Enter the Admin Name and 
Password that you created and click Login

You can manage your wireless network and view network 
statistics using the UniFi Controller management interface. 
For information on configuring and using the UniFi Controller 
software, refer to the User Guide.

Summary of Contents for UAP-AC-LR

Page 1: ...802 11AC Scalable Enterprise Wi Fi Technology Model UAP AC LR ...

Page 2: ...V 0 5A with Mounting Bracket Power Cord Quick Start Guide Only the single pack of the UAP AC LR includes a PoE adapter and power cord Installation Requirements CAT5 6 cable Phillips screwdriver Drill and drill bit 6 mm for wall mounting or 3 mm for ceiling mounting Optional Drywall or keyhole saw to cut 18 mm hole for Ethernet cable feed TERMS OF USE All Ethernet cabling runs must use CAT5 or abov...

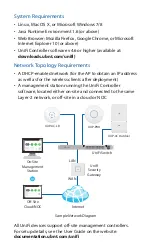
Page 3: ...r software located either on site and connected to the same Layer 2 network or off site in a cloud or NOC UAP AC Outdoor or Network Health DASHBOARD MAP DEVICES CLIENTS CALLS STATISTICS INSIGHTS SETTINGS CURRENT SITE Default REFRESH RATE 2 minutes Off Site Cloud NOC On Site Management Station UniFi Switch UniFi Security Gateway Internet UAP PRO LAN WAN 1G Network Health DASHBOARD MAP DEVICES CLIEN...

Page 4: ...ade is taking place Blue Indicates the device has been successfully integrated into a network and is working properly Quickly Flashing Blue This is used to locate an AP When you click Locate in the UniFi Controller software the LED on the AP will flash It will also display the location of the AP on the map Steady Blue with occasional flashing Indicates the device is in an isolated state all WLANs ...

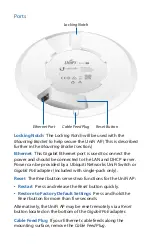
Page 5: ...r Power can be provided by a Ubiquiti Networks UniFi Switch or Gigabit PoE adapter included with single pack only Reset The Reset button serves two functions for the UniFi AP Restart Press and release the Reset button quickly Restore to Factory Default Settings Press and hold the Reset button for more than five seconds Alternatively the UniFi AP may be reset remotely via a Reset button located on ...

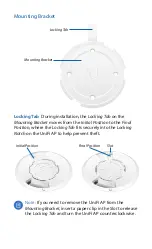
Page 6: ...nitial Position to the Final Position where the Locking Tab fits securely into the Locking Notch on the UniFi AP to help prevent theft Initial Position Slot Final Position Note If you need to remove the UniFi AP from the Mounting Bracket insert a paper clip in the Slot to release the Locking Tab and turn the UniFi AP counterclockwise ...

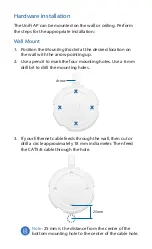
Page 7: ...he wall with the arrow pointing up 2 Use a pencil to mark the four mounting holes Use a 6 mm drill bit to drill the mounting holes Arrow 3 If your Ethernet cable feeds through the wall then cut or drill a circle approximately 18 mm in diameter Then feed the CAT5 6 cable through the hole 25 mm Note 25 mm is the distance from the center of the bottom mounting hole to the center of the cable hole ...

Page 8: ...t the Screw Anchors into the 6 mm holes Secure the Mounting Bracket to the wall by inserting the Screws into the anchors 5 If the Ethernet cable runs along the mounting surface then remove the Cable Feed Plug ...

Page 9: ...6 Connect the Ethernet cable to the Ethernet port 7 Align the arrow on the UniFi AP with the arrow on the Locking Tab of the Mounting Bracket Locking Tab Arrow ...

Page 10: ...8 Ensure that the UniFi AP is firmly seated on the Mounting Bracket Turn the UniFi AP clockwise until it locks into place and the Locking Tab fits securely into the Locking Notch ...

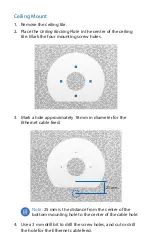
Page 11: ...the four mounting screw holes 3 Mark a hole approximately 18 mm in diameter for the Ethernet cable feed 25 mm Note 25 mm is the distance from the center of the bottom mounting hole to the center of the cable hole 4 Use a 3 mm drill bit to drill the screw holes and cut or drill the hole for the Ethernet cable feed ...

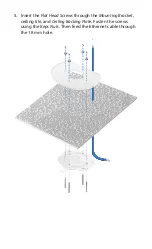
Page 12: ...5 Insert the Flat Head Screws through the Mounting Bracket ceiling tile and Ceiling Backing Plate Fasten the screws using the Keps Nuts Then feed the Ethernet cable through the 18 mm hole ...

Page 13: ...6 Connect the Ethernet cable to the Ethernet port 7 Align the arrow on the UniFi AP with the arrow on the Locking Tab of the Mounting Bracket Locking Tab Arrow ...

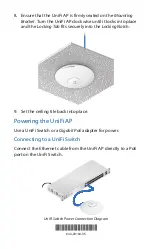
Page 14: ...Notch 9 Set the ceiling tile back into place Powering the UniFi AP Use a UniFi Switch or a Gigabit PoE adapter for power Connecting to a UniFi Switch Connect the Ethernet cable from the UniFi AP directly to a PoE port on the UniFi Switch 1 3 5 7 9 11 13 15 17 19 21 22 2 4 6 8 10 12 14 16 18 20 22 24 SPF1 SPF2 UniFi Switch Power Connection Diagram 640 00184 05 640 00184 05 ...

Page 15: ...e adapter s LAN port 3 Connect the Power Cord to the adapter s power port Connect the other end of the Power Cord to a power outlet Mounting the PoE Adapter Optional 1 Remove the PoE Mounting Bracket from the adapter place the bracket at the desired location and mark the two holes 2 Pre drill the holes if necessary and secure the bracket using two fasteners not included 3 Align the adapter s slots...

Page 16: ...bsite documentation ubnt com unifi After you have installed the software and run the UniFi Installation Wizard a login screen will appear for the UniFi Controller management interface Enter the Admin Name and Password that you created and click Login You can manage your wireless network and view network statistics using the UniFi Controller management interface For information on configuring and u...

Page 17: ... 802 11 a b g n ac Power Method Passive PoE Pairs 4 5 7 8 Return Power Supply 24V 0 5A Gigabit PoE Adapter Max Power Consumption 6 5W Max TX Power 2 4 GHz 5 GHz 24 dBm 22 dBm BSSID Up to Four per Radio Wireless Security WEP WPA PSK WPA Enterprise WPA WPA2 TKIP AES Certifications CE FCC IC Mounting Wall Ceiling Kits Included Operating Temperature 10 to 70 C 14 to 158 F Operating Humidity 5 to 95 No...

Page 18: ...provided only by a qualified service technician 3 This equipment is provided with a detachable power cord which has an integral safety ground wire intended for connection to a grounded safety outlet a Do not substitute the power cord with one that is not the provided approved type Never use an adapter plug to connect to a 2 wire outlet as this will defeat the continuity of the grounding wire b The...

Page 19: ...IV has been subjected to misuse abuse negligence abnormal physical electromagnetic or electrical stress including lightning strikes or accident V has been damaged or impaired as a result of using third party firmware VI has no original Ubiquiti MAC label or is missing any other original Ubiquiti label s or VII has not been received by Ubiquiti within 30 days of issuance of the RMA In addition the ...

Page 20: ... FACILITIES UBIQUITI NETWORKS ITS AFFILIATES AND ITS AND THEIR THIRD PARTY PROVIDERS ARE NOT RESPONSIBLE FOR ANY INTERRUPTIONS DELAYS CANCELLATIONS DELIVERY FAILURES DATA LOSS CONTENT CORRUPTION PACKET LOSS OR OTHER DAMAGE RESULTING FROM ANY OF THE FOREGOING In addition UBIQUITI NETWORKS does not warrant that the operation of the Products will be error free or that operation will be uninterrupted ...

Page 21: ...e must accept any interference received including interference that may cause undesired operation This equipment has been tested and found to comply with the limits for a Class B digital device pursuant to Part 15 of the FCC Rules These limits are designed to provide reasonable protection against harmful interference in a residential installation This equipment generates uses and can radiate radio...

Page 22: ...uding interference that may cause undesired operation of the device This radio transmitter IC 6545A UAPACLR has been approved by Industry Canada to operate with the antenna types listed below with the maximum permissible gain and required antenna impedance for each antenna type indicated Antenna types not included in this list having a gain greater than the maximum gain indicated for that type are...

Page 23: ... used for this transmitter must be installed to provide a separation distance of at least 20 cm from all persons and must not be located or operating in conjunction with any other antenna or transmitter Les antennes utilisées pour ce transmetteur doivent être installé en considérant une distance de séparation de toute personnes d au moins 20 cm et ne doivent pas être localisé ou utilisé en conflit...

Page 24: ...ce or the shop where you purchased the product Deutsch Die Europäische Richtlinie 2002 96 EC verlangt dass technische Ausrüstung die direkt am Gerät und oder an der Verpackung mit diesem Symbol versehen ist nicht zusammen mit unsortiertem Gemeindeabfall entsorgt werden darf Das Symbol weist darauf hin dass das Produkt von regulärem Haushaltmüll getrennt entsorgt werden sollte Es liegt in Ihrer Ver...

Page 25: ...nsi que tout autre matériel électrique ou électronique par les moyens de collecte indiqués par le gouvernement et les pouvoirs publics des collectivités territoriales L élimination et le recyclage en bonne et due forme ont pour but de lutter contre l impact néfaste potentiel de ce type de produits sur l environnement et la santé publique Pour plus d informations sur le mode d élimination de votre ...

Page 26: ...t conforme aux exigences essentielles et aux autres dispositions pertinentes de la directive 1999 5 CE Deutsch German Hiermit erklärt UBIQUITI NETWORKS dass sich dieses UBIQUITI NETWORKS Gerät in Übereinstimmung mit den grundlegenden Anforderungen und den anderen relevanten Vorschriften der Richtlinie 1999 5 EG befindet Ελληνική Greek Δια του παρόντος UBIQUITI NETWORKS δηλώνει ότι αυτή η συσκευή U...

Page 27: ...ser som framgår av direktiv 1999 5 EG Español Spanish Por medio de la presente UBIQUITI NETWORKS declara que este dispositivo UBIQUITI NETWORKS cumple con los requisitos esenciales y cualesquiera otras disposiciones aplicables o exigibles de la Directiva 1999 5 CE Polski Polish Niniejszym Ubiquiti Networks oświadcza że urządzenie UBIQUITI NETWORKS jest zgodny z zasadniczymi wymaganiami oraz pozost...

Page 28: ...i Networks the Ubiquiti U logo the Ubiquiti beam logo and UniFi are trademarks or registered trademarks of Ubiquiti Networks Inc in the United States and in other countries All other trademarks are the property of their respective owners JL082615 w w w u b n t c o m ...

Reviews: