background image

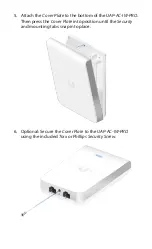
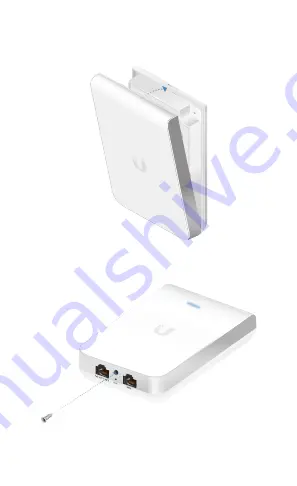
5.  Attach the Cover Plate to the bottom of the UAP-AC-IW-PRO

Then press the Cover Plate into position until the Security 
and mounting tabs snap into place.

6.  Optional: Secure the Cover Plate to the UAP-AC-IW-PRO 

using the included Torx or Phillips Security Screw

Summary of Contents for UNIFI UAP-AC-IW-PRO

Page 1: ...In Wall 802 11ac Pro Wi Fi Access Point Model UAP AC IW PRO...

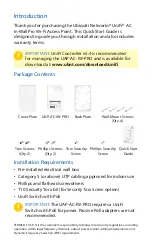
Page 2: ...W PRO Torx Screws Qty 2 Phillips Screws Qty 2 Torx Security Screw Phillips Security Screw Quick Start Guide Installation Requirements Pre installed electrical wall box Category 5 or above UTP cabling...

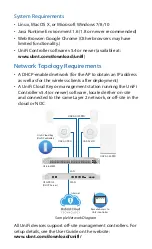
Page 3: ...ll as for the wireless clients after deployment A UniFi Cloud Key or management station running the UniFi Controller v5 4 or newer software located either on site and connected to the same Layer 2 net...

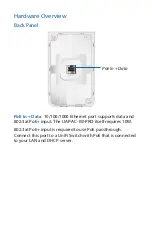
Page 4: ...Data 10 100 1000 Ethernet port supports data and 802 3at PoE input The UAP AC IW PRO itself requires 10W 802 3at PoE input is required to use PoE passthrough Connect this port to a UniFi Switch with P...

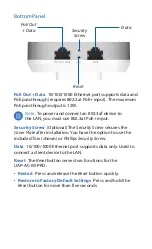
Page 5: ...input Security Screw Optional The Security Screw secures the Cover Plate after installation You have the option to use the included Torx shown or Phillips Security Screw Data 10 100 1000 Ethernet port...

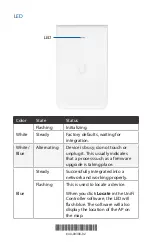
Page 6: ...t This usually indicates that a process such as a firmware upgrade is taking place Blue Steady Successfully integrated into a network and working properly Flashing This is used to locate a device When...

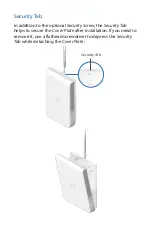
Page 7: ...to the optional Security Screw the Security Tab helps to secure the Cover Plate after installation If you need to remove it use a flathead screwdriver to depress the Security Tab while detaching the...

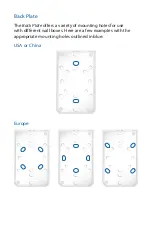
Page 8: ...Back Plate The Back Plate offers a variety of mounting holes for use with different wall boxes Here are a few examples with the appropriate mounting holes outlined in blue USA or China Europe...

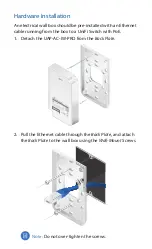
Page 9: ...th an Ethernet cable running from the box to a UniFi Switch with PoE 1 Detach the UAP AC IW PRO from the Back Plate 2 Pull the Ethernet cable through the Back Plate and attach the Back Plate to the wa...

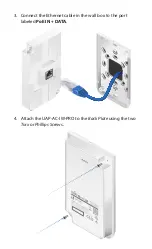
Page 10: ...3 Connect the Ethernet cable in the wall box to the port labeled PoE IN DATA 4 Attach the UAP AC IW PRO to the Back Plate using the two Torx or Phillips Screws...

Page 11: ...e bottom of the UAP AC IW PRO Then press the Cover Plate into position until the Security and mounting tabs snap into place 6 Optional Secure the Cover Plate to the UAP AC IW PRO using the included To...

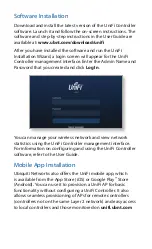
Page 12: ...lick Log In You can manage your wireless network and view network statistics using the UniFi Controller management interface For information on configuring and using the UniFi Controller software refe...

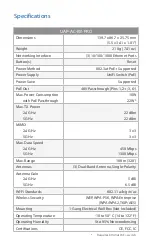
Page 13: ...through 10W 22W Max TX Power 2 4 GHz 5 GHz 22 dBm 22 dBm MIMO 2 4 GHz 5 GHz 3 x 3 3 x 3 Max Data Speed 2 4 GHz 5 GHz 450 Mbps 1300 Mbps Max Range 100 m 328 Antennas 3 Dual Band Antenna Single Polarity...

Page 14: ...e risk of electric shock from lightning Electrical Safety Information 1 Compliance is required with respect to voltage frequency and current requirements indicated on the manufacturer s label Connecti...

Page 15: ...an addition made thereto except by Ubiquiti Networks or Ubiquiti Networks authorized representatives or as approved by Ubiquiti Networks in writing II has been painted rebranded or physically modifie...

Page 16: ...LAR PURPOSE AND NON INFRINGEMENT AND ANY WARRANTIES ARISING FROM ANY COURSE OF DEALING USAGE OR TRADE PRACTICE IN CONNECTION WITH SUCH PRODUCTS AND SERVICES BUYER ACKNOWLEDGES THAT NEITHER UBIQUITI NE...

Page 17: ...f implied warranties or conditions so the above exclusion may not apply to you You may have other rights that vary from country to country state to state or province to province Some countries states...

Page 18: ...signed to provide reasonable protection against harmful interference when the equipment is operated in a commercial environment This equipment generates uses and can radiate radio frequency energy and...

Page 19: ...th single polarity 2 4 GHz Gain 5 dBi 5 GHz Gain 6 5 dBi CAN ICES 3 A NMB 3 A Cet appareil num rique de la classe A est conforme la norme NMB 003 du Canada Pour r duire le risque d interf rence aux au...

Page 20: ...tion condition to meet regulatory RF exposure requirement 3 External antenna Use only the antennas which have been approved by Ubiquiti Networks Inc The non approved antenna s may produce un wanted s...

Page 21: ...acon a respecter une distance de 20 cm entre l antenne emettrice et les personnes 3 Antenn externe Utiliser uniiquement les antennes approuvees par le fabricant L utilisation d autres antennes peut co...

Page 22: ...au moins 20 cm et ne doivent pas tre localis ou utilis en conflit avec tout autre antenne ou transmetteur Australia and New Zealand Warning This is a Class A product In a domestic environment this pro...

Page 23: ...ice or the shop where you purchased the product Deutsch Die Europ ische Richtlinie 2012 19 EU verlangt dass technische Ausr stung die direkt am Ger t und oder an der Verpackung mit diesem Symbol verse...

Page 24: ...que tout autre mat riel lectrique ou lectronique par les moyens de collecte indiqu s par le gouvernement et les pouvoirs publics des collectivit s territoriales L limination et le recyclage en bonne e...

Page 25: ...IQUITI NETWORKS vakuuttaa ett t m UBIQUITI NETWORKS laite on yhdenmukainen olennaisten vaatimusten ja muiden sit koskevien direktiivin 1999 5 EY Fran ais French Par la pr sente UBIQUITI NETWORKS d cla...

Page 26: ...QUITI NETWORKS declar c acest dispozitiv UBIQUITI NETWORKS este n conformitate cu cerin ele esen iale i alte prevederi relevante ale Directivei 1999 5 CE Slovensky Slovak T mto UBIQUITI NETWORKS prehl...

Reviews: