background image

5

Installation Requirements

Installation Requirements

•  CAT5/6 cable
•  Phillips screwdriver
•  Drill and drill bit (6 mm for wall-mounting or 3 mm for 

ceiling-mounting)

•  Optional: Drywall or keyhole saw (to cut 25 mm hole for 

Ethernet cable feed)

Hardware Installation

The UniFi AP can be mounted on the wall or ceiling. Perform the 
steps for the appropriate installation:

Wall Mount

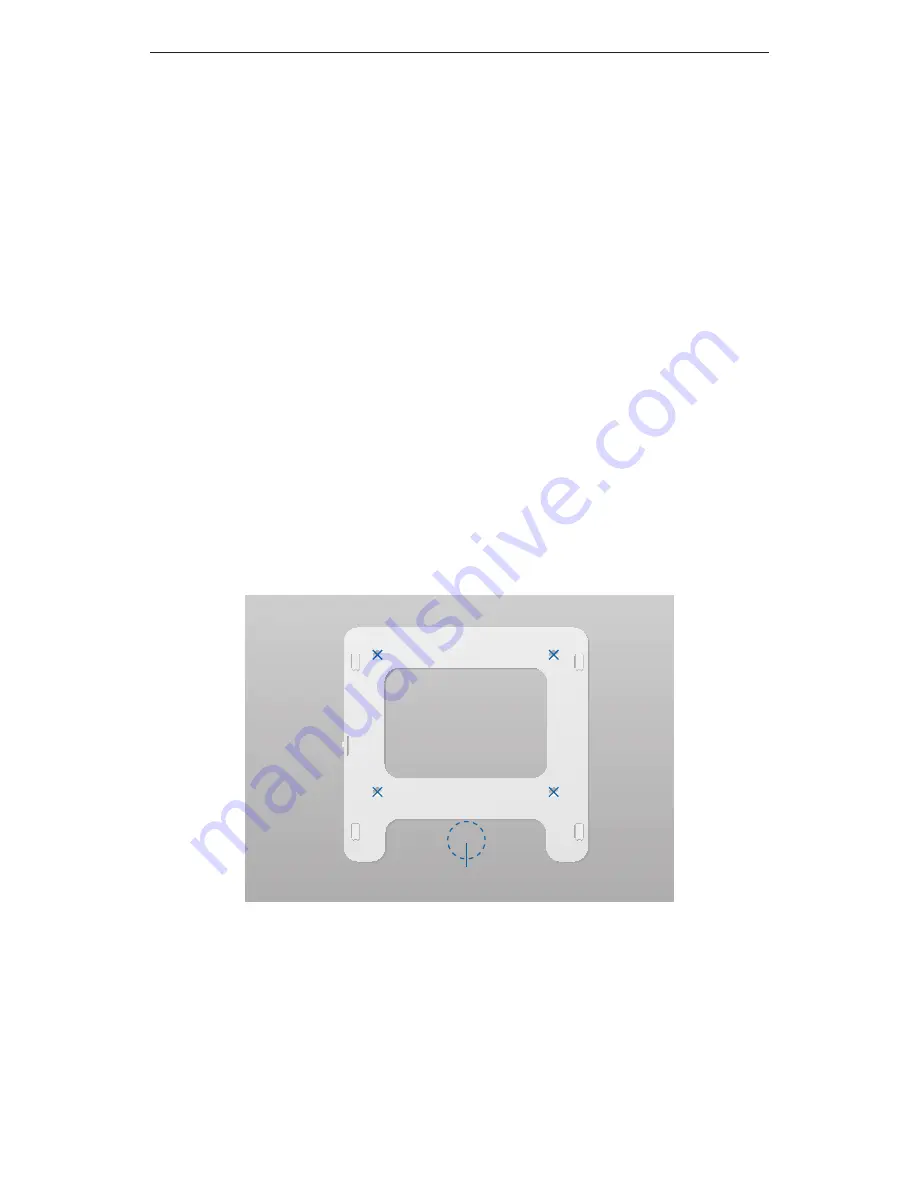
1.  Position the Mounting Bracket at the desired location on the 

wall with the cable feed slot pointed towards the floor.

2.  Use a pencil to mark the four mounting holes. Use a 6 mm drill 

bit to drill the mounting holes.

Top

Optional 25 mm Hole for 

Ethernet Cable Feed through Wall

3.  Follow the instruction for your type of Ethernet cable feed:

 -

Feeds Through the Wall 

Cut or drill a circle approximately 

25 mm in diameter, just below the bottom center of the 

Mounting Bracket (as shown above). Then feed the CAT5/6 

cable through the hole.

 -

Feeds Along the Mounting Surface 

Remove the Cable 

Feed Plug on the side of the UniFi AP.

Summary of Contents for UniFI UAP-AC

Page 1: ...Enterprise WiFi System Model UAP AC...

Page 2: ......

Page 3: ...of the following PoE GigE Adapter included PoE 802 3at compliant switch Ubiquiti Networks TOUGHSwitch PRO model TS 8 PRO Package Contents UniFi AP AC Mounting Bracket Ceiling Backing Plate M3x50 Flat...

Page 4: ...work for the AP to obtain an IP address as well as for the wireless clients after deployment A management station computer running the UniFi Controller software located either onsite and connected to...

Page 5: ...firmware upgrade is taking place Quickly flashing blue This is used to locate an AP When you click Locate in the UniFi Controller software the AP will flash It will also display the location of the A...

Page 6: ...be connected to the LAN and DHCP server Power can be provided by any of the following PoE GigE Adapter included PoE 802 3at compliant switch Ubiquiti Networks TOUGHSwitch PRO model TS 8 PRO Secondary...

Page 7: ...Bracket at the desired location on the wall with the cable feed slot pointed towards the floor 2 Use a pencil to mark the four mounting holes Use a 6 mm drill bit to drill the mounting holes Top Opti...

Page 8: ...ong the mounting surface feed the cable through the Cable Feed of the UniFi AP MAIN SECONDARY RESET This device complies with Part 15 of FCC rules Operation is subject to the following 2 conditions 1...

Page 9: ...7 Hardware Installation 6 Align the slots on the UniFi AP with the tabs on the Mounting Bracket 7 Slide the UniFi AP down until it locks into place...

Page 10: ...ce the Ceiling Backing Plate in the center of the ceiling tile Mark the four mounting screw holes and 25 mm hole for the Ethernet cable feed 25 mm Hole for Ethernet Cable Feed 3 Use a 3 mm drill bit t...

Page 11: ...llation 4 Secure the Mounting Bracket to the ceiling tile using the Ceiling Backing Plate M3x50 Flathead Screws and M3 Keps Nuts 5 Feed the Ethernet cable through the 25 mm hole 6 Set the ceiling tile...

Page 12: ...it io n s 1 th is d e v ic e m a y n o t c a u s e h a rm fu l in te rf e re n c e a n d 2 th is d e v ic e m u s t a c c e p t a n y in te rf e re n c e re c e iv e d in c lu d in g in te rf e re n c...

Page 13: ...compatible PoE switch or with the included PoE GigE Adapter Connecting to a PoE Switch Connect the other end of the Ethernet cable coming from the Main port on the UniFi AP directly to a PoE port on...

Page 14: ...ng from the Main port on the UniFi AP to the Ethernet port labeled POE on the PoE GigE Adapter 2 Connect an Ethernet cable from your LAN to the Ethernet port labeled LAN on the PoE GigE Adapter 3 Conn...

Page 15: ...tion Insert the UniFi Controller software CD into your CD ROM drive and follow the instructions for your specific computer type Mac Users 1 Click the Install icon 2 Click Continue and follow the on sc...

Page 16: ...ble click the UniFi icon Proceed to Configuring the UniFi Controller Software on page 16 PC Users 1 Launch UniFi installer exe 2 Click Install 3 If your computer doesn t have Java 1 6 or above install...

Page 17: ...tware Installation 4 Click Next 5 Ensure that the Start UniFi Controller after installation option is checked and click Finish Note The UniFi Controller software can also be launched from Start All Pr...

Page 18: ...ler software startup will begin Click Launch a Browser to Manage Wireless Network 2 Select your language and country Click Next Note U S product versions are locked to the U S Country Code to ensure c...

Page 19: ...network name SSID in the Secure SSID field b Enter a passphrase to be used for your primary network c If you want to enable guest access select Enable Guest Access and enter a guest network name in t...

Page 20: ...ess network is now configured A login screen will appear for the UniFi Controller management interface Enter the Admin Name and Password that you created and click Login You can manage your wireless n...

Page 21: ...ange 39 to 57VDC Power Supply 48V 0 5A PoE Gigabit Adapter Included Max Power Consumption 22 W BSSID Up to Four per Radio Power Save Supported Wireless Security WEP WPA PSK WPA TKIP WPA2 AES 802 11i C...

Page 22: ...vice should be provided only by a qualified service technician 3 This equipment is provided with a detachable power cord which has an integral safety ground wire intended for connection to a grounded...

Page 23: ...en damaged due to errors or defects in cabling IV has been subjected to misuse abuse negligence abnormal physical electromagnetic or electrical stress including lightning strikes or accident V has bee...

Page 24: ...l be uninterrupted In no event shall UBIQUITI NETWORKS be responsible for damages or claims of any nature or description relating to system performance including coverage buyer s selection of products...

Page 25: ...d antenna usage details please visit our website at www ubnt com products Industry Canada This Class A digital apparatus complies with Canadian ICES 003 To reduce potential radio interference to other...

Page 26: ...is es pour cet metteur doit tre install pour fournir une distance de s paration d au moins 20 cm de toutes les personnes et ne doit pas tre situ ou op rant en conjonction avec une autre antenne ou un...

Page 27: ...ktronische Ger te ber die daf r zust ndigen und von der Regierung oder rtlichen Beh rden dazu bestimmten Sammelstellen zu entsorgen Ordnungsgem es Entsorgen und Recyceln tr gt dazu bei potentielle neg...

Page 28: ...s pouvoirs publics locaux le service de traitement des d chets ou l endroit o vous avez achet le produit Italiano La direttiva europea 2002 96 EC richiede che le apparecchiature contrassegnate con que...

Page 29: ...ITI NETWORKS vakuuttaa t ten ett UBIQUITI NETWORKS device tyyppinen laite on direktiivin 1999 5 EY oleellisten vaatimusten ja sit koskevien direktiivin muiden ehtojen mukainen Fran ais French Par la p...

Page 30: ...enna UBIQUITI NETWORKS device st r I verensst mmelse med de v sentliga egenskapskrav och vriga relevanta best mmelser som framg r av direktiv 1999 5 EG Espa ol Spanish Por medio de la presente UBIQUIT...

Page 31: ......

Page 32: ...w w w u b n t c o m 2013 Ubiquiti Networks Inc All rights reserved Support support ubnt com Wiki Page wiki ubnt com Support Forum forum ubnt com Downloads downloads ubnt com...

Reviews: