background image

Español

La Directiva 2012/19/UE exige que los equipos que lleven este símbolo en 
el propio aparato y/o en su embalaje no deben eliminarse junto con otros 
residuos urbanos no seleccionados. El símbolo indica que el producto 
en cuestión debe separarse de los residuos domésticos convencionales 
con vistas a su eliminación. Es responsabilidad suya desechar este y 
cualesquiera otros aparatos eléctricos y electrónicos a través de los puntos 
de recogida que ponen a su disposición el gobierno y las autoridades 
locales. Al desechar y reciclar correctamente estos aparatos estará 
contribuyendo a evitar posibles consecuencias negativas para el medio 
ambiente y la salud de las personas. Si desea obtener información más 
detallada sobre la eliminación segura de su aparato usado, consulte a las 
autoridades locales, al servicio de recogida y eliminación de residuos de su 
zona o pregunte en la tienda donde adquirió el producto.

Français

La directive européenne 2012/19/UE exige que l’équipement sur lequel 
est apposé ce symbole sur le produit et/ou son emballage ne soit pas jeté 
avec les autres ordures ménagères. Ce symbole indique que le produit 
doit être éliminé dans un circuit distinct de celui pour les déchets des 
ménages. Il est de votre responsabilité de jeter ce matériel ainsi que tout 
autre matériel électrique ou électronique par les moyens de collecte 
indiqués par le gouvernement et les pouvoirs publics des collectivités 
territoriales. L’élimination et le recyclage en bonne et due forme ont pour 
but de lutter contre l’impact néfaste potentiel de ce type de produits 
sur l’environnement et la santé publique. Pour plus d’informations sur le 
mode d’élimination de votre ancien équipement, veuillez prendre contact 
avec les pouvoirs publics locaux, le service de traitement des déchets, ou 
l’endroit où vous avez acheté le produit.

Italiano

La direttiva europea 2012/19/UE richiede che le apparecchiature 
contrassegnate con questo simbolo sul prodotto e/o sull’imballaggio non 
siano smaltite insieme ai rifiuti urbani non differenziati. Il simbolo indica 
che questo prodotto non deve essere smaltito insieme ai normali rifiuti 
domestici. È responsabilità del proprietario smaltire sia questi prodotti sia 
le altre apparecchiature elettriche ed elettroniche mediante le specifiche 
strutture di raccolta indicate dal governo o dagli enti pubblici locali. Il 
corretto smaltimento ed il riciclaggio aiuteranno a prevenire conseguenze 
potenzialmente negative per l’ambiente e per la salute dell’essere umano. 
Per ricevere informazioni più dettagliate circa lo smaltimento delle vecchie 
apparecchiature in Vostro possesso, Vi invitiamo a contattare gli enti 
pubblici di competenza, il servizio di smaltimento rifiuti o il negozio nel 
quale avete acquistato il prodotto.

Summary of Contents for UniFi XG

Page 1: ...Quad Radio 802 11ac Wave 2 Access Point with Dedicated Security Model UAP XG...

Page 2: ...y 2 T Bar Screws Qty 2 Allen Wrench Wall Screws Qty 4 Screw Anchors Qty 4 Quad Radio 802 11ac Wave 2 Access Point with Dedicated Security Model UAP XG Release Tool Cable Feed Plug Gigabit PoE 50V 1 2A...

Page 3: ...g location should be at least 60 cm 2 ft from the edge of the eave or ceiling Cable feed opening must be directed away from the open environment Cable feed must be pointed downwards when wall mounted...

Page 4: ...6 GB 5 46 GB 258 241 220 213 130 110 126 DEVICES 645 GB TRAFFIC 1172 CLIENTS 1 2 3 4 5 6 7 8 9 10 11 36 40 44 48 52 56 60 64 100 104 108 112 116 120 124 128 132 136 140 144 149 153 157 161 165 CURREN...

Page 5: ...upgrade is taking place Blue Indicates the device has been successfully integrated into a network and is working properly Quickly Flashing Blue This is used to locate an AP When you click Locate in th...

Page 6: ...more than five seconds 1 GbE The 1 GbE port is a 10 100 1000 Ethernet port used for bridging It can also be used to connect the power 10 GbE The 10 GbE port is a 1 10 Gbps Ethernet port used to connec...

Page 7: ...with the UAP AC PRO mounting hardware so you only need to remove the UAP AC PRO and replace it with the UAP XG To begin the upgrade 1 Insert the Release Tool into the UAP AC PRO Security Slot to dise...

Page 8: ...of mounting brackets used for previous UniFi AP models Wall Mount 1 Position the Mounting Plate at the desired location on the wall with the Arrow pointing up 2 Mark the four mounting holes marked A a...

Page 9: ...he Mounting Plate to the wall by inserting the Wall Screws into the anchors 4 Go to the Connecting Ethernet section and then return to step 5 5 Align the Arrow on the top edge of the UniFi AP with the...

Page 10: ...ck Tab engages Ceiling Mount 1 Remove the ceiling tile 2 Place the Ceiling Backing Plate in the center of the ceiling tile Mark the four mounting screw holes and an 18 mm hole for the Ethernet cable f...

Page 11: ...nd cut or drill the 18 mm hole for the Ethernet cable feed 4 Insert the Ceiling Screws through the Mounting Plate ceiling tile and Ceiling Backing Plate Fasten the screws using the Keps Nuts Then feed...

Page 12: ...then return to step 6 6 Align the Arrow on the top edge of the UniFi AP with the Arrow on the Mounting Plate Lock Tab Arrow Arrow 7 Rotate the UniFi AP clockwise until the tabs lock into place and th...

Page 13: ...ting 2 Loosen the set screws of the T Bar Mounts 3 Insert the T bar into a T Bar Mount and turn the T Bar Mount clockwise to attach it Use the included Allen Wrench to tighten the two set screws to se...

Page 14: ...5 Use the two dashed lines on the Mounting Plate to space the T Bar Mounts 77 mm 3 apart 77 mm 6 Tighten the two set screws on the second T Bar Mount...

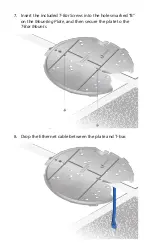
Page 15: ...7 Insert the included T Bar Screws into the holes marked B on the Mounting Plate and then secure the plate to the T Bar Mounts 8 Drop the Ethernet cable between the plate and T bar...

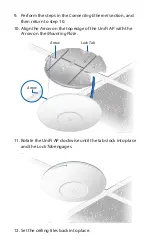
Page 16: ...hen return to step 10 10 Align the Arrow on the top edge of the UniFi AP with the Arrow on the Mounting Plate Arrow Arrow Lock Tab 11 Rotate the UniFi AP clockwise until the tabs lock into place and t...

Page 17: ...llation 2 Pull the Ethernet cable through the Mounting Plate and attach the Mounting Plate to the junction or outlet box using at least two screws not included Note For in wall applications position t...

Page 18: ...4 Align the Arrow on the top edge of the UniFi AP with the Arrow on the Mounting Plate Lock Tab Arrow Arrow 5 Rotate the UniFi AP clockwise until the tabs lock into place and the Lock Tab engages...

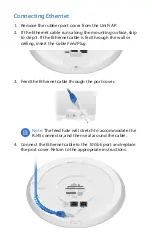
Page 19: ...ble through the port cover Note The feed hole will stretch to accommodate the RJ45 connector and then seal around the cable 4 Connect the Ethernet cable to the 10 GbE port and replace the port cover R...

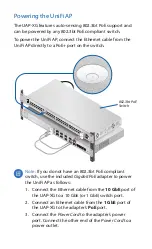
Page 20: ...3bt PoE Switch Note If you do not have an 802 3bt PoE compliant switch use the included Gigabit PoE adapter to power the UniFi AP as follows 1 Connect the Ethernet cable from the 10 GbE port of the U...

Page 21: ...lick Log In You can manage your wireless network and view network statistics using the UniFi Controller management interface For information on configuring and using the UniFi Controller software refe...

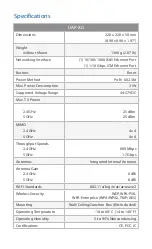
Page 22: ...ge 44 57VDC Max TX Power 2 4 GHz 5 GHz 25 dBm 25 dBm MIMO 2 4 GHz 5 GHz 4 x 4 4 x 4 Throughput Speeds 2 4 GHz 5 GHz 800 Mbps 1 7 Gbps Antennas Integrated Internal Antenna Antenna Gain 2 4 GHz 5 GHz 6...

Page 23: ...te risk of electric shock from lightning Electrical Safety Information 1 Compliance is required with respect to voltage frequency and current requirements indicated on the manufacturer s label Connect...

Page 24: ...has been subjected to misuse abuse negligence abnormal physical electromagnetic or electrical stress including lightning strikes or accident V has been damaged or impaired as a result of using third...

Page 25: ...FACILITIES UBIQUITI NETWORKS ITS AFFILIATES AND ITS AND THEIR THIRD PARTY PROVIDERS ARE NOT RESPONSIBLE FOR ANY INTERRUPTIONS DELAYS CANCELLATIONS DELIVERY FAILURES DATA LOSS CONTENT CORRUPTION PACKET...

Page 26: ...ld void the user s authority to operate the equipment This device complies with Part 15 of the FCC Rules Operation is subject to the following two conditions 1 This device may not cause harmful interf...

Page 27: ...pr sents metteurs radio IC 6545A UAPXG IC 6545A M442G IC 6545A M445GL et IC 6545A M445GH ont t approuv par ISDE Canada RF Exposure Warning The antennas used for this transmitter must be installed to...

Page 28: ...ice or the shop where you purchased the product Deutsch Die Europ ische Richtlinie 2012 19 EU verlangt dass technische Ausr stung die direkt am Ger t und oder an der Verpackung mit diesem Symbol verse...

Page 29: ...que tout autre mat riel lectrique ou lectronique par les moyens de collecte indiqu s par le gouvernement et les pouvoirs publics des collectivit s territoriales L limination et le recyclage en bonne e...

Page 30: ...aatimustenmukaisuusvakuutuksen t ysimittainen teksti on saatavilla seuraavassa internetosoitteessa www ubnt com compliance Fran ais French Le soussign UBIQUITI NETWORKS d clare que l quipement radio l...

Page 31: ...Rom n Romanian Prin prezenta UBIQUITI NETWORKS declar c tipul de echipamente radio UAP XG este n conformitate cu Directiva 2014 53 UE Textul integral al declara iei UE de conformitate este disponibil...

Page 32: ...stered trademarks of Ubiquiti Networks Inc in the United States and in other countries All other trademarks are the property of their respective owners AI091417 Online Resources Support help ubnt com...

Reviews: