6.2 Turn Valve to OPEN
6.3 Turn Valve to CLOSE
6.4 Pause
OPEN/CLOSE Operation
Turn Valve to OPEN position and let water run through the pipe.
i. Start: Short click Touch Sense Button 1 time.
ii. Processing: Water Valve turning to OPEN position, Green Heartbeat LED
“Fade-in & Fade-out” and short beep sound keep continue.
iii. Success: The LED indicator changes to Yellow LED blinking
Turn Valve to CLOSE position and don’t let water run through the pipe.
i. Start: Short click Touch Sense Button 1 time.
ii. Processing: Water Valve turning to CLOSE position, Yellow Heartbeat LED
“Fade-in & Fade-out” and short beep sound keep continue.
iii. Finished: The LED indicator changes to Yellow LED blinking
Pause only take effect during OPEN
or CLOSE operation.
i. Start: Short click Touch Sense Button 1 time.
ii. Processing: Yellow LED blinking and Valve stop operation.
6.5 Resume OPEN/CLOSE Operation
Resume only take effect during Pause operation.
i. Start: Short click Touch Sense Button 1 time.
ii. Finished: Valve resume to operation (Continue to Opening / Closing) and LED
indicator changes
to LED Yellow/Green Heartbeat.
7 WATER LEAK SENSOR & ALARM
7.1 Water Leak Detection & Alarm
Custos BVS comes with Local Leak Sensor Probe and support following functions,
in short, once Water Leak is detected, Water Leak Alarm will be activated, hence
the water valve will be closed spontaneously, at this moment all other operations
will not be accepted except Water Leak Alarm Cancellation.
i. Activated Water Leak Alarm
- RED LED fast blinking.
- Fast beep sound.
ii. CLOSE Water Valve automatically
iii. Send out Heartbeat
iv. Water Valve keeps
in CLOSE position
v. The operation is forbidden temporally until perform Water Alarm Cancellation
operation. (Refer 7.2)
7.2 Water Leak Alarm Cancellation
Water Leak Alarm Cancellation operation only accepted when Local Water Leak
Sensor Probe is no longer detected water.
i. Start: Long hold Touch Sensor
Button 2 seconds
ii. Success: The LED indicator changes
to previous status. (Yellow LED blinking
or Green LED slow blinking and buzzer goes silence.)
iii. Send out Heartbeat
Ubitech Ltd. Version: 2.0
PAGE 2
8 TEMPERATURE SENSOR
i. By default, Custos BVS will send out Heartbeat automatically when temperature
in 1°C or 4°F change of ambient temperature.
ii. Custos will send out °F in US version and °C for other versions.
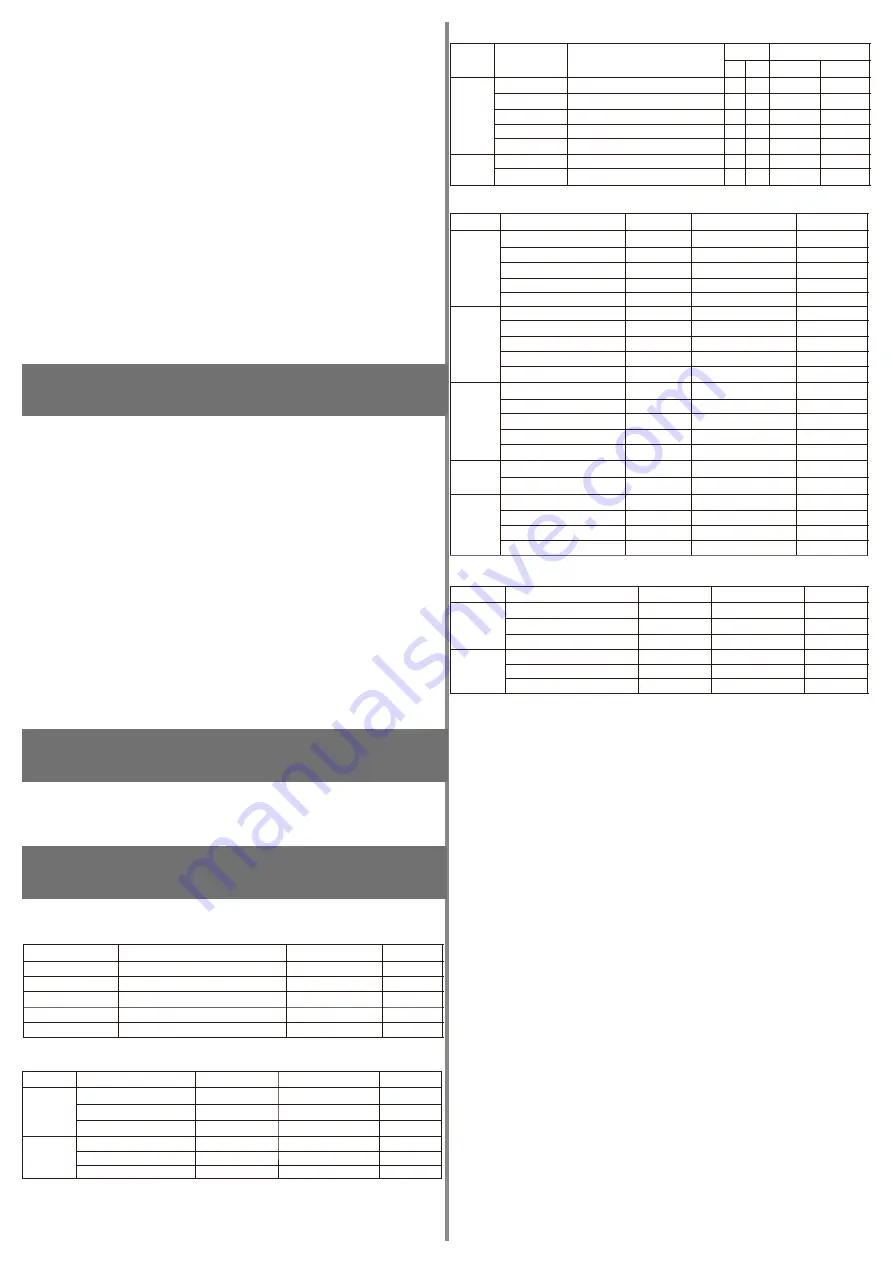
9.3 Operation Mode
Operation
Mode
Water Valve
Manual
Operation
Key
Action
Operation Support
Long Short Standalone Network
Open Control water valve to full open --- 1 Support Support
Close Control water valve to full close --- 1 Support Support
Pause Pause only works during open/close operation --- 1 Support Support
Resume Resume to previous during Pause operation --- 1 Support Support
Auto-calibration Perform calibrate position and torque force 5 5 Support Support
Trigger to close valve Auto close water valve --- 1 Support Support
Alarm Cancellation 2 --- Support Support
Resume to normal operation
mode if no alarm triggered
Water Leak
Alarm
Function
Description
9 APPENDIX
9.1 System Event Status
9.2 Touch Sense Button Keylock
Terminology, all events and operations details including action key event, LED and buzzer
Event Detail LED Buzzer
System Ready BVS is Ready to operate after power on or reset. Green LED ON 2 seconds 2 beep sounds
Standalone mode heartbeat Standalone Heartbeat without network connection Yellow LED blinking ---
Event Success Finished operation and success Green LED ON 2 seconds Short beep x 2
Event Error Operation fail or not available RED LED blinking 3 times Long beep x 3
Event Timeout Operation timeout RED LED ON 1” Pulse sound
9.4 Water Valve Operation & Status
PAUSE Only available during
Open/Close operation
Event Action / Status Key Action LED Status Buzzer Status
Start OPEN (Valve in closed position) Click 1 time Yellow LED keep blinking
—
Processing --- Yellow LED keep blinking Keep short beep
Success --- Green LED ON 1 second Short beep x 2
Next status (In Network Mode) --- Green LED slow blinking —
Next status (In Standard Mode) --- Yellow LED slow blinking —
Start CLOSE (Valve in open position) Click 1 time Green LED ON 1 second 1” Pulse sound
Processing --- Yellow LED keep blinking Keep short beep
Success --- Green LED ON 1 second Short beep x 2
Next status(In Network Mode) --- Green LED slow blinking ---
Next status (In Standard Mode) --- Yellow LED slow blinking ---
Click 1 time Short beep x 1
Processing
-
“In Network Mode”
--- Yellow LED slow blinking
---
Next status – “In Network Mode” --- Green LED keep blinking
---
Processing – “In Standalone Mode” --- Yellow LED keep blinking ---
Next status – “In Standalone Mode”
--- Yellow LED keep blinking
---
Click 1 time Green LED ON 1 second
Short beep x 1
Next Status – Return Open/Close --- Yellow/Green LED blinking Keep short beep
Start Manual Calibration
--- ---
Processing–Open&Close 1-2 cycles
--- Yellow LED keep blinking
Keep short beep
Next status – “In Network Mode” --- Green LED slow blinking
---
Next status – “In Standalone Mode” --- Yellow LED keep blinking ---
OPEN Valve
GreenLED ON 1 second
CLOSE
Valve
PAUSE
Operation
RESUME
Operation
Manual
Calibration
Start RESUME available during
Open/Close operation
Hold 5 sounds &
click 5 times
Event Action/Status Key Action LED Status Buzzer Status
Start Water Leak Alarm
--- RED LED fast blinking
Fast beep sound
— RED LED fast blinking Fast beep sound
Alarm Cancellation Green LED blinking 2 times Short beep x 2
Success cancellation --- Green LED blinking 3 times
Short beep x 3
Next Status–“In Network Mode” --- Green LED slow blinking —
Nest
Status – “In Standalone Mode” --- Yellow LED blinking —
Processing – Close Water
Valve automatically
Long hold 2 seconds
Leak Alarm
Cancellation
Leak Sensor
Probe
Triggered
9.5 Water Leak Event & Alarm
9.6 Patents
Patent 1: US 11,233,501 B1
Patent 2: US 10,995,876 B2
9.7 Cautions
MOVING PARTS WARNING: Keep hands, hair and all loose articles of clothing away from moving parts.
Moving parts can cause serious Injury. Maintain a safe distance from the product during its operation to
eliminate risk of injury.
POWER SUPPLY WARNING: The power supply is for indoor use only. Only use power supply included
with your product. Do not attempt to repair or use a damaged power supply. Do not immerse the power
supply in water or subject it to physical abuse. Inspect the power supply regularly for cable, plug damage.
CORRECT DISPOSAL OF BATTERIES IN THIS PRODUCT: This marking on the product, accessories or
literature indicates that the product and its electronic accessories should not be disposed of with other
household waste. To prevent possible harm to the environment or human health from uncontrolled waste
disposal, please separate these items from other types of waste and recycle them responsibly to promote
the sustainable reuse of material resources.
Household users should contact either the retailer where they purchased this product, or their
government office, for details of where and how they can take these items for environmentally safe
recycling.
Business users should contact their supplier and check the terms and conditions of the purchase
contract. This product and its electronic accessories should not be mixed with other wastes for disposal.
This marking on the battery, manual or packaging indicates that the batteries in this product should not be
disposed of with other household waste. Where marked, the chemical symbols Hg, Cd or Pb indicate that
the battery contains mercury, cadmium or lead above the reference levels in EC Directive 2006/66.If
batteries are not properly disposed of, these substances can cause harm to human health or the
environment.
SAFE USAGE GUIDELINES: Do not modify or open the product except for battery removal and
replacement. Do not disassemble or attempt to service this product. This product is safe under normal
and reasonably foreseeable misuse operating conditions. Always use both hands while operating the
product. This is not a children's product and is not intended for use by children. Product must be returned
to the manufacturer for any service or repair. Long periods of repetitive motion using the product may be
associated with nerve, tendon or muscle injury in your hands, wrists, arms, shoulders, neck or back. See
a qualified health professional for pain, numbness, swelling, burning, cramping or stiffness.
Event Action/Status Key Action LED Status Buzzer Status
Keylock Enable Enable Lock Key Function Long beep x 1
Success–“In Network Mode” --- ---
Success– “In Standalone Mode” --- ---
Keylock Disable Disable Lock Key Function Long beep x 3
Success–“In Network Mode” --- Green LED slow blinking ---
Success – “In Standalone Mode” --- Yellow LED blinking ---
Hold 3 seconds&
click 3 times
Yellow LED ON 1 second
Red LED ON 1 second
Hold 3 seconds&
click 3 times
Green/Yellow/Red LED blink
one by one with 3 beeps
Yellow LED Fade-in &
Fade out
Yellow LED Fade-in &
Fade out


