background image


BMD-34 / 38 EVK - User guide 

UBX-19033356 - R06 

Setting up the evaluation board


Page 18 of 20 

C1-Public 

10.


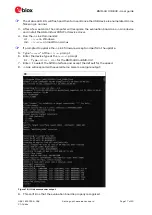
While still in the J-Link Commander session, save the pre-programmed public Bluetooth 
address by typing in: 

savebin mac_addr.bin 0x10001080 8


11.


Save the file 

mac_addr.bin

 to a convenient location for future use. 

12.


Exit the J-Link session by typing 

exit.


At this point, the file 

mac_addr.bin

 is saved in the current directory. The file contents contain 

the Bluetooth device (MAC) address in little-endian format:  
 

33 22 11 C3 09 60 FF FF 

 
This  corresponds  to  the  address 

60:09:C3:11:22:33

.  The  last  two 

FF

  values  are  fillers  to 

complete the 8-byte read. 


This binary file may be used to restore the Bluetooth address after performing an erase or 
recover with the J-Link command: 

loadbin mac_address.bin 0x10001080


The Bluetooth  device  address  is  also printed on the  module label. See the  module data 
sheet for details. 

3.3


Open an example project 


When selecting examples from the SDK, note the following cross reference: 

u-blox evaluation board


Nordic SoC 

Preferred Nordic SoftDevice 

Compatible Nordic DK 

BMD-340-EVAL  

nRF52840 

S140 

PCA10056 / nRF52840 DK 

BMD-341-EVAL  

nRF52840 

S140 

PCA10056 / nRF52840 DK 

BMD-380-EVAL  

nRF52840 

S140 

PCA10056 / nRF52840 DK 

Table 10: u-blox evaluation with Nordic DK cross reference 

For this guide, the nRF SDK v15.3.0 Heart Rate Service example for the BMD-340-EVAL will 
be used. 


The latest SDK version should be used whenever possible. The “nRF5_SDK_xx.x.x_yyyyyyy” 

directory may change. The folders under usually remain the same from version to version. 

1.


Navigate to the location of the heart rate example from the SDK, typically  

<unzipped_location>\nRF5_SDK_15.3.0_59ac345\examples\ble_peripheral\ble_app_hrs 

2.


Select the DK Board, SoftDevice and IDE directories. Here is the full path: 

<unzipped_location>\nRF5_SDK_15.3.0_59ac345\examples\ble_peripheral\ble_app_hrs\ 
pca10056\s140\ses 

3.


Open  the  project  file  (

ble_app_hrs_pca10056_s140.emProject

)  to  start  the  SEGGER 

Embedded Studio IDE 

4.


Build the project (

<F7>

5.


Once the build is successful, you can download the application code onto the module Board 

(Target | Download ble_app_hrs_pca10056_s140)


The first time the board is programmed, both the SoftDevice and the application will be 
downloaded to the module. Once the SoftDevice is loaded, subsequent downloads will only 
transfer  the  application.  If  you  need  to  change  SoftDevice  versions,  erase  the  board 
through the IDE: 

(Target | Erase All)


6.


On a mobile device, open the nRF Toolbox application. Select the Heart Rate Monitor. 

7.


Tap Connect. You should see the evaluation board advertising as 

Nordic_HRM

8.


Select  this device  to see the  simulated heart  rate being transmitted from the BMD-34 
module. 

Additional training videos for SEGGER Embedded Studio can be viewed 

here

.

Summary of Contents for BMD-38 EVK

Page 1: ...38 series modules User guide Abstract This document describes how to set up the EVK BMD 340 EVK BMD 341 and EVK BMD 380 evaluation kits to evaluate BMD 34 series modules It also describes the differen...

Page 2: ...rty rights in the products names logos and designs included in this document Copying reproduction modification or disclosure to third parties of this document or any part thereof is only permitted wit...

Page 3: ...board 6 2 1 2 USB peripheral power 7 2 2 Reset 7 2 3 Buttons 8 2 4 LEDs 9 2 5 32 kHz crystal oscillator 10 2 6 NFC connector 10 2 7 Current sensing headers 11 2 8 External SEGGER J Link debug interfac...

Page 4: ...ll 48 GPIO are available on headers that are compatible with the Arduino form factor This allows easy use of any existing Arduino shields Current sense resistors allow for measuring current into the m...

Page 5: ...e for Windows macOS and Linux Nordic Semiconductor SDK The nRF5 SDK is your first stop for building fully featured reliable and secure applications with the nRF52 and nRF51 series It offers developers...

Page 6: ...lder jumpers are provided to allow by passing any of the protection diodes eliminating the voltage drop across them Care should be taken to not damage the supplies when the protection is by passed 2 1...

Page 7: ...18 is assumed to be used as the reset pin for all BMD 34 and Nordic example projects and thus the evaluation board hardware is configured to use P0 18 as a reset The Reset button can be configured to...

Page 8: ...below RESET_N is connected to the interface IC and to the reset connections on the Arduino headers Figure 4 Schematic Reset 2 3 Buttons The evaluation board has four user buttons Button 1 Button 2 Bu...

Page 9: ...h drive when sinking current for the LEDs The LEDs can be completely removed from the circuit by breaking the associated jumper Figure 6 Schematic User LEDs The evaluation board allows for easy serial...

Page 10: ...l calibrated RC oscillator an internal synthesized clock derived from the 32 MHz clock or an external crystal oscillator The external crystal oscillator is the most accurate and lowest power LF clock...

Page 11: ...a multimeter or other precision voltage measurement device to measure voltage drop across pins one and two Current can also be measured directly by removing RBMD RSHD and using a current meter in ser...

Page 12: ...ware EXT_GND_DETECT is used by the debug interface to detect the presence of an external target hardware Connect EXT_GND_DETECT to GND on the target hardware Connect GND to GND on the target hardware...

Page 13: ...z crystal P0 09 P0 10 NFC antenna and P0 17 P0 20 P0 23 QSPI These are disconnected from the I O headers as they would interfere with the default functions The GPIO jumpers are shown on the bottom of...

Page 14: ...15 P1 15 GPIO 6 P1 14 P1 14 GPIO 7 P1 13 P1 13 GPIO 8 P1 12 P1 12 GPIO 9 P1 11 P1 11 GPIO 10 P1 10 P1 10 GPIO Table 4 Header J6 Pin Pin name nRF52840 Function 1 P1 08 P1 08 GPIO 2 P1 07 P1 07 GPIO 3 P...

Page 15: ...P0 15 P0 15 GPIO 6 P0 16 P0 16 GPIO 7 P0 17 P0 17 OPEN GPIO QSPI CS 8 P0 18 P0 18 RESET_N GPIO 9 P0 19 P0 19 OPEN GPIO QSPI CLK 10 P0 20 P0 20 OPEN GPIO QSPI DIO0 11 P0 21 P0 21 OPEN GPIO QSPI DIO1 1...

Page 16: ...desktop a second evaluation board or a nRF52 USB Dongle is required to make Bluetooth low energy connections with your DUT 4 Install the SEGGER J Link Commander If presented with a screen to select d...

Page 17: ...evice driver 4 Run the J Link Commander 4 1 JLink on Windows 4 2 JLinkExe on macOS and Linux If prompted to update the J Link firmware accept and perform the update 5 Type connect at the J Link prompt...

Page 18: ...ss reference For this guide the nRF SDK v15 3 0 Heart Rate Service example for the BMD 340 EVAL will be used The latest SDK version should be used whenever possible The nRF5_SDK_xx x x_yyyyyyy directo...

Page 19: ...ion register on our website www u blox com Revision history Revision Date Comments 1 0 01 Feb 2018 Initial release 2 0 05 Jun 2019 Added new modules and changed title to BMD 34 EVAL User Guide Update...

Page 20: ...ional Office China Beijing Phone 86 10 68 133 545 E mail info_cn u blox com Support support_cn u blox com Regional Office China Chongqing Phone 86 23 6815 1588 E mail info_cn u blox com Support suppor...

Reviews: