background image


2005 UCAN FASTENING PRODUCTS


11

Thes

re recommended for use with the 

PA 5000

e accessories a

Battery p

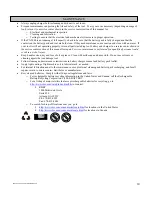
ACCESSORIES 

acks: 

f this manual for battery proper use of batteries. 


See “Operation” section o

ttery pack. 


Recycle old ba


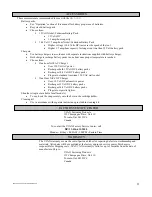
Choose from: 


12 V lt N

um Battery Pack 

o

ickel-Cadmi


12 Volts DC 


1.3 amp-hour capacity 


14.4 ol

 V t 1.7 amp-hour Nickel-Cadmium Battery Pack 


Higher voltage (14.4 Volts DC) increases the speed of the tool 


Higher 1.7 amp-hour capacity for longer run time than 12 Volt battery pack 

Char rs

ge : 


Use battery chargers in accordance with separate instructions supplied with battery charger. 

recharge battery packs in one hour once proper temperature is reached. 


Both chargers 


Choose from: 


One

ur

 ho  NiCd AC Charger 


Uses 120 Volt AC power 

ks 


Recharges both 12 Volt DC battery pac


Recharges 14.4 Volt DC battery packs 

merican 120 VAC wall socket 


Plugs into standard A


One ou

 H r NiCd DC Charger 


Uses 12 Volt DC automotive power 


Recharges 12 Volt DC battery packs 

ttery packs 


Recharges 14.4 Volt DC ba

e lighter 


Plugs into cigarett

Shou er

ld  strap (not available for all models) 

se, hook the snap securely onto the hole in the cartridge holder. 


To u

Clea ng

ni  kit 


Use in accordance with separate instructions provided in cleaning kit. 

UCAN Fastening Products 

nit 10 

155 Champagne Drive, U

, Ont. M3J 2C6  

Toronto

anada 

C

FACTORY SERVICE CENTER 


To contact the

e Center, call 

 UCAN Factory Servic


1-416-631-9400 

Monday - Friday • 8:00AM - 5:00PM • Eastern Time 

The UCAN warranty covers the cost of parts and labor for repairing defects in workmanship and 
materials. All repairs will be completed at the factory approved service center. Purchaser is 
responsible for shipping costs.  The UCAN warranty is valid for up to 12months from the date of 
manufacture. Ship to: 

WARRANTY 

UCAN Fastening Products 

nit 10 

155 Champagne Drive, U

, Ont. M3J 2C6  

Toronto

anada 

C


Summary of Contents for PA 5000

Page 1: ...5000 READ UNDERSTAND AND SAVE ALL SAFETY INFORMATION AND INSTRUCTIONS INCLUDING BATTERY CHARGER MANUAL PA 5000 INSTRUCTION MANUAL BATTERY INFORMATION LEAFLET INSTRUCTIONS ON THE CARTRIDGE OR SAUSAGE...

Page 2: ...with integral batteries or a separate battery pack must be recharged only with the specified charger for the battery A charger that may be suitable for one type of battery may create a risk of fire w...

Page 3: ...rs 5 6 When battery pack is not in use keep it away from other metal objects like paper clip coins keys nails screws or other small metal objects that can make a connection from one terminal to anothe...

Page 4: ...electric motor All electric motors generate sparks and may ignite vapors from materials 8 Condition of Tool 8 1 Do not use damaged tools Lockout or clearly mark DO NOT USE until repaired Many accident...

Page 5: ...to its minimum setting and remove battery pack This prevents tool from starting 10 6 ON position by any means rubber band tape etc This may result in an unsafe operatin Do not fix trigger in the g con...

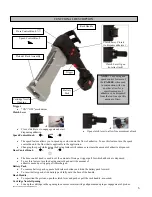
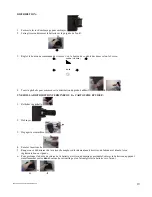
Page 6: ...ing the d wh sing the dosin Dose Control Knob DOSE l The dose control knob is used to set the amount of time per trigger pu To use this feature turn the dosing control knob until the amount of ive nee...

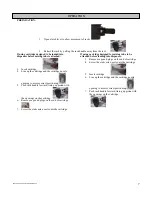
Page 7: ...ush rack handle forward lining up piston with the openings on the cartridge 6 Remove caps and plugs on the end of cartridge 7 Screw the static mix nozzle onto the cartridge If using cartridge designed...

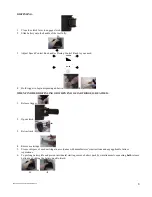
Page 8: ...n dispensing adhesive 4 WHEN FINISHED DISPENSING OR WHEN END OF CARTRIDGE IS REACHED 1 Release trigger 2 Open clutch 3 Retract rack 4 Remove cartridge 5 Store or dispose of used cartridge in accordanc...

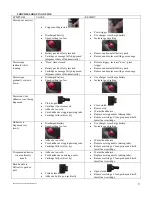
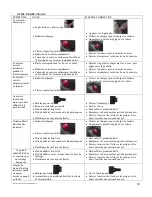
Page 9: ...uns but adhesive is not being dispensed Clutch open oved Cartridge tip not rem Adhesive too cold xing tube Cured adhesive clogging mi Cartridge failure blow by Close clutch Remove tip Warm the adhesiv...

Page 10: ...in a risk of injury Keep handles clean dry and free of oil or grease Clean with mild soap and damp cloth Do not use solvents or cleaning agents that can damage tool ual and battery pack leaflet Follow...

Page 11: ...acks merican 120 VAC wall socket Plugs into standard A One ou H r NiCd DC Charger Uses 12 Volt DC automotive power Recharges 12 Volt DC battery packs ttery packs Recharges 14 4 Volt DC ba e lighter Pl...

Page 12: ...TES LES INFORMATIONS ET DIRECTIVES DE S CURIT Y COMPRIS MANUEL DU CHARGEUR DE BATTERIE MANUEL D UTILISATION ET D ENTRETIEN DU PA 5000 D PLIANT D INFORMATION SUR LES BATTERIES DIRECTIVES SUR LA CARTOUC...

Page 13: ...le seulement 3 2 Un outil bloc batterie amovible ou batterie int gr e ne doit tre recharg qu avec le chargeur pr vu pour la batterie Un chargeur qui convient tel type de batterie peut pr senter un ris...

Page 14: ...bris ou toute autre condition pr judiciable au bon fonctionnement de l outil Si vous constatez qu un outil est endommag faites le r parer avant de vous en servir De nombreux accidents sont caus s par...

Page 15: ...ation dangereuse 9 3 Utiliser uniquement un savon doux pour le nettoyage D autres produits de nettoyage tels que l essence le t trachlorure de carbone l ammoniaque etc peuvent endommager les pi ces en...

Page 16: ...at de fonctionnement dangereux 10 7 Ne pas mettre en service l outil lorsque les pistons ne sont pas fix s Ceci endommagera la cartouche et peut tre dangereux 10 8 Utiliser uniquement des batteries co...

Page 17: ...cr maill re de se d placer librement Bouton de commande de vitesse SPEED La fonction vitesse permet d acc l rer ou de ralentir l coulement du produit adh sif Pour utiliser cette fonction tourner le b...

Page 18: ...ns rer la cartouche 4 Aligner la cartouche sur l orifice de sa buse pour assurer un positionnement correct 5 Pousser la poign e de la cr maill re vers l avant en alignant le piston sur les orifices de...

Page 19: ...ution du produit adh sif 4 UNE FOIS LA DISTRIBUTION TERMIN E OU LA CARTOUCHE PUIS E 1 Rel cher la g chette 2 D brayer 3 D gager la cr maill re 4 Enlever la cartouche 5 Ranger ou se d barrasser de la c...

Page 20: ...touche non retir Produit adh sif trop froid Produit adh sif sec bouchant le tube m langeur D faillance de la cartouche fuite Fermer l embrayage Enlever le bec R chauffer le produit adh sif Remplacer l...

Page 21: ...arder les poign es propres s ches et exemptes d huile ou de graisse Nettoyer avec un savon doux et un chiffon moite Ne pas utiliser des solvants ou des produits de nettoyage susceptibles d endommager...

Page 22: ...les v hicules automobiles Utilise la tension lectrique de 12 V Recharge les batteries 12 Volts CC ts CC Recharge les batteries 14 4 Vol igare Se branche sur l allume c Band uli o re non disponible po...

Reviews: