10
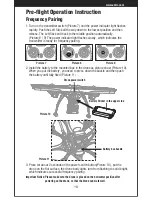
Picture 7
Picture 8
Picture 9
1. Turn on the transmitter switch (Picture 7) and the power indicator light flashes
rapidly. Push the Left Stick all the way down to the lowest position and then
release. The Left Stick will back to the middle position automatically.
(Picture 8 / 9) The power indicator light flashes slowly, which indicates the
transmitter is ready for frequency pairing.
2. Install the battery to the mounted box in the drone as picture show (Picture 10).
When you put the battery, you need to press down the buckle and then push
the battery until fully fixed (Picture 11
)
.
3. Press for about 2 seconds on the power switch button(Picture 10), put the
drone on the flat surface, the drone body lights turn from flashing to solid bright,
which indicates successful frequency pairing.
Important Notice: Please make sure the drone is placed on the horizontal position after
powering on the drone, so that the drone can work well.
Pre-flight Operation Instruction
Frequency Pairing
Picture 10
Picture 11
Battery Sticker in the upper side
Battery box buckle
Drone power switch
www.udirc.com
Summary of Contents for Discovery2
Page 1: ...Operations Guide U818A Plus W ...
Page 28: ......


