background image

22

23

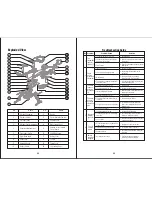
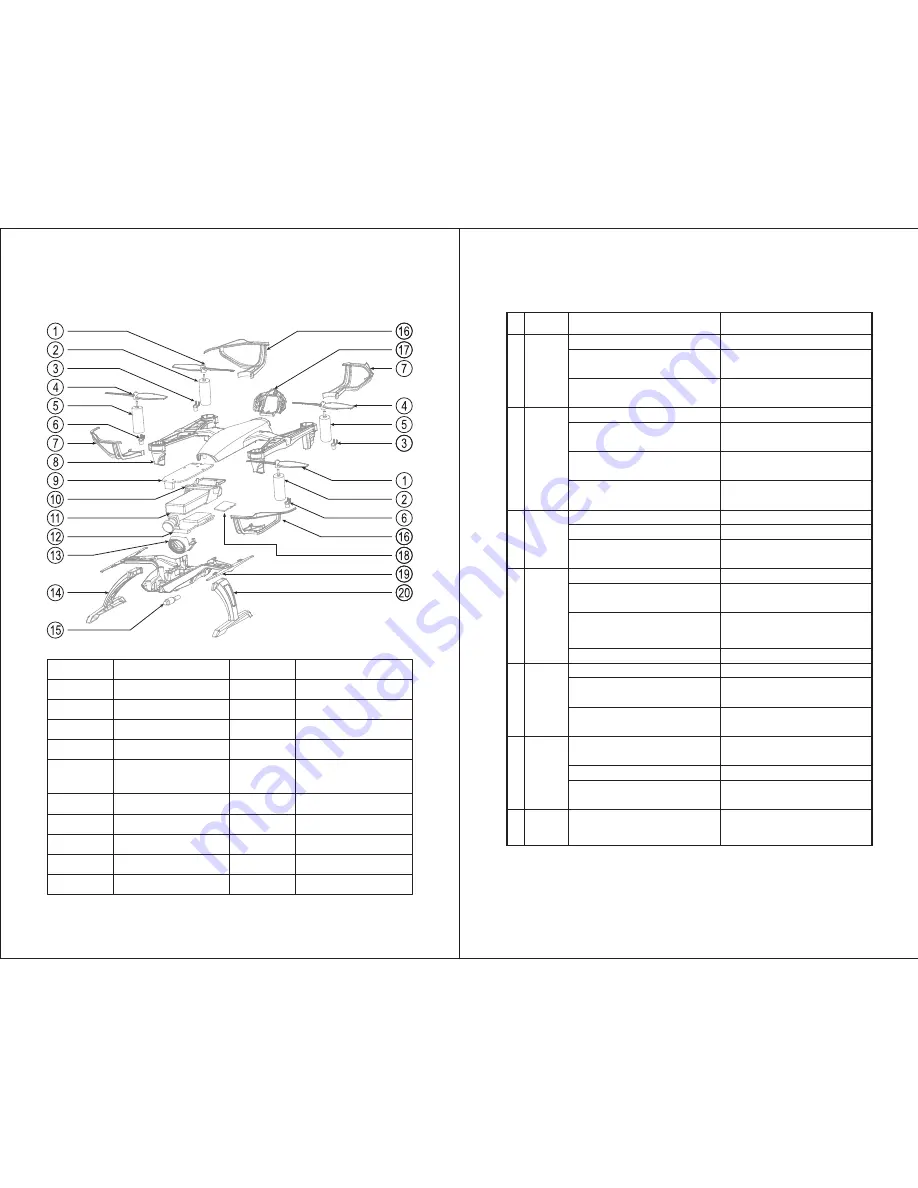
Exploded View

TF Card

Battery Cover

Left Blade Guard

Antenna for  for Camera

Circuit Board

18

17

16

15

19

20

Lower Cover

Left Landing Gear

Battery Holder

Receiving Board

10

9

5

6

7

8

Counterclockwise Motor

Front Light (Green)

Right Blade Guard

Upper Cover

Right Landing Gear

Camera Cover

Circuit Board for Camera

Name

14

13

12

No.

No.

1

2

3

4

Name

A Blade (Clockwise)

Clockwise Motor

Tail Light (Red)

B Blade (Counterclockwise)

Battery

11

Troubleshooting Guide

The

transmitter

indicator

light is off

Fail to

pair the

drone with

transmitter

The drone

is under-

powered

or can not

fly.

The drone

can not

hover and

tilts to one

side

The drone

indicator

light is off

Can not

see the

picture

Hard to

control by

cellphone

1

2

3

4

5

6

7

Problem

Problem Cause

Solution

No.

1. The transmitter battery is too low.

1. Replace battery.

2. The battery positive pole and negative

    pole are in reverse order.

2. Install the battery in accordance with the

    user manual.

3. Poor Contact.

3. Clean the dirt between the battery and the

    battery alice.

1. Indicator light is off.

1. The same as above 1.2.3.

2. There is interfering signal nearby.

2. Restart the drone and power on the

    transmitter.

3. Misoperation.

3. Operate the drone step by step in

    accordance with the user manual.

4. The electronic component is damaged

    for frequent crash.

4. To buy spare parts from local seller and

    replace damaged parts.

1. The blade deformed seriously.

1. Replace blade.

2. The drone battery is too low. 

2. Recharge the drone battery.

3. Incorrect installation of blade.

3. Install the blade in accordance with the

    user manual instruction.

1. The blade deformed seriously.

1. Replace blade.

2. The motor holder deformed and out of

    verticality.

2. Replace the motor holder.

3. The gyro did not reset after violent crash.

3. Put the drone on the flat ground for

    about 10s or restart the the drone to

    calibrate again.

4. The motor is damaged.

4. Replace motor.

1. The drone battery is too low.

1. Recharge the drone battery.

2. The battery is expired or overdischarge

    protection.

2. Buy a new battery from local seller to

    replace or recharge the battery.

3. Poor contact.

3. Disconnect the battery and then connect

    it with the plug again.

1. Did not connect the wire of camera box

    or poor contact.

1. Check the wire and connect well.

2. There is interfering signal nearby.

2. Cut off the wire and re-connect.

3. Damaged camera.

3. Buy a new camera box from local seller

    to replace.

1. Not experienced enough.

1. Practice and read the cellphone

    controlling instruction carefully.

Summary of Contents for U28W

Page 1: ...9 Flying Control by Transmitter 9 12 Installation and Replacement for Blade 12 APP SETTINGS 19 Help 20 Operation for Video Recording and Photo Taking 20 Spare Parts 21 Exploded View 22 Troubleshooting Guide 23 Operation Instruction for Mobile Phone WiFi 13 19 6 2 Attaching your Mobile Phone to Transmitter 6 7 1 Download and install the APP 13 2 Frequency Pairing between Mobile Phone and Drone WiFi...

Page 2: ...from humid environment The drone inside is consisted of precise electronic components Humidity or water vapor may damage electronic components and cause accident The drone inside is consisted of precise electronic components Humidity or water vapor may damage electronic components and cause accident 3 Safe operation Please operate the RC drone in accordance with your physical status and flying ski...

Page 3: ...rd Backward Trim Grid 7 Left Right Trim Grid 8 Throttle Digital Display 9 Left Right Rotation Trim Grid Picture 5 Indication Direction of Power Switch Indication Direction of Trim FPV Signal Indication Icon Lens Hood High Medium Low Speed Mode Press Down Headless Mode Press Down Picture 6 Mobile Phone Holder 360 Flip in Four Directions One Button Return Under Headless Mode Picture 2 Picture 3 Blad...

Page 4: ...t do not touch the mobile phone button as Picture 11 Picture 10 Picture 11 Charging Instruction 1 Connect the drone battery to the USB charging cable then connect the USB charging cable to any available USB port prior to choose 2A 5V charger 2 The red USB indicator light keeps bright when charging The charging time is about 70 minutes The light turns to green when fully charged Do not put the batt...

Page 5: ...hing to stable bright The drone is ready to be controlled Frequency Pairing Important Notice Please make sure the gyro of the receiving board is placed on the horizontal position after powering on the drone so that the drone is ready for controlling Pre Flight Operation 1 The camera is front 2 Power on the drone and check the direction of the rotating blades The left front and right rear A blades ...

Page 6: ... Medium Speed Mode M Prerequisite Position the drone in such a way that its front is your front see Picture 1 Tip Do not change the orientation of the transmitter see Picture 2 after entering headless mode To turn on headless mode press the headless mode button and the drone LED lights flash which indicates the headless mode is ready To turn off headless mode press the headless mode button again a...

Page 7: ...ture 19 Picture 20 and Picture 21 as below Operation Instruction for Mobile Phone WiFi Picture 20 Picture 19 Picture 21 udirc FPV ANDROID APP ON App Store Available on the Press the Button on the back side of the transmitter when the drone is flying and the transmitter will issue sounds of dididi and then push the Forward Backward Left Right Stick to Forward Backward Left Right The drone will do 3...

Page 8: ... 3 To view the screen without controls 3 Touch the icon to view your screen without controls 2 To view photo and video files Touch the icon to view photos and videos 2 4 High Low speed mode 4 Touch the icon Low Speed to switch to the icon High Speed 5 To take photos 5 Touch the icon once to take a photo 6 To record Video 6 Touch the icon to record a video and touch the icon again to stop recording...

Page 9: ...ottlel Ball to the right to rotate right 11 12 10 To fly forward and backward Move the Direction Control Ball up to fly the drone forward and move the ball down to fly backwards 15 16 11 To turn on Gravity Induction Mode Touch icon to enter gravity induction mode which is only available for flying left right and forward backward 7 If the mobile phone shakes to the left right the Direction Control ...

Page 10: ...t turn off WiFi and turn on again to search and connect 2 The available WiFi control radius is 25m please control the drone within this range 3 When changing control method from mobile phone to transmitter or transmitter to mobile phone pull the Throttle Stick to the lowest position APP SETTINGS In the interface click the gear icon Picture 25 and you ll see Picture 26 Picture 25 Click Picture 26 F...

Page 11: ...4 Camera Circuit Board U28W 15 Transmitter U28W 16 Spanner U28W 17 Iron axis for battery cover U28W 18 TF Card U28W 19 Card Reader Tip Please play the video or photo after coping all aerial photography data to computer and make sure the play software can support its format Basic parameter for aerial camera Video DPI 1280 720P 30FPS Image Size 1280 720P Picture 31 Operation for Video Recording and ...

Page 12: ...er on the transmitter 3 Misoperation 3 Operate the drone step by step in accordance with the user manual 4 The electronic component is damaged for frequent crash 4 To buy spare parts from local seller and replace damaged parts 1 The blade deformed seriously 1 Replace blade 2 The drone battery is too low 2 Recharge the drone battery 3 Incorrect installation of blade 3 Install the blade in accordanc...

Reviews: