background image

9

www.udirc.com

Picture 3

Picture 4

3. Install the rod into the third hole of steering gear arm( picture 3).
4. Install the steering gear into its slot and lock the press pieces and rod screws
    (picture 4). 
    ( Replace the steering gear when powered on, please take care of the propeller
    rotating accidentally )

Lock the screw when the 
rudder is loaded into the 
slot of the steering gear.

Tail rudder screw

Steering gear replacement

When the steering gear is damaged, you need to take out the steering gear holder, 
and pick out the defective part, then loose the steering gear arm. When install the 
new steering gear, power on the boat and install the arm to the steering gear, 
lock the fasten parts, then it’s ok to play.
1. Disassemble the tail rudder screw, and then loose the steering gear press part 
    and take out the steering gear.(Picture 1)
2.  When the new steering gear is powered on, install the arm and fasten the 
    screw, please take care of the vertical degree( picture 2).
    (There is some tolerance which is normal)

Picture 2

Picture 1

Steering gear

screw

Steering fastener screw

Summary of Contents for UDI009

Page 1: ...UDI009 User Manual ...

Page 2: ...tice for Battery 4 Part installation and disassemble 8 Checklist before Flight 10 Boat and Transmitter instruction 5 Playing Steps 10 Boat function introduction 16 Maintenance and Repair 16 Spare Parts 17 Troubleshooting Guide 19 Catalogue www udirc com ...

Page 3: ...e legally approved by your local government Do not play the boat in the swimming pool or near the people who is swimming in the water area Playing field must spacious enough 1 Playing field Keep the package and user manual so as to refer to the important information whenever Only use the UDIRC s original or authorized spare parts and accessories otherwise we are not responsible for any injuries or...

Page 4: ... stop using it immediately till it s fixed well The RC boat is made of metal fiber plastic electronic components etc Keep away from heat and sunshine to avoid distortion and damage Safe Notice for Battery www udirc com Keep the battery away from children and animals Discontinue charging if you notice the battery is swollen Do not charge the battery once it is crashed or damaged Check the battery i...

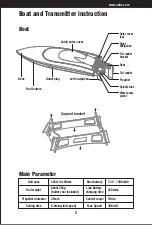
Page 5: ...t 565g battery not included 35mm 6 8mins full speed Max Speed 30Km H 100 m 220mins Boat battery 7 4V 1500mAh Lipo Battery charging time Control range Support bracket Cabin outer cover Left navigation Propeller Water press pieces Outer cover lock Right navigation Tail rudder bracket Rods Deck Hull bottom Outlet plug Tail rudder Spindle tube ...

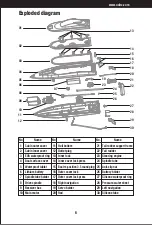
Page 6: ...r 15 Boat re position 3 5 round plug 26 Anti slip nut 5 Waterproof tablet 16 Outer cover lock 27 Battery holder 6 Lithium battery 17 28 Silicone waterproof ring 7 Spindle tube holder 18 Outer cover lock press 8 Drive spindle 19 Right navigation Pressure water sheet 9 Receiver box 20 Servo holder 10 Main motor 21 Rod No No 29 Left navigation 30 Silicone tube Exploded diagram 12 13 01 02 03 04 05 06...

Page 7: ...ning deviation Power switch Push left to power on the transmitter and back to power off Steering knob Twist forward the knob the boat turns right Twist backward the knob then turn left Throttle trigger Pull down the throttle trigger and the boat goes forward Push up the trigger then go backward Forward trim Backward trim Power indicator Left Rudder trim Right Rudder trim Power switch Open the batt...

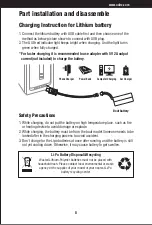
Page 8: ...Lithium Polymer batteries must not be placed with household trash Please contact local environmental or waste agency or the supplier of your model or your nearest Li Po battery recycling center Charging Instruction for Lithium battery Boat battery For faster charging it is recommended to use adapter with 5V 2A output current not included to charge the battery Power Bank Phone Charger Computer Char...

Page 9: ...steering gear is damaged you need to take out the steering gear holder and pick out the defective part then loose the steering gear arm When install the new steering gear power on the boat and install the arm to the steering gear lock the fasten parts then it s ok to play 1 Disassemble the tail rudder screw and then loose the steering gear press part and take out the steering gear Picture 1 2 When...

Page 10: ...f 4 Make sure the connection is solid between battery and motor etc The ongoing vibration may cause bad connection of power terminal make the boat out of control 5 Improper operation may cause impact to the boat and damage the hull or propeller then cause difficult control or unable to control Please go to the local distributor to buy new parts for replacement so that the boat will return to its b...

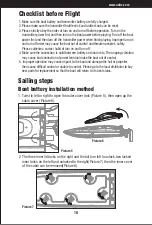
Page 11: ...e rotation direction of propeller once power on Picture 12 Pull back the throttle trigger of transmitter slowly the propeller will spin counterclockwise Push forward the throttle trigger slowly the propeller will spin clockwise Picture 8 3 Put the lithium battery into the battery holder of the hull Picture 9 The power line of the battery puts on the side of the hull push the battery to the end and...

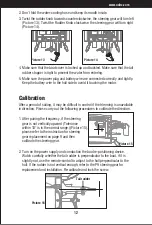
Page 12: ... sailing it may be difficult in control if the trimming is unavailable in direction Please carry out the following procedures to calibrate the direction 1 After pairing the frequency if the steering gear is not vertically upward Tolerance within 10 is in the normal range Picture 15 please refer to the instruction for steering gear replacement on page 9 and then calibrate the steering gear Picture ...

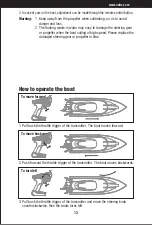
Page 13: ... or propeller when the boat sailing at high speed Please replace the damaged steering gear or propeller in time How to operate the boat To move forward To move backward To turn left 1 Pull back the throttle trigger of the transmitter The boat moves forward 2 Push forward the throttle trigger of the transmitter The boat moves backwards 3 Pull back the throttle trigger of the transmitter and move th...

Page 14: ...der alignment It will start moving straight 7 If the boat drifts to the left press the right rudder trim on the transmitter and the boat will gradually correct the rudder alignment It will start moving straight 5 If the boat capsizes Push forward and backward the throttle trigger of the transmitter and then pull back at once The boat will then return to normal The capsize reset function will turn ...

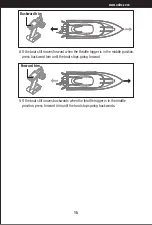
Page 15: ...hrottle trigger is in the middle position press forward trim until the boat stops going backwards Forward trim 8 If the boat still moves forward when the throttle trigger is in the middle position press backward trim until the boat stops going forward Backward trim ...

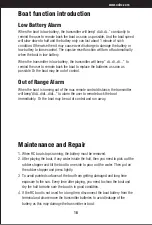
Page 16: ...ce and Repair Low Battery Alarm Boat function introduction When the boat in low battery the transmitter will beep di di di constantly to remind the user to remote back the boat as soon as possible And the boat speed will slow down to half and the battery only can last about 1 minute at such condition Otherwise then it may cause over discharge to damage the battery or low battery to loose control T...

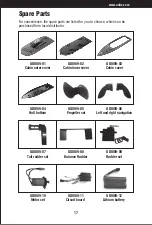
Page 17: ...local distributor UDI009 01 Cabin outer cover UDI009 02 Cabin inner cover UDI009 03 Cabin cover UDI009 04 Hull bottom UDI009 05 Propeller set UDI009 06 Left and right navigation UDI009 07 Tail rudder set UDI009 08 Balance Rudder UDI009 09 Rudder set UDI009 10 Motor set UDI009 11 Circuit board UDI009 12 Lithium battery ...

Page 18: ...ber UDI009 20 battery holder UDI009 21 transmitter Important Notice Our company s products are improving all the time design and specifications are subject to change without notice All the information in this manual has been carefully checked to ensure accuracy if any printing errors our company reserve the final interpretation right Thank you again for your choice and your trust ...

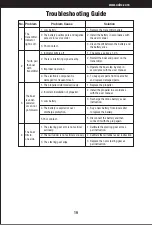
Page 19: ...t step by step in accordance with the user manual 4 The electronic component is damaged for frequent crash 4 To buy spare parts from local seller and replace damaged parts 1 The propeller deformed seriously 1 Replace the propeller 2 Incorrect installation of propeller 2 Install the propeller in accordance with the user manual 3 Low battery 3 Recharge the drone battery as per instruction 4 The batt...

Page 20: ...in the instruction manual Modifications not authorized by the manufacturer may void user s authority to operate this device The equipment may generate or use radio frequency energy Changes or modifications to this equipment may cause harmful interference unless the modifications are expressly approved in the instruction manual Modifications not authorized by the manufacturer may void user s author...

Reviews: