Yudian (H.K.) Automation Technology Co. Ltd.
Website:
http://www.yudian.us
http://www.yudian.com.hk
Email:
sales@yudian.com.hk
Tel: +852-2770
8785 Fax: +852-2770 8796
required, it should be equipped with extra 24V power supply and J4 current module.
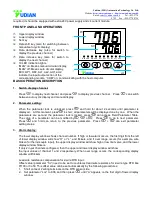
FRONT PANEL AND OPERATIONS
○
1
Upper display window
○
2
Lower display window
○
3
Set key
○
4
Data shift key (also for switching between
manual/auto cyclic display)
○
5
Data decrease key (also for switch to
display the previous channel)
○
6
Data increase key (also for switch to
display the next channel)
○
5
10 LED indication lights.
“MAN
”
on: Means manual circular display,
“MAN
”
off: Means auto circular display.
MIO, OP1, OP2, AL1, AL2, AU1, AU2
indicate the input/output action of the
corresponding module. “COM
”
on: communicating with the host computer.
BASIC OPERATION DESCRIPTION
1. Switch display channel:
Press
to display next channel, and press
to display previous channel. Press
can switch
between auto cyclic display and manual display.
2. Parameter setting:
When the parameter lock is unlocked, press
and hold for about 2 seconds until parameter is
displayed. At this moment, press
in short
; all parameters will be displayed one by one. When the
parameters are set and the parameter lock is locked, press
can access Field Parameter Table.
The value of a parameter can be modified by
,
or
. Press
to go to next parameter.
Press
and hold can return to the previous parameter. Press
+
can exit parameter
setting status.
3. Alarm display:
The lower display window shows channel number. If high or low alarm occurs, the first digit from the left
of lower display window will show “H” or “L”, and flickers, and if over range
occurs (for example, wire
broken for thermocouple input), the upper display window will show high or low limit valve, and the lower
display window flickers.
If only 2 input channels configured, then the upper and lower display window will show
the input values of channel 1 and 2 respectively. When over range occurs, the corresponding display
window will flickers.
Lead wire resistance compensation for 2-wire RTD input:
O
ffset value (parameter “Sc”) need to be set to counteract lead wire resistance for 2
-wire type RTD like
Pt100 or Cu50. This offset value can be set automatically by the following procedures:
1. Short connect 2 wiring terminals on the RTD sensor side
2.
Set parameter “Loc” to 808, and then press
until “A” appears on the first digit of lo
wer display
window.
①
②
③
④
MAN PRG
COM
MIO
AL1
AL2
OP1
OP2
A/M
RUN/HOLD
AU2
STOP
AU1
⑤
⑥
⑥
⑦
⑥
PV
SV
AI


