UDO Super 6 — Owner’s Manual
26
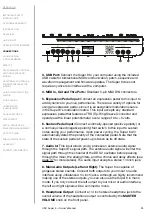
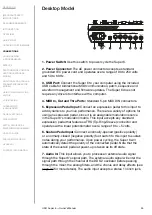
Desktop Model
USB
AUDIO IN
IN
OUT
THRU
MIDI
PEDALS
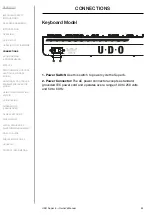
1. Power Switch:
Use this switch to power cycle the Super 6.
2. Power Connector:
The AC power connector accepts a standard,
grounded IEC power cord and operates over a range of 90 to 250 volts
and 50 to 60 Hz.
3. USB Port:
Connect the Super 6 to your computer using the included
USB cable for bidirectional MIDI communication, patch, sequence and
waveform management and firmware updates. The Super 6 does not
require any drivers to interface with a computer.
4. MIDI In, Out and Thru Ports:
Standard 5-pin MIDI DIN connectors.
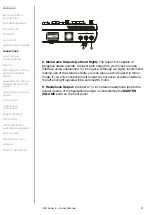
5. Expression Pedal Input:
Connect an expression pedal to this input to
add dynamics to your live performance. There are a variety of options for
using an expression pedal, since it is an assignable modulation source
in the Super 6’s modulation matrix. This input accepts any standard
expression pedal that features a TRS (Tip-Ring-Sleeve) connector and
operates with a linear potentiometer over a range of 0 to +5 volts.
6. Sustain Pedal Input:
Connect a normally-opened (positive polarity)
or a normally-closed (negative polarity) foot switch to this input to sustain
notes during your performance. Upon power cycling, the Super 6 will
automatically detect the polarity of the connected pedal. Note that the
state of the sustain pedal at power-up is taken as its off state.
7. Audio In:
This input allows you to process an external audio signal
through the Super 6’s signal path. The external audio signal will enter the
signal path through the channel of the DDS 2 oscillator before passing
through the mixer, the analog filters, and the chorus and delay effects (see
page 37 for more details). The audio input accepts a stereo 1/4 inch jack.
Summary of Contents for SUPER 6
Page 142: ......


