DL429
True RMS
600V 600A
CAT Ill
CATIII
600V
MAX
30V
T
2
T
1
TEMP
INRUSH
BT RF
T
1
-T
2
NCV
MAX/
MIN
LRA Inrush
RANGE
Temp
/
°F°C
μA
V
Hz/D
uty
MF
D
LINK
INSTRUCTION MANUAL
ENGLISH
DL429
1-800-547-5740 • Fax: (503) 643-6322
www.ueitest.com • email: info@ueitest.com
True RMS Digital Clamp-On
Wireless with Dual Temperature
WARRANTY
The DL429 is warranted to be free from defects in materials and workmanship
for a period of two years from the date of purchase.
For more information on warranty and service:
www.ueitest.com • Email: info@ueitest.com
1-800-547-5740 • FAX: (503) 643-6322
This warranty gives you specific legal rights. You may also have other rights
which vary from state to state.
FCC INFORMATION
NOTE:
This equipment has been tested and found to comply with the limits for
a Class B digital device, pursuant to part 15 of the FCC Rules. These limits are
designed to provide reasonable protection against harmful interference in a
residential installation.
This equipment generates, uses and can radiate radio frequency energy and, if
not installed and used in accordance with the instructions, may cause harmful
interference to radio communications. However, there is no guarantee that
interference will not occur in a particular installation. If this equipment does
cause harmful interference to radio or television reception, which can be
determined by turning the equipment off and on, the user is encouraged to try
to correct the interference by one or more of the following measures:
• Reorient or relocate the receiving antenna.
• Increase the separation between the equipment and receiver.
• Connect the equipment into an outlet on a circuit different from that to
which the receiver is connected.
• Consult the dealer or an experienced radio/TV technician for help.
CAUTION
: Changes or modifications not expressly approved by the
manufacturer responsible for compliance could void the user’s authority to
operate the equipment.
BATTERY REPLACEMENT
• When
indicator is displayed on the LCD, batteries must be replaced.
• Remove the back screw and replace 6 x AAA batteries.
CLEANING
Turn instrument off and disconnect test leads. Clean the instrument by using
a damp cloth. Do not use abrasive cleaners or solvents.
STORAGE
Remove the batteries when instrument is not in use for a prolonged period
of time. Do not expose to high temperatures or humidity. After a period
of storage in extreme conditions exceeding the limits mentioned in the
Specifications section, allow the instrument to return to normal operating
conditions before using it.
DISPOSAL / RECYCLE
Caution
:
This symbol indicates that equipment and its
accessories shall be subject to a separate collection and correct
disposal.
10097 02/15
Copyright © 2015 UEi. All Rights Reserved.
iPhone
®
and iPad
®
are trademarks of Apple, Inc., registered in the U.S. and other countries. Android™ is a
trademark of Google Inc. Other third party trademarks referenced are the property of their respective owners.
FEATURES
• True RMS
• Direct function access with push-button operation
• Dual Display
• Dual Temperature with Differential
• Locked Rotor Inrush Measurement
• Non-contact voltage
• Min / Max / Hold
• Backlit display with Clamp Work-light
• Magnetic mount for hands free use
• RF or Bluetooth
®
Wireless
: BT app available for Android and iOS
• Accepts CH3
: The Hook, or Fieldpiece accessory heads
• Input Jack Safety Lockout
• Auto-ranging measurement with manual ranging capability
• Auto Power Off
: After 30 minutes of non-use.
• Low battery lockout
: Displays “BATT” in display blocking potentially
inaccurate readings.
• Visible High-Voltage alert
MEASURES
• Amps AC to 600A
• µA DC 0.1µA~ 2000µA
• Volts DC 0.1mV ~ 1,000V
• Volts AC 0.1mV ~ 750V
• Resistance 0.1Ω ~ 60MΩ
• Capacitance 0.01nF ~ 2,000µF
• Temperature -22° ~ 752°F (-30° ~ 400°C) with Differential
• Frequency 0.01Hz ~ 99.99kHz
• Duty Cycle
GENERAL SPECIFICATIONS
•
Altitude:
Operating - up to 2000m (6,561 ft.)
Storage - 10,000m (32,808 ft.)
•
Humidity:
80% max
•
Operating Temperature:
32°F to 122°F (0°C to 50°C) at < 75% R.H
•
Storage Temperature:
-4°F to 140°F (-20°C to 60°C) at < 80% R.H
•
Relative humidity:
0% to 80% at 32°F to 95°F (0°C to 35°C),
0% to 70% at 32°F to 131°F (0°C to 55°C)
•
Temperature Coefficient:
Nominal 0.1 x (Specified accuracy) / °C
(<18°C or >28°C ; <64°F or >82°F)
•
Pollution degree:
2
•
Display:
3-5/6 digits 6000 counts dual LCD display(s)
•
Refresh Rate:
3 times/sec
•
Overrange:
"OL" is displayed
•
Polarity:
Automatic(no indication for positive polarity) ; Minus(-) sign
for negative polarity
•
Dimensions:
10.2" x 2.5" x 1.5"
•
Weight:
15.2oz.
•
Calibration:
Accurate for one year
•
CAT Rating:
CAT III 600V
•
Certifications:
ETL & cETL IEC61010-2-032
•
Battery type:
6 x 1.5V AAA or LR03
•
Silicon Test Lead:
IEC61010-2-031
•
Accuracy:
± (% of r # of least significant digits)
WARNINGS
To ensure safe operation and service of the tester, follow these instructions.
Failure to observe these warnings can result in severe injury or death.
• Before each use, verify meter operation by measuring a known voltage
or current.
• Never use the meter on a circuit with voltages that exceed the category
based rating of this meter.
• Do not use the meter during electrical storms, or in wet weather.
• Do not use the meter or test leads if they appear to be damaged.
• Ensure meter leads are fully seated, and keep fingers away from the
metal probe contacts when making measurements.
• Do not open the meter to replace batteries while the probes are
connected.
• Use caution when working with voltages above 60V DC, or 25V AC RMS.
Such voltages pose a shock hazard.
• To avoid false readings that can lead to electrical shock, replace
batteries if a low battery indicator appears.
• Unless measuring voltage or current, shut off and lock out power before
measuring resistance or capacitance.
• Always adhere to local and national safety codes. Use Personal
Protective Equipment (PPE) to prevent shock and arc blast injury.
SYMBOLS USED ON LCD
~
AC Measurement
DC Measurement
Negative DC
AT
Auto Ranging
O.L.
Overload: Range Exceeded
Apo
Auto Power-Off Active
Low Battery
HOLD
Display not updating
MIN
Minimum measured
value displayed
MAX
Maximum measured
value displayed
%
Units for duty cycle
Units for frequency
V
Voltage measurement
mode
A
Amperage measurement
mode
Ω
Resistance measurement
mode
Diode test mode
MFD
Capacitance measurement mode in nano farads or microfarads
VALUE MULTIPLIER
M
mega (x 10
6
or 1,000,000)
k
Kilo prefix (x 10
3
or 1,000)
m
milli (x 10
-3
or 0.001)
n
nano (x 10
-9
or 0.000000001)
µ
micro (x 10
-6
or 0.000001)
INTERNATIONAL SYMBOLS
~
AC Alternating Current
Warning or Caution
DC Direct Current
Dangerous levels
DC/AC Voltage or Current
Double Insulated Class II
Ground
Safe for disconnect
from live conductors
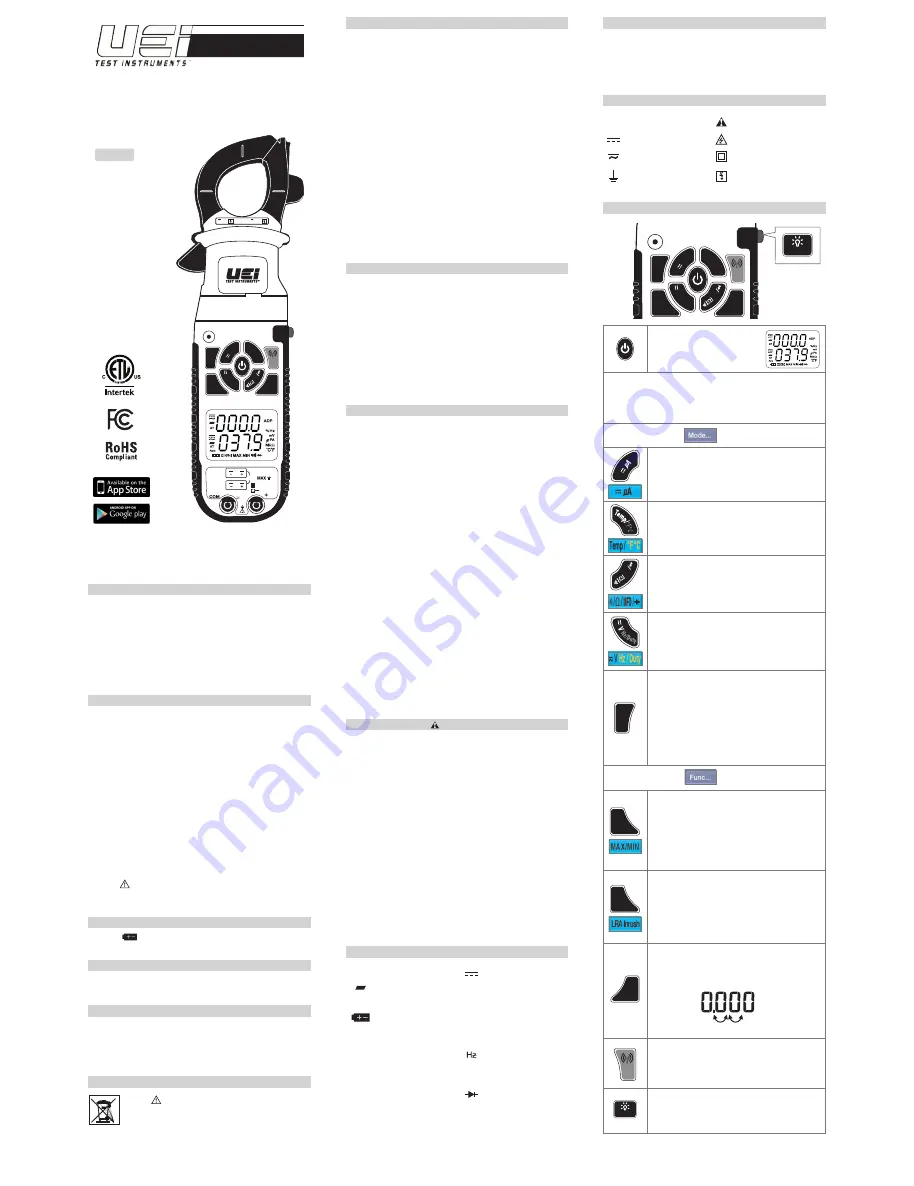
NAVIGATION
• Press briefly to turn the meter on
• Press and hold “HOLD” while turning on
to disable auto power off.
• Press and hold to turn the meter off
• The new user interface allows direct access from any mode.
• Press and hold to access functions in yellow text.
• Wireless app and meter display update simultaneously.
• Modes and functions can be selected from either the app or the meter.
• From wireless app press '
' first
• Press to select DC µA measurement mode.
• Press to select T1.
• Press a second time for T2.
• Press a third time for T1 - T2.
• Press and hold to change from
°
F to
°
C.
MF
D
• Press to select continuity.
• Press a second time for resistance.
• Press a third time for capacitance and a fourth time for diode.
• Press to select VAC or VDC
In VAC mode
• Press and hold for Hz
• Press and hold again for Duty Cycle.
NCV
• Non-Contact Voltage Detection key is used to detect power
with a sensor located at the tip of the clamp head and indicates
positive response with an audible alarm and visual LED indicator
light just above the “NCV” button.
• Do not use non-contact voltage detector to determine if there
is current in the wire. Detection operation could be affected by
socket design, insulation thickness, type and other factors.
• Voltage indicator light may also light when voltage is present on
the meter’s input jack or from external interference sources such
as motors, flashlights etc.
• From wireless app press ‘
’ first
MAX/
MIN
• Press to enter Max / Min mode; the largest and smallest values
will be saved while in this mode.
• Press repeatedly to alternate between the maximum and
minimum readings.
• Press for 2 seconds to return to live reading and clear the stored
maximum and minimum values.
Note
:
Select range prior to selecting Min/Max to capture large
values
LRA Inrush
The UEi LRA Inrush is programmed to properly capture the starting
current for compressor motors.
• Select AC Amps
• Select the range capable of capturing the maximum value
• Press and hold LRA Inrush for two seconds – INRUSH will now
be shown on the screen
• Activate compressor and read value on the display
• Press and hold LRA Inrush for two seconds to exit
RANGE
• Press repeatedly to cycle through manual ranges.
• Press for 2 seconds to return to auto ranging mode.
• AT is displayed on LCD only during auto ranging mode.
Note:
Select range prior to Min/Max for best results.
LINK
• Press to activate Bluetooth®
• Press again to activate RF wireless
◊ Press and hold to turn radio off
• The RF will work with specific transmitter, while the BT will
work with a tablet or smartphone with app installed
HOLD
• Press to hold the reading on the display. Press again to return to
live reading.
• Press and hold "work light" key for 2 seconds to turn on. Press
and hold again to turn off.
DL429
True RMS
600V 600A
CAT Ill
CATIII
600V
MAX
30V
T
2
T
1
TEMP
INRUSH
BT RF
T
1
-T
2
NCV
MAX/
MIN
LRA Inrush
RANGE
Temp
/
°F°C
μA
V
Hz/D
uty
MF
D
LINK
x1
x1
DL429
True RMS
600V 600A
CAT Ill
CATIII
600V
MAX
30V
T
2
T
1
TEMP
INRUSH
BT RF
T
1
-T
2
NCV
MAX/
MIN
LRA Inrush
RANGE
Temp
/
°F°C
μA
V
Hz/D
uty
MF
D
LINK
HOLD
All manuals and user guides at all-guides.com
all-guides.com


