background image

12/2005

Weldmaster, 230 V 

Artikel-Nr. 013479, 

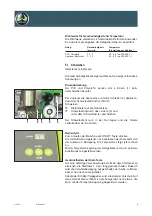
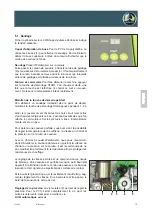
Keeping the START button pressed

To  get  a  welding  already  from  the  start,  keep  the  start  button
pressed for 1 to 2 sec.

This suppresses the motion, but already heats the welding rod
and the floor covering. If you release the button, the Weldmaster
starts to run. 

During the first meters the temperature will rise slightly. Readjust
the temperature setting if necessary.

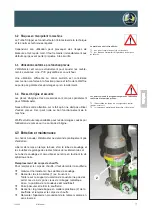
Adjusting the pressure of the welding wheel

The pressure of the welding wheel can be adjusted with thumb
screw (5). Screw down the thumb screw completely for welding
PVC, screw down half for welding all other types of floorings.

Automatic shut-off at the wall

If  the  Weldmaster  reaches  the  wall,  the  valve 
piston  will  automatically  shut  off  the  drive.  The  hot-air-gun
remains switched on, and the hot air is directed to the escape
nozzle at the side of the valve. The front part of the machine is
lifted keeping the hot nozzles away from the flooring.

Shining strips or damaged flooring are avoided by that means.
Cut  the  welding  rod  above  the  feed  tube  just  before  the
Weldmaster will hit the wall. You can use the loose part later to
be welded by hand into the remaining open joint.

Do not switch off the hot-air-gun. The Weldmaster is ready for
welding the next groove.

Trimming the welding rod

Some minutes after welding you can trim the welding rod in two
operations with quarter moon knife and trimming guide.

1. 

Trim with quarter moon knife and trimming guide, which
will leave some 0.5 mm above floor level.

2. 

Trim the rest with quarter moon knife.

Cooling the machine down

Having  finished  welding,  cool  the  machine  down  with  running
ventilator and heating 
set to 0.

7.0 Trouble Shooting

Trouble

Eventual cause

Elimination

Machine does not run

Power supply

Have machine

Disconnected

repaired by a qualified

blown fuse

electrician, respective

defective cable or plug

change parts

Machine does not heat

Heating element defect

Change heating element

13

Summary of Contents for WOLFF Weldmaster 056259

Page 1: ...n utz com Internet www uzin utz com Betriebsanleitung Operating manual Mode d emploi Weldmaster 230 V D F A Art No 056255 Weldmaster 230 V CH Art No 056256 Weldmaster 115 V UK Art No 056259 Weldmaster...

Page 2: ...D F A Art No 056255 Weldmaster 230 V CH Art No 056256 Vor Inbetriebnahme unbedingt durchlesen und aufbewahren Inhalt Technische Daten Seite 3 Sicherheit Seite 3 Sicherheitshinweise Seite 3 Wartung und...

Page 3: ...geeignete Messer verwenden Instandhaltung nur durch qualifiziertes Service Personal Nur Original Ersatzteile verwenden Maschine nie in die N he von brennbaren oder explosionsge f hrdeten Materialien...

Page 4: ...r chtigt werden F r Sch den die durch das Verwenden von Nicht Originalteilen entstehen schlie t die Wolff jede Haftung aus 4 0 Wartung und Pflege Die Weldmaster ist weitgehend wartungsfrei Gelegentlic...

Page 5: ...runde Fr sbl tter mit einem Radius von mehr als 1 8mm ergeben u U schlechte Seitenhaftung Dies macht sich nach einiger Zeit in Form von schmalen schwarzen Streifen zwischen Schwei draht und Belagskant...

Page 6: ...zen Schwei draht durch das Leitrohr 3 und unter dem Schwei rad 4 durchziehen Der Schwei draht mu in der Nut liegen und die hintere Leitrolle ber der Nut sitzen Bedienfeld Zum Anlaufen der Maschine die...

Page 7: ...erhalb des F hrungsrohres ab sofern Sie dies nicht bereits kurz vor Nahtende getan haben Nun kann mit dem Schwei en der n chsten Naht begonnen werden Das Heizgebl se wird nicht abgeschaltet und das Ge...

Page 8: ...wie die erforderlichen Arbeitsmittel verf gt durchzuf hren Wir empfehlen hierf r autorisierte Wolff Servicewerkst tten Im Falle des beabsichtigten Ersatzes von Teilen der beabsichtigten Ausstattung mi...

Page 9: ...t No 056259 Weldmaster 230 V UK Art No 056257 Weldmaster 115 V USA Art No 056260 Read before use and keep safe Contents Technical data Page 9 Safety Page 9 Safety Instructions Page 9 Maintenance Page...

Page 10: ...from your Weldmaster Following these instructions will both extend the life of your machine and reduce repair costs Please ensure any user of the machine is fully familiar with the instructions for u...

Page 11: ...t air gun remove the big plastic ring 2 of the hot air gun and change the heating element reassemble the machine in reverse sequence 5 0 Use The Weldmaster is designed for welding PVC Polyolefine Caou...

Page 12: ...pe of flooring and welding rod Standard values for speed and temperature These standard values should help the user to operate the machine Always follow the specifications of the flooring manu facture...

Page 13: ...part of the machine is lifted keeping the hot nozzles away from the flooring Shining strips or damaged flooring are avoided by that means Cut the welding rod above the feed tube just before the Weldma...

Page 14: ...erials required For this we recommend an authorised Wolff service shop In the event that parts are deliberately replaced accessories are deliberately added or other technical changes are deliberately...

Page 15: ...6256 A lire imp rativement avant la mise en service et conserver Contenu Caract ristiques techniques Page 15 S curit Page 15 Consignes de s curit Page 15 Entretien et maintenance Page 16 Utilisation P...

Page 16: ...echange d origine La maintenance ne pourra tre effectu e que par le personnel qualifi et autoris Ne pas laisser le chariot sans surveillance Ne jamais placer le chariot c t de mat riaux inflammables o...

Page 17: ...n et maintenance La chariot souder Weldmaster ne demande pratiquement pas d entretien Lib rer de temps en temps la buse d air le tube de soudage et les roulettes de guidage des restes fondus de rev te...

Page 18: ...oudure de 4 mm Mise temp rature Mettre la soufflerie en marche et ajuster la temp rature pr coni s e en fonction du rev tement souder Voir indication de temp rature Attendre environ 5 8 minutes avant...

Page 19: ...circuit mais le flux d air chaud est dirig vers le bas L avance travaille d s que l on rel che le commutateur Sur les premiers m tres la temp rature monte encore un peu Pour obtenir une soudure parfa...

Page 20: ...don de soudure Au bout de quelques minutes on peut araser le cordon de soudure l aide d un couteau quart de lune et d un guide d arasement Cette op ration se fait toujours en 2 fois La premi re en uti...

Page 21: ...ous recommandons les ateliers de service Wolff Si vous avez l intention de remplacer des pi ces d installer des accessoires ou d effectuer d autres modifications techniques il est conseill avant le d...

Page 22: ...Notes 12 2009 Weldmaster 22...

Page 23: ...Notes 12 2009 Weldmaster 23...

Page 24: ...7167 Duisburg Elektro K rner GmbH Elektromotoren Reparaturen Herr Sosna Am Inzerfeld 68 0203 581301 Fax 588437 D 49134 Wallenhorst R wekamp Werkzeuge und Maschinen Herr R wekamp Xaver L tz Str 2 05407...

Reviews: