background image

Instructions for use

 (rev 150620)


e.ON  


UGIN DENTAIRE 


9


4.


INSTALLATION  

4.1.


UNPACK 

-


Unpack 

e.ON 

 and check that it is in perfect order (furnace and accessories). 

-


Any defects can be reported to the carrier. 

-


Remember to get the carrier to sign the delivery note. 

NOTE: keep the original packaging to transport the furnace (see chapter 3.2) 
 

4.2.


INSTALLATION 

-


Install in a room aired. Observe the conditions indicated in chapter 3.2. 

-


Place the furnace on a level and aired surface. Keep a distance from other objects around not less than 
25 cm. Keep it away from heat sources (for example, radiators and/or other equipment that release heat).   

-


Despite excellent insulation, the furnace provides heat and, in the long term, can discolour surfaces that 
are nearest. 

-


Do not shake the furnace, avoid vibrations and shock. 

-


The molybdenum silicon rods are very brittle at room temperature: DO NOT HANDLE THEM. Avoid moving 
the furnace after installation. 

-


Dust, corrosive or explosive gases can damage the body and the insulation. 

-


Its forbidden placing inflammables, toxic, volatile or explosives around the furnace. 


This unit requires its own power line and has to be connected to a circuit breaker.  
Grounding is mandatory

 to avoid accidents and the dangers of overheating the power line.  

Due to the power of furnace: 

connect it directly to the mains

, do not use multiple sockets (risk of 

electrical interference). 


Summary of Contents for e.ON SINTER +

Page 1: ...0620 INSTRUCTIONS FOR USE Sintering furnace 25 rue de la Tuilerie 38170 SEYSSINET PARISET France T l National 04 76 84 45 45 T l International 33 4 76 84 45 43 info ugin dentaire fr http www ugindenta...

Page 2: ......

Page 3: ...CURVE CURRENT CYCLE 13 6 4 INTERFACE PROGRAM EDITOR 13 6 4 1 CHANGE SETTINGS 13 6 4 2 PROGRAMMING INSTRUCTIONS 14 6 4 2 1 EXAMPLES OF CALCULATION 15 6 5 PARAMETER SETTING 15 6 6 PROGRAMS 16 6 6 1 PRO...

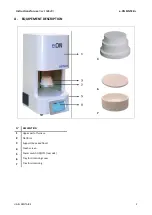
Page 4: ...e ON SINTER UGIN DENTAIRE 2 A EQUIPEMENT DESCRIPTION 3 6 7 N DESCRIPTION 1 Upper part of furnace 2 Platform 3 Support base and floor 4 Touch screen 5 Power switch ON OFF rear side 6 Tray for sinterizi...

Page 5: ...Instructions for use rev 150620 e ON SINTER UGIN DENTAIRE 3 B WIRING DIAGRAM...

Page 6: ...r sinterizing and cover may reach high temperatures do not touch Wear suitable gloves for handling prosthetic objects tray for sinterizing and cover and support The unit has to be connected to an elec...

Page 7: ...7 damage equipment risk The chamber is made up refractory ceramic fibres Handle carefully They can release dust remove with a vacuum cleaner do not blow or use compressed air Use only genuine spare p...

Page 8: ...must be disposed in accordance with applicable regulations in force 2 EC DECLARATION OF CONFORMITY The equipment s EC declaration of conformity is provided as appendix of instructions for use Content...

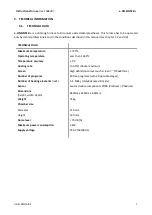
Page 9: ...ture 1 730 C Operating temperature Less than 1 650 C Temperature accuracy 1 C Heating rate To 40 C minute maximum Screen High definition colour touch screen 7 155x87mm Number of programs 40 free progr...

Page 10: ...ly with the protective elements polystyrene Take hold the furnace by its base never lift by upper part of furnace For transport the furnace must remain in an upright position not horizontal position I...

Page 11: ...s and or other equipment that release heat Despite excellent insulation the furnace provides heat and in the long term can discolour surfaces that are nearest Do not shake the furnace avoid vibrations...

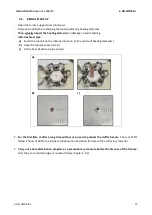
Page 12: ...it on the intended location in the centre of heating elements b Close the furnace cover screw c Fix the base of exhaust pipe screw a b c For the first time or after a long time without use need to pre...

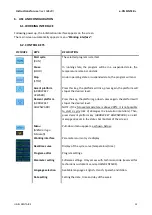
Page 13: ...ization interface appears on the screen The main screen automatically appears as follows menu Working interface c Press button arrow key downward on touch screen The platform moves down Remove the pro...

Page 14: ...Descent platform ARROW KEY DOWNWARD Press the key the platform go down press again the platform will stop at the desired level NOTE if the furnace temperature is above 300 C it is not possible to star...

Page 15: ...played on the screen For each program number the cycle parameters are displayed as a chart C represents temperature C and T represents time minutes Each program is two pages the first page displays th...

Page 16: ...n Time 3 Total duration of third stage 0 to 9999 minutes Temperature 4 Final temperature of third stage and start temperature of fourth stage If necessary the parameters are programmed as for the prev...

Page 17: ...ature remains to 1250 C Time remains 2 hours Time 04 2 hours x 60 min 120 min T04 120 minutes Zirconia SINTERING TEMPERATURES are given as indicative by disc manufacturer If necessary these one can be...

Page 18: ...t regular decontamination of the furnace e ON SINTER using the cycle recorded in number 40 PRECAUTIONS High translucency zirconia are very sensitives To avoid and prevent crossed discoloration with ot...

Page 19: ...30 2 C2 300 T2 30 2 C2 300 T2 60 3 C3 1000 T3 120 3 C3 1000 T3 180 4 C4 1480 T4 60 4 C4 1480 T4 90 5 C5 1480 T5 60 5 C5 1480 T5 60 6 C6 800 T6 121 6 C6 800 T6 121 SINTERING CURVE No 3 6 to 8 unit or...

Page 20: ...the floor 6 7 2 POSITIONING OF ELEMENTS AND TRAY FOR SINTERIZING Empty a zirconia pearls into a tray a layer at the bottom to prevent the elements from rubbing on the bottom and sides Place the eleme...

Page 21: ...he furnace starts to rise in temperature b the platform rise and stays closed 5 to 10 seconds c the platform go down partially and holds about 5 min d the platform rise without closing completely e wh...

Page 22: ...time required 30 minutes 1 C1 0 T1 30 2 17 5 C min time required 40 minutes 2 C2 300 T2 40 3 4 83 C min time required 100 minutes 3 C3 1000 T3 100 4 Remains time required 120 minutes 4 C4 1480 T4 120...

Page 23: ...the screen below 300 C When the temperature is below 200 C the power supply can be switched off switch at the back of furnace At the end of the cycle the furnace automatically returns to the standby...

Page 24: ...gram Add pieces of white Zirconia absorption of pollutants to improve the effectiveness of decontamination yellow colour enclosure still contaminated repeat a decontamination cycle black colour ok fur...

Page 25: ...es on the screen with a soft cloth and a small amount of special glass cleaner Cleaning wipes for optic products can also be used For avoid screen damage do not use a sharp object to operate the touch...

Page 26: ...ting elements with a wrench supplied as an accessory 3 Repeat step 2 for all the heating elements to replace 4 Unscrew the support elements of heating element with a wrench supplied as an accessory 5...

Page 27: ...the program parameters temperature and time Adjust sintering temperatures if necessary see chapter 6 4 The furnace does not heat up It is necessary to test the continuity of the rods Do not use the fu...

Page 28: ...25 rue de la Tuilerie 38170 SEYSSINET PARISET France T l National 04 76 84 45 45 T l International 33 4 76 84 45 43 info ugin dentaire fr http www ugindentaire fr...

Reviews: