background image

 9

Initial Setup

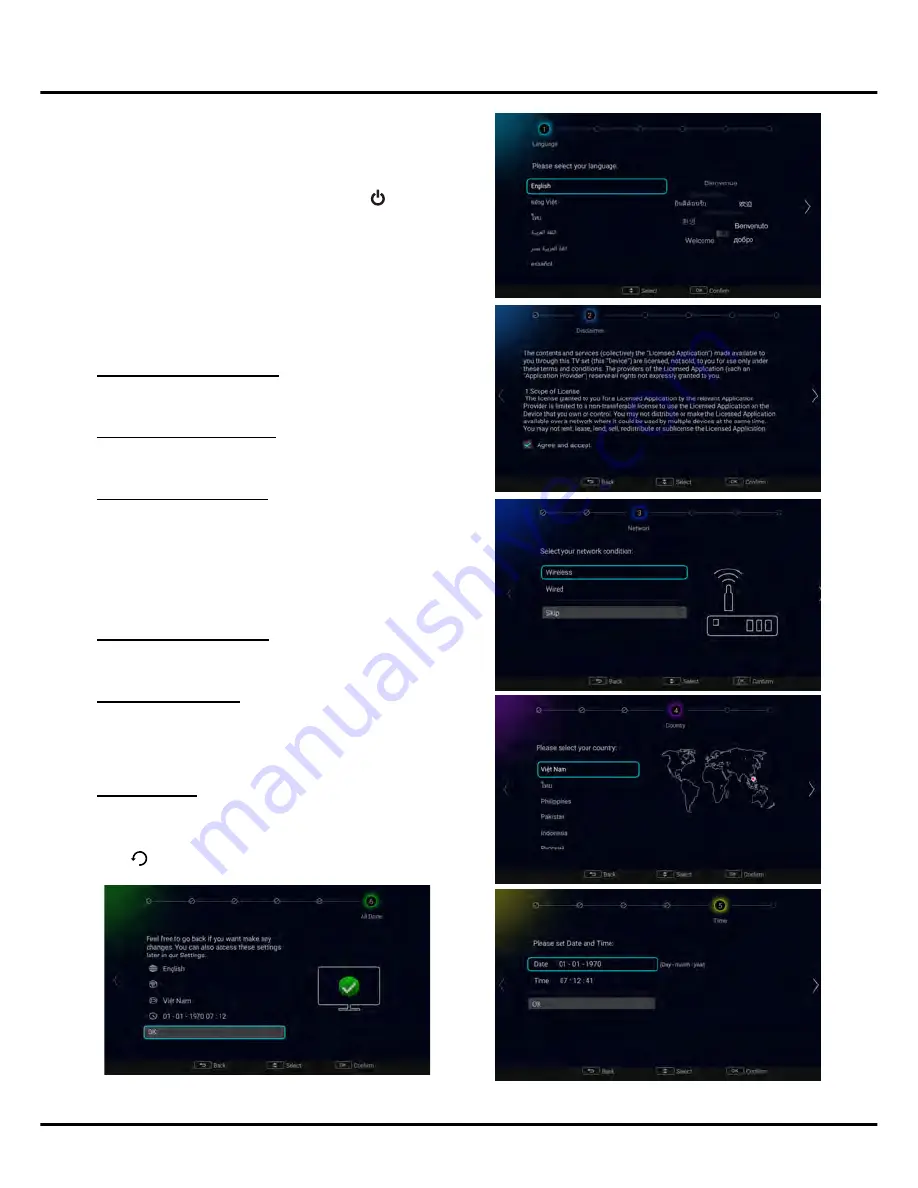
The first time you switch the set on, the Initial setup wizard 

opens, which guides you through the initial setup process.

Perform the following steps before you press 

 on the 

remote control.

• 

Insert the batteries into the remote control. 

• 

Connect the antenna cable to the TV. 

• 

Plug in the AC cord to the AC outlet.

• 

Connect your TV to a network.

Make sure that the television is switched on and follow all 

the steps in turn specified hereafter. 

Step 1 Select your language

Use 

▲/▼

 to select your desired language. Press 

OK

 to 

confirm and move to next step. 

Step 2 Agree the disclaimer

Use 

▲/▼

 to select [Agree and accept]. Press 

OK

 to tick. 

Then press 

OK

 to comfirm and move to next step. 

Step 3 Set up the network 

Android-based TV requires Internet service to access the 
web and Smart TV applications. Connect Internet using your 
existing wireless home network or Ethernet cable, and follow 
the guides on the screen. Select [

Wireless

] or [

Wired

] and 

press 

OK

 to proceed to the next screen.You can also skip this 

step by selecting [

Skip

], and connect to the internet later. For 

details, please see "Network Connection" & "Network Setup". 

Step 4 Select your country

Use 

▲/▼

 to select your country. Press 

OK

 to confirm and 

move to next step. 

Step 5 Set up the time

Use 

▲/▼

 to move your cursor to the Date or Time, press 

OK

 to enter the submenu. Use 

▲/▼

 to scroll between the 

numbers and select the correct date and time. Select 

OK

 and 

press 

OK

 to confirm and move to next step. 

Step 6 All Done

When all setup is done, the 

[All Done]

 interface displays on 

the screen, and press 

OK

 to finish the initial setup. You can 

also go back to former step and make any changes by using 

◄ or


.


Chapter 2 

General Operation

Summary of Contents for UG55SMART4K

Page 1: ...OPERATION MANUAL...

Page 2: ...ions Chapter 2 General Operation Switching on Switching off Network Connection Initial Setup Chapter 3 Homepage Operation Using Homepage TV Using Homepage Apps Chapter 4 Menu Operation Using Quick Acc...

Page 3: ...y from direct sunlight Apparatus shall not be exposed to dripping or splashing and no objects filled with liquids such as vases shall be placed on the set Do not use the set in dusty place Operating T...

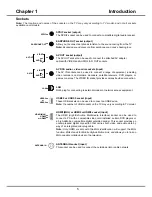
Page 4: ...and shape may vary depending on the model 1 MENU Turns the TV on by pressing the Controller when the TV is in standby mode In the menu system press and release it within 2 seconds it acts like OK but...

Page 5: ...decoders satellite receivers DVD players or games consoles The VIDEO IN socket provides composite video connection LAN RJ45 plug for connecting to external modem or network access equipment USB2 0 or...

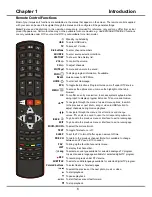
Page 6: ...te through the menus to select menu options to switch to the previous or next photo song or video in USB function to adjust channels during GoLive playback To navigate through the menus to set functio...

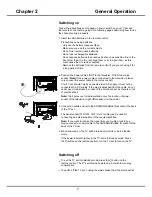
Page 7: ...nly be connected to an AC supply It must not be connected to a DC supply If the plug is detached from the cable do not under any circumstances connect it to a mains socket as there is a risk of electr...

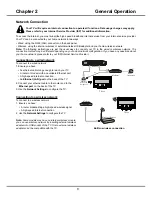
Page 8: ...Internet Service Provider Modem Internet TV Set Router Ethernet Port on the back panel or Chapter 2 General Operation Connecting to a wired network To connect to a wired network 1 Ensure you have An...

Page 9: ...res Internet service to access the web and Smart TV applications Connect Internet using your existing wireless home network or Ethernet cable and follow the guides on the screen Select Wireless or Wir...

Page 10: ...plication s updates or the application itself may be discontinued Depending on your country s regulations some applications may have limited service or not be supported Using Homepage TV Note Some opt...

Page 11: ...ress TV Apps Use to focus on each item App Store Pre installed apps App Stores Many useful and entertaining apps are available for downloading After entering the APP store you will see the recommendat...

Page 12: ...th If you want to change channel or signal source during recording store the recording data before changing the channel or source The TV cannot play files normally if the parameters of the file exceed...

Page 13: ...ns Press to enter and use to choose an option Schedule List This function is used to perform scheduled recording 1 Press on the remote control and select Schedule List 2 Press OK to display the schedu...

Page 14: ...Channel delete Press OK to display Channel list Press to select a channel you want to delete then press OK to delete the channel Channel diagnostics on digital TV channels Press OK to display some si...

Page 15: ...y connecting the LAN port on your TV directly to a network wall outlet using a Cat 5 cable Note that the wall outlet is attached to a modem or router elsewhere in your house Select Settings Network th...

Page 16: ...Change password This option allows you to change the password Press OK to enter then press OK to display the virtual keyboard and enter the new password twice Input Settings Select System Input Setti...

Page 17: ...cations then the Applications menu appears with the following options Press to enter and use to choose an option All apps Press OK to display the information of all the apps Running apps Press OK to d...

Page 18: ...h the TV at the same time they will not be recognized some times All mobile hard disks consume a lot of power which may result in power supply problems We recommend inserting only one hard disk or a l...

Page 19: ...ts When the signal is extremely weak it may be necessary to install a special antenna to improve the reception 1 Adjust the position and orientation of the indoor outdoor antenna 2 Check the connectio...

Page 20: ......

Page 21: ...2...

Page 22: ...3...

Page 23: ...4 TV controller The on screen NAV menu...

Page 24: ...5 SPDIF EARPHONE OUT AV OUT VIDEO L R AUDIO USB2 0 USB3 0 or HDMI1 MHL HDMI2 or HDMI3 ANTENNA IN AV IN LAN VIDEO L R AUDIO...

Page 25: ...6 USB 0 9 buttons TV EPG VOL CH SOURCE HISTORY INFO OK MENU HOME BACK SUBTITLE EXIT TEXT SLEEP PRE CH FAV LIST Colored buttons ZOOM ZOOM REC APP MUTE Lang USB...

Page 26: ...7...

Page 27: ...8...

Page 28: ...9...

Page 29: ...10...

Page 30: ...11...

Page 31: ...12...

Page 32: ...13...

Page 33: ...14...

Page 34: ...15...

Page 35: ...16...

Page 36: ...17...

Page 37: ...18...

Page 38: ...19...

Reviews: