background image


4                                                                      UGO

®

 Music Wear User Manual Version 1.0 

Figure 4 

– Controlling Speaker’s Buttons and Microphone 


Figure 5 

– Properly Fitted Music Wear 


Figure 6 

– Power and Phone Call Button 


4. 

Controlling Speaker’s Buttons and Microphone 


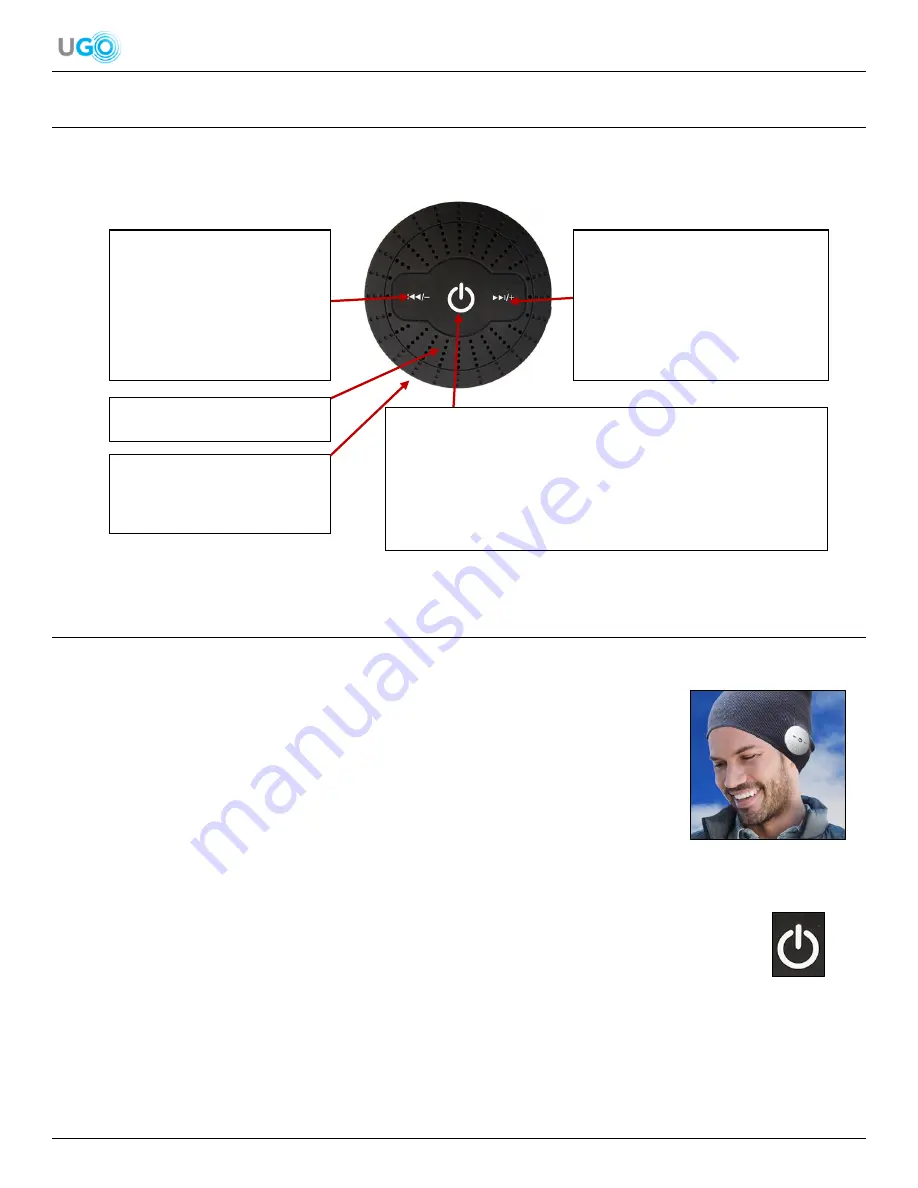
The Music Wear headphones have only 3 buttons located on the outside of the controlling speaker. On that same side, a 
microphone is located to receive audio input from a user when he or she is making or receiving a phone call (

see


Figure 4 

– 

Controlling Speaker’s Buttons and Microphone

).  


5. Connect the Music Wear to a Bluetooth

®

 Device 

The UGO

®

 Music Wear is 

required

 to be connected to a smartphone or tablet using Bluetooth

® 

technology to operate. 


1.  Fit the Music Wear on the head where the speakers comfortably cover both ears. 

Ensure the 3 buttons on the controlling speaker are located on the outside to allow 
operation of the Music Wear (

see Figure 5 

– Properly Fitted Music Wear

).   


2.  Press and hold the


Power and Phone Call Button for 4 seconds located on the controlling speaker (

see Figure 6 

– 

Power and Phone Call Button

). 


3.  Hear 

the speaker state “pairing”. In addition, the red and blue LED lights located below the Power and Phone Call 

Button the will flash. Both actions will indicate the Music Wear is turned ON and ready to connect to a smartphone or 
tablet.   


Power and Phone Call Button:


To turn ON or OFF the headphones

, press and hold for 4 

seconds. When turned ON, the Red and Blue LED lights will flash 
and the headphones will state “pairing”. When turned OFF, the 
headphones will state “disconnected” and the LED lights will be 
OFF.   


To answer or end a phone call

, press the button once.   


Skip Audio Forwards and Increase 
Volume Button:


To increase volume

, press and 

hold the button.  


To play next audio

, press the 

button once.   


Skip Audio Backwards and 
Decrease Volume Button:


To reduce volume

, press 

and hold the button.  


To play previous audio

press the button once.   


Microphone: 

Internally located 

next the red and blue LED lights.


Power Port: 

Located on the 

side. Used to plug in a micro 
USB cable to recharge the 
battery. 


Summary of Contents for Music Wear

Page 1: ...1 UGO Music Wear User Manual Version 1 0 UGO Music Wear User Manual Version 1 0 Learn How To Use The UGO Music Wear ...

Page 2: ...adphones 3 4 Controlling Speaker s Buttons and Microphone 4 5 Connect the Music Wear to a Bluetooth Device 4 6 Operate the Audio 5 7 Answer and Redial Phone Calls 7 8 Recharge the Music Wear Battery 7 9 Wash the Music Wear Headgear 8 10 Troubleshooting and Tips 8 11 Technical Specifications 9 12 Warranty and Replacement Policy 9 ...

Page 3: ...the Music Wear s tips technical specifications warranty and replacement policy NOTE Always pay attention to the surroundings when using the Music Wear 2 UGO Music Wear Headgear Styles The Music Wear comes in 16 different headgear styles for each season of the year Styles range from headbands to beanies to fit for any situation like running through a park or walking down to the café see Figure 1 UG...

Page 4: ...old the Power and Phone Call Button for 4 seconds located on the controlling speaker see Figure 6 Power and Phone Call Button 3 Hear the speaker state pairing In addition the red and blue LED lights located below the Power and Phone Call Button the will flash Both actions will indicate the Music Wear is turned ON and ready to connect to a smartphone or tablet Power and Phone Call Button To turn ON...

Page 5: ...e Music Wear is paired to a smartphone or tablet it will automatically connect the next time the Music Wear is turned ON as long as the smartphone or tablet is also turned ON and the Bluetooth setting is turned ON 7 Click Done and select a desired audio file or audio app player on the smartphone or tablet to hear on the headphones 6 Operate the Audio The UGO Music Wear can play and operate desired...

Page 6: ...ear s Headphones Steps 1 Ensure that desired audio has been selected to play on the smartphone or tablet see Operate Audio from a Smartphone or Tablet Steps on page 5 2 Play the audio file from the smartphone or tablet then do one of the following actions on the headphones controlling speaker To play or stop the audio press the Power and Phone Call Button see Figure 11 Power and Phone Call Button ...

Page 7: ...on the controlling speaker see Figure 15 Power and Phone Call Button Redial the Last Phone Number in the Call Log Steps 1 Fit the Music Wear on the head where the speakers comfortably cover both ears Ensure the 3 buttons on the controlling speaker are located on the outside to allow operation of the Music Wear see Figure 14 Properly Fitted Music Wear 2 Ensure the smartphone is turned ON and connec...

Page 8: ...akers through the passage until free of the headgear Repeat this process for the second speaker 3 Observe the headphones outside of the headgear see Figure 16 UGO Music Wear Headphones 4 Wash the headgear by hand and if possible use biodegradable soap Do not use a washing machine and or bleach If the headphones get wet then let them dry for 48 hours before turning ON or recharging 5 Set the headge...

Page 9: ... s speakers on the headphones have a 12 month warranty against manufacturer s defects Warranty is void when the speakers have been tampered with immersed in liquid exposed to extreme heat chemicals electrostatic interference or dust The UGO Music Wear headgear hats headbands have a 90 day warranty against manufacturer s defects Viewing the FAQ and Troubleshooting Guides on the UGO website UGOSPEAK...

Reviews: