background image


417003 en fr de ma 2015

5/20

Delice 3L

3

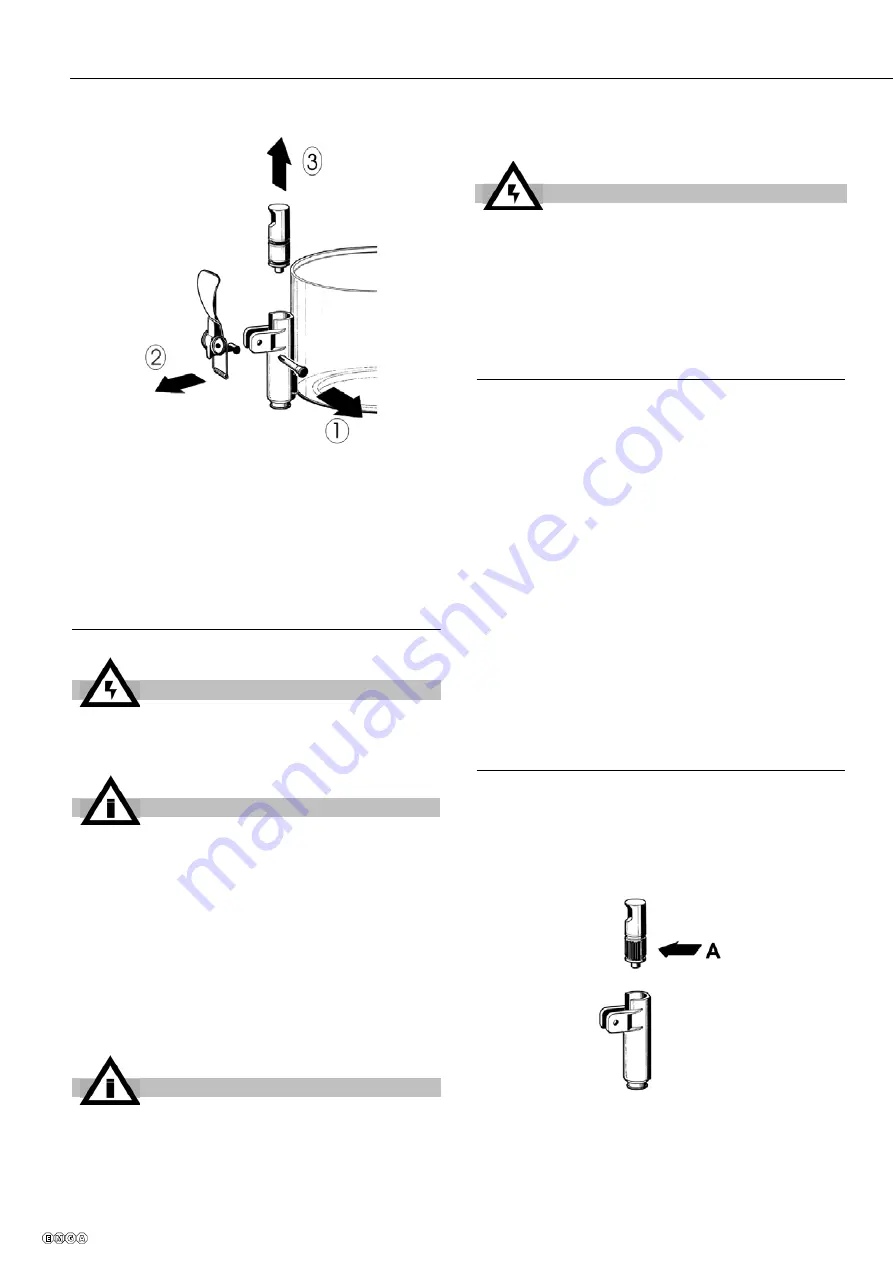
Dismantle the faucet following the sequence

shown (see fig. 1).

figure 1

4

Remove the container, lifting it upwards. 

5

Remove the drip-tray and empty it. lavaggio

.

7. 2 CLEANING

1

Prepare approx. two litres (2 gallons) of hot

water (45-60° C) and specific detergent in a bowl

according to the instructions of the manufacturer;

a solution, which is too concentrated, may cause

damage to the parts to be washed, one that is

too diluted will not clean adequately. Do not use
abrasive detergents. 

2

Use a suitable brush and carefully clean all

the parts in contact with the drink.

3

Rinse all the washed parts in running water. 

7. 3 SANITIZING

The dispenser must be sanitized prior to starting

the machine, every day. Do not allow the unit to

sit for extended periods of the time after sanitiza-

tion. 

1

Before starting the procedure described

below wash hands with an anti-bacterial soap. 

2

Prepare at least two litres of hot water (45-

60°C) and sterilising product legally approved in

your Country, following the instructions of the

manufacturer. If there is no specific sterilising

product prepare a solution of water and bleach in

the following ratio: 1 tbsp: 2 litres of water. 

3

Immerse all the parts to be sterilised in the

solution for time indicated by the manufacturer. 

4

Allow the sterilised parts to air dry on a clean

surface. 

5

Use non-abrasive cloths to dry the external

parts.

7. 4 ASSEMBLY

1

Put the drip-tray and grill in place.

2

Lubricate the faucet piston (in the area A

shown in fig. 2) using food grade approved lubri-

cant. 

figure 2

ATTENTION

Before cleaning disconnect the dispenser

from the electricity taking out the plug. 

IMPORTANT

Do not wash any component of the

machine in the dishwasher. 

IMPORTANT

Use detergents compatible with the plastic

parts to avoid damaging the dispenser. 

ATTENTION

Do not use excessive amounts of water

near the electric components of the dispen-

ser when washing it as this can cause

electric shock or damage the dispenser. 

Summary of Contents for Delice 3L

Page 1: ...417003 en fr de ma 2015 1 20 OPERATOR S MANUAL CARNET D INSTRUCTIONS GEBRAUCHSANWEISUNG Delice 3L...

Page 2: ...p A Modell DELICE 3lt DELICE SILVER 3lt DELICE GOLD 3lt 230V 50Hz mit den folgenden Normen bereinstimmen Gem den EWG Richtlinien 2006 42 CE 2006 95 CE 2004 108 CE EN ISO 12100 1 2010 EN ISO 12100 2 2...

Page 3: ...ension cords to connect the unit electrically 5 The dispenser does not leave the factory presanitized and sanitized Prior to use it must be disassembled cleaned and sanitized according to the instruct...

Page 4: ...b to 90 C to obtain the cooking temperature of the product When the hot chocolate is ready lower the temperature to the value required for dispensing turning the ther mostat knob 7 CLEANING AND SANITI...

Page 5: ...acterial soap 2 Prepare at least two litres of hot water 45 60 C and sterilising product legally approved in your Country following the instructions of the manufacturer If there is no specific sterili...

Page 6: ...he container 8 MAINTENANCE 1 Daily check the dispenser for any loss of product from the gaskets If there is first check the dispenser is assembled correctly making sure that the gaskets need no lubric...

Page 7: ...turn Motor overheated Thermal Protection tripped Check the voltage of the outlet Check the ventilation fins on the side panels obstructed or lower part of the distributor obstructed Check the viscosit...

Page 8: ...ure of the service thermostat located on the side of the distributor is set too low Adjust it to a suitable temperature Product excessively diluted Increase the concentration of the product I m not ge...

Page 9: ...ver ture des contacts permettant un d branchement int gral dans des conditions de surtension de cat gorie III N utilisez pas de rallonge pour bran cher l appareil au r seau lectrique 5 Le distributeur...

Page 10: ...chocolat chaud conformez vous la production artisanale Diluez bien le cacao dans une casserole avant de le verser dans le conteneur du distributeur Si vous utilisez des produits instantan s emball s s...

Page 11: ...Dans une bassine pr parez environ deux litres d eau chaude 45 60 C et du produit lavant sp cial en vous conformant aux prescriptions du fabricant Une solution trop concentr e peut endommager les pi ce...

Page 12: ...du distribu teur sans utiliser de linges abrasifs 7 4 REMONTAGE 1 Mettez le tiroir qui recueille les gouttes et la grille en place 2 Lubrifiez le piston robinet dans la zone A indiqu e sur la figure 2...

Page 13: ...produit Le motor ducteur ne tourne pas Le moteur est surchauff intervention du protecteur thermique Contr ler le voltage de la prise de courant Contr ler la ventilation ailettes des panneaux lat raux...

Page 14: ...fisamment dense Le thermostat de service plac sur le c t du distributeur est r gl sur une temp rature trop basse Le r gler la bonne temp rature Le produit est trop dilu Augmenter la concentration du p...

Page 15: ...Netzsteckers mit Erdung unter Beachtung der geltenden Bestimmungen an das Einphasenstromnetz anschlie en Sollte das Trennen des Ger ts von der Stromversorgung ber einen allpoligen Schalter erfolgen mu...

Page 16: ...entuelle Verunreinigung des Produkts zu vermeiden 6 Der Distributor muss ununterbrochen betrieben werden Die Heizung schaltet sich automatisch ab wenn das Produkt f r die Ausgabe fertig ist Das R hrwe...

Page 17: ...en Prozeduren haben allgemeinen Charakter und unterliegen in Abh ngigkeit von den geltenden Hygienebestimmungen Abweichungen Vor dem Zerlegen des Distributors f r das Sp len muss das Produkt entleert...

Page 18: ...n des Distributors abtrocknen dabei keine kratzenden Lappen verwenden 6 4 MONTAGE 1 Die Tropfschublade und den Rost in seinen Sitz einsetzen 2 Den Kolben des Hahns in Bereich A gezeigt auf Abbildung 2...

Page 19: ...n Getriebe dreht sich nicht Motor berhitzt Thermo schutz ausgel st Die Spannung des Stromanschlusses pr fen Die Bel ftung pr fen Lamellen der Seitenw nde oder unterer Teil des Verteilers verschlossen...

Page 20: ...kfl ssiges Produkt zu erzielen Das Betriebsthermostat seitlich des Verteilers ist auf eine zu niedrige Temperatur eingestellt Auf die entsprechende Temperatur einstellen Produkt zu stark verd nnt Die...

Reviews: