background image

· 

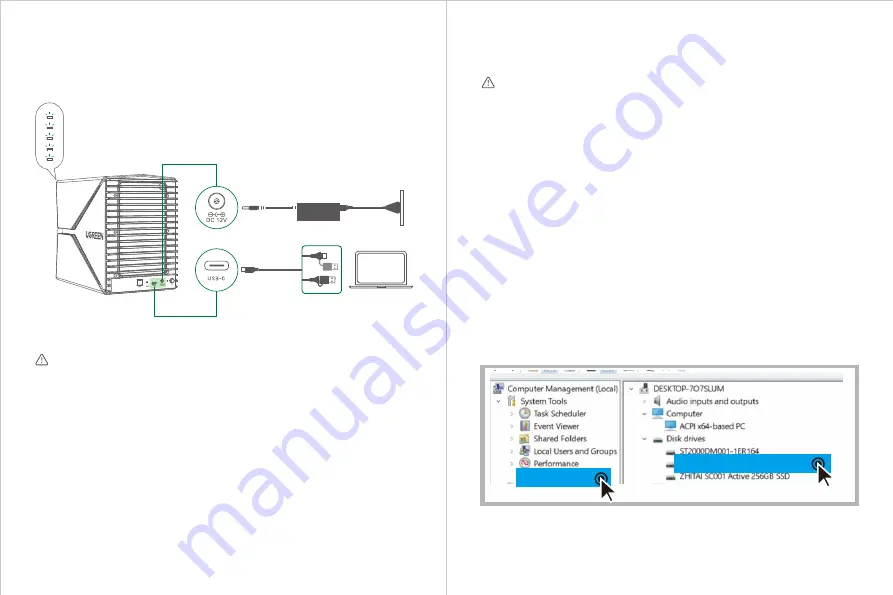
Подключите корпус к ПК / ноутбуку с помощью прилагаемого кабеля, затем подключи

    те к адаптеру питания.

· 

Включите устройство, индикатор питания горит красным.

4  Подключите устройство к источнику питания

· 

Выключение: нажмите и удерживайте кнопку питания (около 3 секунд), пока индикат

    ор питания не погаснет.

· 

Выберите режим массива на основе диаграммы режимов массива и отрегулируйте 

    DIP-переключатель «1/2/3» соответственно.

· 

Удерживая «СБРОС», нажмите и удерживайте кнопку питания (около 3 секунд), чтобы 

    включить его; через 15 секунд отпустите кнопку RESET. Смена режима успешна, если и

    ндикатор накопителя мигает белым.

· 

Перейдите в «Этот компьютер/This PC»> «Управление/Manage»> «Управление компьют

    ера/Computer management»> «Диспетчер устройств/Device manager», затем проверьте 

    текущий режим RAID.

Переключиться в первый раз

Использование нестандартных или несертифицированных адаптеров недопустимо в случа

е потенциальных рисков.

Внимание

IV  Настройка и подключение режима RAID

1  Переключение режимов RAID

· 

Рекомендуется использовать новый жесткий диск одинаковой емкости.

· 

Если вы используете старый жесткий диск, отформатируйте его перед переключением ре

    жима RAID и сделайте резервную копию всех ваших важных данных.

· 

По умолчанию продукт работает в режиме PM.

· 

Сначала вернитесь в режим PM, когда вам нужно изменить режим, а затем переключитесь 

    в режим RAID, который вы предпочитаете.

Внимание

Vhsffo!Mbshf!VTC!Efwjdf

Efwjdf!Nbobhfs

67

68

Summary of Contents for CM292

Page 1: ...5 Bay 3 5 RAID Hard Drive Enclosure Model CM292 English 01 12 Deutsch 13 24 Fran ais 25 36 Espa ol 37 48 Italiano 49 60 P 61 72 73 84 85 96...

Page 2: ...Hard Drive Installation 2 1 3 5 inch Hard Drive 2 2 2 5 inch Hard Drive 3 Put Drive Tray Back Into the Enclosure 4 Plug the Device Into Power Outlet IV RAID Mode Setting and Connection 1 Switch RAID M...

Page 3: ...data caused by improper operation or deliberate damage the data restoration will not be covered by the warranty Make sure to back up your important data regularly 2 Notice 1 User Manual Screws Screwdr...

Page 4: ...ut Remove the xing plates then put the hard drive on the drive tray Pins of the hard drive face down III Installation Steps 1 Take Out the Tray 2 Hard Drive Installation 3 LED Indicator 4 Speci cation...

Page 5: ...screw the hard drive rmly Put the drive tray back into the enclosure then slowly push it to the SATA port 3 Put Drive Tray Back Into the Enclosure As the following picture remove one of the plates rst...

Page 6: ...ange succeeds if the drive indicator ashes white Go to This PC Manage Computer management Device manager then check the current RAID mode Switching for the rst time Non standard or non certi ed adapte...

Page 7: ...security acceptable read and write with small capacity When one hard drive fails other drives work normally then you ll have to replace the broken drive greater than or equal to the capacity of the or...

Page 8: ...t its capacity Select the unallocated space and right click New Simple Volume then follow the pop up windows until the process is completed Your PC laptop will be able to read the drive after formatti...

Page 9: ...ential danger please contact UGREEN aftersales Warning If there are less than 5 hard drives in the current RAID mode then you can add new drive s Power o press and hold the power button about 3 second...

Page 10: ...2 1 3 5 Zoll Festplatte 2 2 2 5 Zoll Festplatte 3 Einsetzen des Laufwerksfachs wieder in das Geh use 4 Stecken die Festplatte in die Steckdose IV Einstellung und Verbindung von RAID Modus 1 Switch RAI...

Page 11: ...s Sie Ihre wichtigen Daten regelm ig sichern 2 Hinweise Vielen Dank f r den Kauf von UGREEN Produkten F r eine optimale Operation lesen Sie bitte dieses Handbuch vor dem Gebrauch zuerst sorgf ltig dur...

Page 12: ...neue Festplatte Daten USB C 7 15 Pin SATA 5 USB 3 0 5Gbps Max PM RAID 0 RAID 1 RAID 3 RAID 5 RAID 10 Large Clone 2 5 3 5 inch SATA interface HDD or SSD Input Output USB Standard Transfer Rate Support...

Page 13: ...fest Setzen Sie den Laufwerktr ger wieder in das Geh use ein und schieben Sie ihn dann langsam an den SATA Port 3 Einsetzen des Laufwerksfachs wieder in das Geh use Wie in der folgenden Abbildung geze...

Page 14: ...dus erfolgreich umgeschaltet berpr fen Sie unter Computerverwaltung Ger te Manager den aktuellen RAID Modus Zum ersten Mal Wechseln Modus Verwenden Sie keine nicht standardm ege oder nicht zerti ziert...

Page 15: ...latte ausf llt funktionieren die anderen Laufwerke noch normal aber Sie m ssen das defekte Laufwerk die ganze Neue ersetzen die Kapazit t der ersetzten Festplatte muss gr er oder gleich der Kapazit t...

Page 16: ...it t fest W hlen Sie den nicht zugewiesenen Speicherplatz aus und klicken mit der rechten Maustaste auf New Simple Volume Folgen Sie dann den Popup Fenstern bis der Vorgang abgeschlossen ist Ihr PC La...

Page 17: ...ger als 5 Festplatten be nden k nnen Sie neue Laufwerke hinzuf gen Ausschalten Halten Sie die Einschalttaste ca 3 Sekunden gedr ckt bis die Betriebsanzeige erlischt Setzen Sie die neue Festplatte in d...

Page 18: ...u Disque Dur 2 1 Disque Dur 3 5 pouces 2 2 Disque Dur 2 5 pouces 3 Remettez le plateau du disque dans le bo tier 4 Branchez le p riph rique dans l adaptateur secteur IV Con guration et Connexion du Mo...

Page 19: ...mmages intentionnels la restauration des donn es ne sera pas couverte par la garantie Veuillez assurer de sauvegarder r guli rement vos donn es importantes 2 Remarques 1 Manuel de l utilisateur Vis To...

Page 20: ...veau disque USB C 7 15 Pin SATA 5 USB 3 0 5Gbps Max PM RAID 0 RAID 1 RAID 3 RAID 5 RAID 10 Large Clone 2 5 3 5 inch SATA interface HDD or SSD Input Output USB Standard Transfer Rate Supported Array Mo...

Page 21: ...e disque dur Remettez le plateau de disque dans le bo tier puis poussez le lentement vers le port SATA 3 Remettez le plateau du disque dans le bo tier Comme le montre l image suivante retirez d abord...

Page 22: ...RESET Le changement de mode r ussit si l indicateur du disque clignote en blanc Acc der Ce PC G rer Gestion de l ordinateur Gestionnaire de p riph riques puis v ri ez le mode RAID actuel Changer le m...

Page 23: ...ture et d criture moyenne avec une petite capacit et haute s curit Lorsqu un disque dur tombe en panne les autres disques fonctionnent normalement Alors vous avez besoin de remplacer le disque cass su...

Page 24: ...issez sa capacit S lectionnez l espace non allou et cliquez avec le bouton droit sur Nouveau Volume Simple puis suivez les fen tres contextuelles jusqu ce que le processus soit termin Votre PC ordinat...

Page 25: ...ous pouvez alors ajouter de nouveaux disques S teignez Appuyez et maintenez le bouton d alimentation environ 3 secondes jusqu ce que l indicateur d alimentation s teigne Placez le nouveau disque dur d...

Page 26: ...disco duro 2 1 Disco duro de 3 5 pulgadas 2 2 Disco duro de 2 5 pulgadas 3 Colocar la bandeja del disco duro en la caja 4 Conectar el dispositivo a la toma de corriente IV Con guraci n y conexi n del...

Page 27: ...datos causado por un funcionamiento incorrecto o da o deliberado la restauraci n de datos no estar cubierta por la garant a Aseg rese de realizar copias de seguridad de sus datos importantes con regu...

Page 28: ...aci n Cambiar una nuevo disco duro y hacer una copia de seguridad USB C 7 15 Pin SATA 5 USB 3 0 5Gbps Max PM RAID 0 RAID 1 RAID 3 RAID 5 RAID 10 Large Clonaci n 2 5 3 5 pulgadas SATA HDD o SSD Entrada...

Page 29: ...el disco duro rmemente Vuelva a colocar la bandeja del disco duro en la caja y luego emp jela lentamente hacia el puerto SATA 3 Colocar la bandeja del disco duro en la caja Como se muestra en la sigui...

Page 30: ...bio de modo se realiza correctamente si el indicador de disco duro parpadea en blanco Vaya a Este equipo Administrar Administraci n de equipos Administrador de dispositivos luego veri que el modo RAID...

Page 31: ...aceptable y peque a capacidad disponible Cuando uno de los discos duros falla los dem s funcionan normalmente Reemplace el disco duro defectuoso por uno nuevo mayor o igual a la capacidad del disco d...

Page 32: ...regi n sin partici n haga clic con el bot n derecho en la unidad y seleccione un nuevo volumen simple en el men contextual El PC puede leer la nueva unidad despu s del formateo macOS Pasos Otro Utili...

Page 33: ...discos duros en el modo RAID actual puede agregar nuevos discos duros Apagar mantenga presionado el bot n de encendido unos 3 segundos hasta que el indicador de encendido se apague Coloque el nuevo d...

Page 34: ...disco rigido 2 1 Disco rigido da 3 5 pollici 2 2 Disco rigido da 2 5 pollici 3 Reinserire il vassoio dell unit nell involucro 4 Collegare il dispositivo alla presa di corrente IV Impostazione e Connes...

Page 35: ...ni improprie o danni intenzionali il ripristino dei dati non sar coperto dalla garanzia Assicurati di eseguire regolarmente il backup dei dati importanti 2 Avviso 1 Manuale dell Utente Viti Cacciavite...

Page 36: ...RAID 1 RAID 3 RAID 5 RAID 10 Large Clone HDD o SSD d Interfaccia SATA da 2 5 3 5 Input Output USB Standard Velocit di Trasferimento Modalit Array Supportate Disco Rigido Supportato Protocollo Supporta...

Page 37: ...vitare saldamente il disco rigido Inserire il vassoio dell unit nell enclosure e poi spingerlo lentamente verso la porta SATA 3 Inserire il Vassoio dell Unit nell Involucro Come nell immagine seguente...

Page 38: ...modalit ha esito positivo se l indicatore dell unit lampeggia in bianco Va su Questo PC Gestisci Gestione computer Gestione dispositivi e poi controlla la modalit RAID corrente Switching per la prima...

Page 39: ...essere ripristinati Alta sicurezza lettura e scrittura accettabili con capacit ridotta Quando un disco rigido si guasta le altre unit funzionano normalmente e poi dovrai sostituire l unit danneggiata...

Page 40: ...Seleziona lo spazio non allocato e fai clic con il pulsante destro del mouse su Nuovo volume semplice e poi segue le nestre pop up no al completamento del processo Il Suo PC laptop sar in grado di leg...

Page 41: ...post vendita UGREEN Avvertimento Se sono presenti meno di 5 dischi rigidi nella modalit RAID corrente possibile aggiungere nuove unit Spegnimento premere il pulsante di accensione circa 3 secondi nch...

Page 42: ...61 61 61 62 63 63 64 64 64 65 66 67 68 69 70 71 71 I 1 2 II 1 2 3 4 III 1 2 2 1 3 5 2 2 2 5 3 4 IV RAID 1 RAID 2 RAID DIP 3 V 1 2 VI C RU RAID 5 3 5...

Page 43: ...UGREEN 5 RAID DIP USB C I 1 II 1 2 RAID 2 1 1 RAID 3 5 5 1 A 1 USB A C USB C USER MANUAL 8 RAID DIP RAID DIP RAID RAID 3 3 1 2 3 ON 1 2 3 ON 2 3 4 5 6 8 7 61 62...

Page 44: ...3 RAID1 3 5 10 USB C 7 15 SATA 5 USB 3 0 5 PM RAID 0 RAID 1 RAID 3 RAID 5 RAID 10 2 5 3 5 HDD SSD SATA USB SATA UASP PC ABS UV Windows macOS Linux L249 W151 H205 mm III 1 2 4 2 1 3 5 63 64...

Page 45: ...2 5 SATA 3 2 2 2 5 65 66...

Page 46: ...4 3 DIP 1 2 3 3 15 RESET This PC Manage Computer management Device manager RAID IV RAID 1 RAID RAID PM PM RAID Vhsffo Mbshf VTC Efwjdf Efwjdf Nbobhfs 67 68...

Page 47: ...P RAID 0 RAID 1 RAID 1 RAID 1 RAID 0 RAID 1 RAID 10 ON ON OFF OFF ON ON ON OFF ON OFF OFF OFF 4 2 2 2 1 PM RAID RAID 0 ON ON ON ON ON OFF ON OFF OFF OFF ON OFF 2 2 3 1 1 3 RAID 1 RAID 3 RAID 5 DIP DIP...

Page 48: ...Manage Storage Disk Management macOS Other Disk Utility Erase ExFAT Erase Complete Mac RAID 2 MBR GPT Windows Linux NTFS macOS ExFAT NCS Nbtufs Cppu Sfdpse HQU HVJE Qbsujujpo Ubcmf Jojujbmj f Ejtl OUG...

Page 49: ...Linux Applications Disks Format Partition Mount V 1 RAID VI USB 3 0 UGREEN RAID 5 3 DIP PM RESET 3 15 RESET DIP RAID 4 RAID 1 3 5 10 Clone 3 3 2 71 72...

Page 50: ...73 73 73 74 75 75 76 76 76 77 78 79 80 81 82 83 83 I 1 2 II 1 2 3 LED 4 III 1 2 2 1 3 5 2 2 2 5 3 4 IV RAID 1 RAID 2 RAID DIP 3 V 1 2 VI JP 5 3 5 RAID...

Page 51: ...UGREEN No 5 RAID DIP USB C DC I 1 II 1 2 RAID PC 2 1 1 5 3 5 RAID 1 1 USB A C to USB C USER MANUAL 8 RAID RAID DIP RAID DIP RAID RAID PC 3 3 1 2 3 ON 1 2 3 ON 1 2 3 4 5 7 6 73 74...

Page 52: ...e 2 5 3 5 inch SATA interface HDD or SSD Input Output USB Standard Transfer Rate Supported Array Modes Supported Drive Type Supported Drive Protocol Transfer Protocol SATA protocol UASP Outer Shell PC...

Page 53: ...2 5 4 SATA 3 1 2 2 2 5 PC 77 78...

Page 54: ...PC 4 3 DIP 1 2 3 RESET 3 15 RESET PC RAID IV RAID 1 RAID RAID PM PM RAID Ugreen Large USB Device Device Manager 79 80...

Page 55: ...RAID0 2 RAID 1 1 1 1 RAID 10 ON ON OFF OFF ON ON ON OFF ON OFF OFF OFF 4 2 2 2 1 Clone Large PM 1 1 1 1 2 1 2 RAID RAID 0 Fast ON ON ON ON ON OFF ON OFF OFF OFF ON OFF 2 2 3 1 3 1 RAID 1 Safe RAID 3...

Page 56: ...3 RAID Windows PC PC PC macOS ExFAT Mac RAID 2TB MBR GPT Windows Linux NTFS macOS ExFAT MBR Master Boot Record GPT GUID Partition Table Initialize Disk NTFS New Simple Volume 82...

Page 57: ...Linux PC V 1 RAID 2 VI USB3 0 UGREEN RAID 5 3 DIP PM RESET 3 15 RESET DIP RAID 4 RAID 1 3 5 10 1 3 3 2 83 84...

Page 58: ...85 85 85 86 87 87 88 88 88 89 90 91 92 93 94 95 95 1 2 1 2 3 4 1 2 2 1 3 5 2 2 2 5 3 4 RAID 1 RAID 2 RAID 3 1 2 CN 3 5...

Page 59: ...5 RAID RESET USB C DC 1 1 2 RAID 2 1 1 1 USB A C C 1 USER MANUAL RAID 8 RAID RAID RAID RAID RAID USB 3 3 1 2 3 ON 1 2 3 ON 1 2 3 4 5 7 6 85 86...

Page 60: ...3 5 10 Clone 3 USB C 7 15 Pin SATA 5 USB 3 0 5Gbps Max PM RAID 0 RAID 1 RAID 3 RAID 5 RAID 10 Large Clone 2 5 3 5 SATA HDD SSD USB SATA UASP PC ABS UV Windows macOS Linux L249 W151 H205 mm 1 2 4 2 1...

Page 61: ...2 5 SATA 3 2 2 2 5 89 90...

Page 62: ...USB 4 3 RAID 1 2 3 RESET 3 15 RESET RAID RAID 1 RAID RAID PM PM RAID Vhsffo Mbshf VTC Efwjdf 91 92...

Page 63: ...RAID RAID 1 RAID 1 RAID 0 RAID 1 RAID 10 ON ON OFF OFF ON ON ON OFF ON OFF OFF OFF 4 2 2 2 1 Clone Large PM RAID 0 Fast ON ON ON ON ON OFF ON OFF OFF OFF ON OFF 2 2 3 1 3 1 RAID 1 Safe RAID 3 RAID 5 1...

Page 64: ...3 RAID Windows macOS ExFAT RAID 2TB MBR 2TB 2TB GPT Windows Linux NTFS macOS ExFAT NCS N HQU HVJE H OUGT 94...

Page 65: ...Linux 1 RAID USB 3 0 3 PM RESET 3 15 RESET RAID 4 RAID 5 RAID 1 3 5 10 Clone 3 3 2 95 96...

Reviews: