Umwelt-Geräte-Technik GmbH | Eberswalder Str. 58 | D-15374 Müncheberg | Tel.: +49 (0) 33 43 2 - 89 575 |
6.
Test procedure
6.1
Preparation of the Hood Infiltrometer
Putting up the Hood Infiltrometer please mind that it only works properly on level measur-
ing sites.
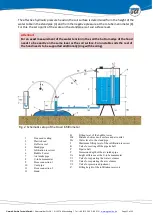
First screw the tripod (
Fig.:2 [12]
) into the base plate of the infiltration reservoir and align it
vertically. Fill the bubble tower [6] with water up to the marking “B”. Therefor draw the air
intake pipe [7] and insert the funnel. Close Valve “V1” and fill the infiltration reservoir with
water up to the marking “I” following close it with the plug. If using a Hood Infiltrometer
IL-2700 with pressure sensor and capturing the data with the handheld logger it is advisable
to calibrate the pressure sensor before the test run. Therefor filling the infiltration reservoir
should be carried out as last step and the calibration process at the handheld device needs
to be started before filling the infiltration reservoir. See more information on this at chapter
“8.6 Calibration”.
Connect the hood to the infiltration reservoir with the hose connection 2 [11] and the
vent pipe [10] and make sure the valves “V2” and “V3” are closed. Connect the U-tube
manometer to the upper end of the standpipe with the hose connection 1 [9] and fill the
U-tube manometer up to the zero marking of the scale if necessary.
6.2
Setting up the Hood Infiltrometer
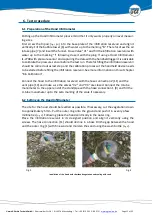
The site for the hood should be levelled as possible. If necessary, cut the vegetation down
to approximately 5 mm. Put the outer ring onto the ground and push it in evenly a few
millimetres (
Fig. 3
). Following place the hood centrically in the outer ring.
Place the infiltration reservoir in its designed position and align it vertically using the
screws. The hose connection [11] should decline in a bow. Fill the gap between the hood
and the outer ring [1] with fine sand and moisten the sand using the wash bottle (
Fig. 4
).
Fig. 3
Fig. 4
Installation of the Hood with shortened vegetation and sealing with sand.

