background image

Service manual 

CXx16x 

Compact electronic knob cylinder 


9  


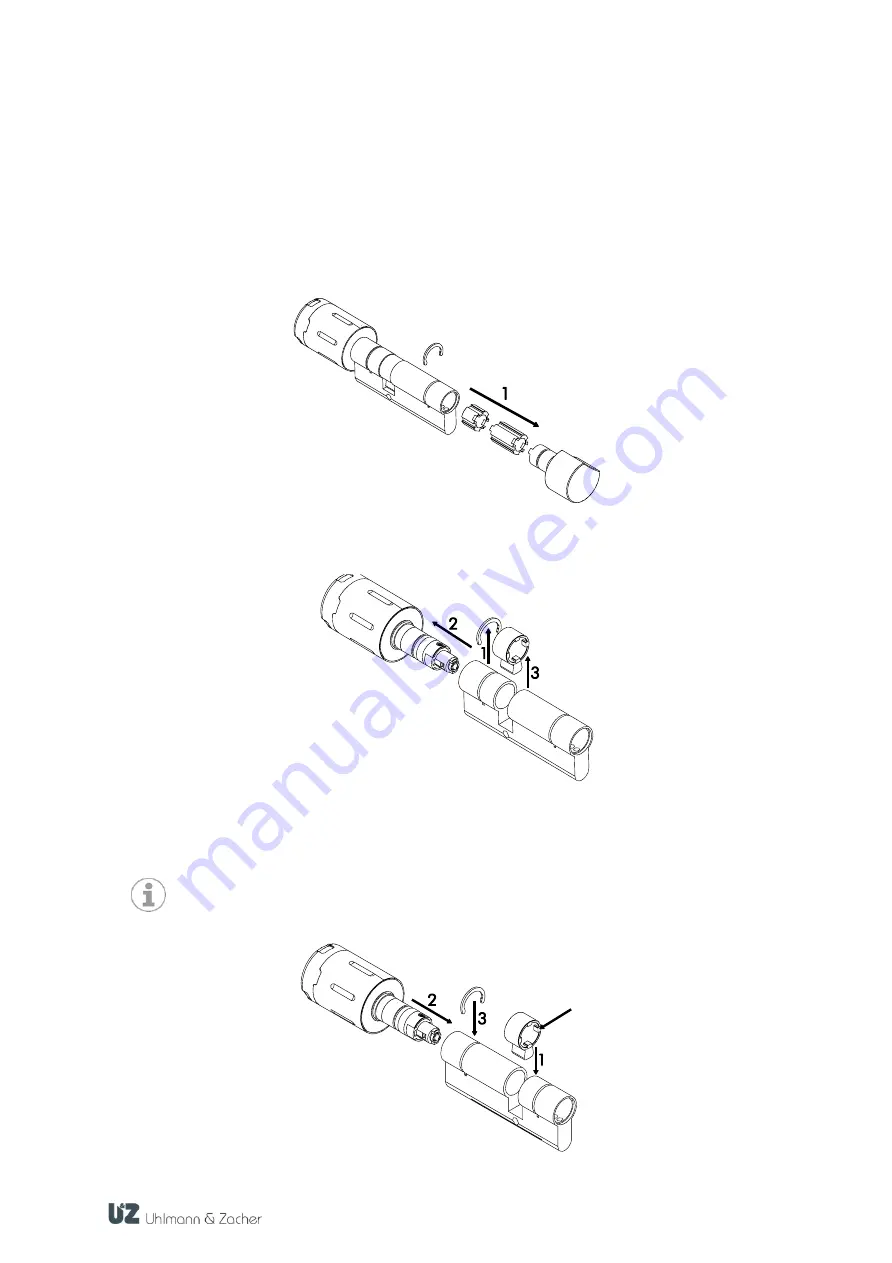
Remove the parts out of the cylinder carefully. Do not change the position and sequence. Different parts 
are used depending on the cylinder dimensions. 


Remove the snap ring from the electronic knob, pull it carefully out of the cylinder and remove the lock-
ing cam.  


Rotate the cylinder and hold the locking cam in the cylinder opening, such that the four inner tappets 
point towards the mechanical knob. Then insert the electronic knob into the appropriate side of the lock-
ing cylinder and secure it with the snap ring.  

From a cylinder dimension of 45/xx onwards, the locking cam can be inserted in the cylinder 
opening even after mounting the electronic knob. 


Summary of Contents for CX 16 Series

Page 1: ...Service manual CXx16x Compact electronic knob cylinder Compact electronic knob cylinder CXx16x Service manual...

Page 2: ...n Zacher GmbH Gutenbergstr 2 4 97297 Waldbuettelbrunn Germany Phone 49 931 40672 0 E Mail contact UundZ de http www UundZ de The service manual is protected by copyright The information contained this...

Page 3: ...nob 6 3 1 Relates to the following variants 6 3 2 Necessity of the measure 6 3 3 Procedure 6 3 4 Check 7 4 Rotation of the cylinder 8 4 1 Relates to the following variants 8 4 2 Necessity of the measu...

Page 4: ...ages resulting from non compliance with this service manual or incorrectly configured knob cylinder Prerequisite for ordering individual components is the system training for assembly If there are sti...

Page 5: ...ttery beyond the specified storage temperature Use only original spare parts and accessories from Uhlmann Zacher to prevent malfunctions and damages Always test the product after a modification to see...

Page 6: ...faulty and has to be replaced 3 3 Procedure If the electronic knob is faulty it can be replaced This should only be done by trained personnel Remove the snap ring between the electronic knob and locki...

Page 7: ...lectronic knob be fixed using the snap ring This procedure become easy if the product is engaged when interlocking and turning 3 4 Check Check the function of the electronic locking system before inst...

Page 8: ...sions have to be changed Other parts are required here which will be included when the cylinder is re ordered 4 3 Procedure If the cylinder needs to be rotated both the electronic knob and the mechani...

Page 9: ...ll it carefully out of the cylinder and remove the lock ing cam Rotate the cylinder and hold the locking cam in the cylinder opening such that the four inner tappets point towards the mechanical knob...

Page 10: ...of the mechanical knob should now point downwards If it is pointing upwards then the mechanical knob has to be pulled slightly out of the locking cylinder rotated by 180 and rein serted Only then can...

Page 11: ...ions have to be changed 5 3 Procedure The locking cylinder can be replaced for changing the cylinder dimensions This should only be done by trained personnel Remove the snap ring between the electroni...

Page 12: ...ts 5 depends on the cylinder length They are inserted in to the cylinder such that the two carrier lugs point towards the electronic knob 7 4 The coupling carrier 6 has two slots for the two carrier l...

Page 13: ...ing system before installing in the door In the unauthorised state the locking cam has to be disengaged from the electronic knob Once an authorised transponder is held up the locking cam has to engage...

Page 14: ...to the locking cam Locking cam Part of locking cylinder which rotates inside the lock during the locking operation and actuates the lock Filler parts Transmits the rotational movement to the locking...

Reviews: