3
Quick Install Guide
SET
ALARM
CO
2
Monitor
LED button
Socket
LED button
Buzzer
On-Site Installation
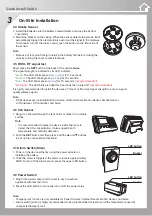
3.4 Smoke Sensor
1. Install the batteries into the battery compartments and close the bottom
cover firmly.
2. Mount the bracket on the ceiling. When the sensor detects the smoke, it will
automatically trigger the alarm and also send out the signal to the Gateway.
To manually turn off the alarm sound, push the button on the front side of
the sensor.
Note:
• Because of fool-proof design, install in the battery first before closing the
case by turning the cover counterclockwise.
3.5 RSSI - RF signal test
Short press the
SET
button at the back of the sensor
twice
.
The signal strength is indicated by its LED indicator:
*
Good
: The LED blinks green (
very quickly
) for 15 seconds
*
Normal
: The LED blinks green (
quickly
) for 15 seconds
*
Poor
: The LED blinks green (
slowly
) for 15 seconds
(not recommended)
*
No Signal
: The LED blinks red light for 3 seconds then turned off
(not recommended)
It is highly recommended to install the devices at “Good” or “Normal” signal strength to ensure a good
quality wireless signal.
Note:
• RSSI devices are including Button Console, Contact Sensor, Motion Sensor, Smoke Sensor,
AI Transducer, DI Transducer, and Siren.
3.6 CO
2
Sensor
1. Hang it on the wall through the rear holds or place it on a stable
surface.
Note:
• It is recommended to place the device inside the room to
detect the CO
2
concentration. It also supports both
temperature and humidity detection.
2. Push the
SET
button and then press both the
and
buttons
to set up the concentration threshold.
3.7 Alarm Switch(Siren)
1. Power on the device either by using the power adapter or
installing the battery.
2. Once the alarm is triggered, the alarm volume is approximately
90dB. To turn off the alarm sound, press the upper LED button.
3.8 Power Switch
1. Plug it into a wall socket and connect to any household
appliance with less than 10A.
2. Press the LED button to manually turn on/off the power relay.
Note:
• Tamper-proof function is only available for Panel Console, Contact Sensor, Motion Sensor, and Siren.
• Alarm switch (siren) is highly recommended to be joined/installed at last to avoid the false alarm caused by
unexpected tamper-proof.


