background image

5m - series



ECONOMY Prime

2

Safety Instructions

Please use gloves and stable shoes when assembling the metal frame portion of this unit. The metal

components may have sharp edges and be oily cause of the metal processing.

Snow must be removed from the tarpaulin in a timely manner. Temporary accommodation as tents should

be taken down in adverse weather condition like heavy wind, snowfall and ice.

Ensure sufficient distance of the tarpaulin to heat sources, electrical-, gas- and other pipes (min. 1.2m). You

can obtain detailed information from your responsible authority.

Pay attention to the following points when choosing a location:

The pavilion must stand on a flat, non-slip and safe place

choose a sheltered location

Avoid damage to the material, please place the pavilion so that it cannot rub or chafe on

branches,

parts of buildings etc.

Put up the pavilion at a safe distance to fireplaces and pay attention to the direction of the wind

Leave your pavilion to dry in an erected position before packing it away.

Assembly Instructions

Step1.

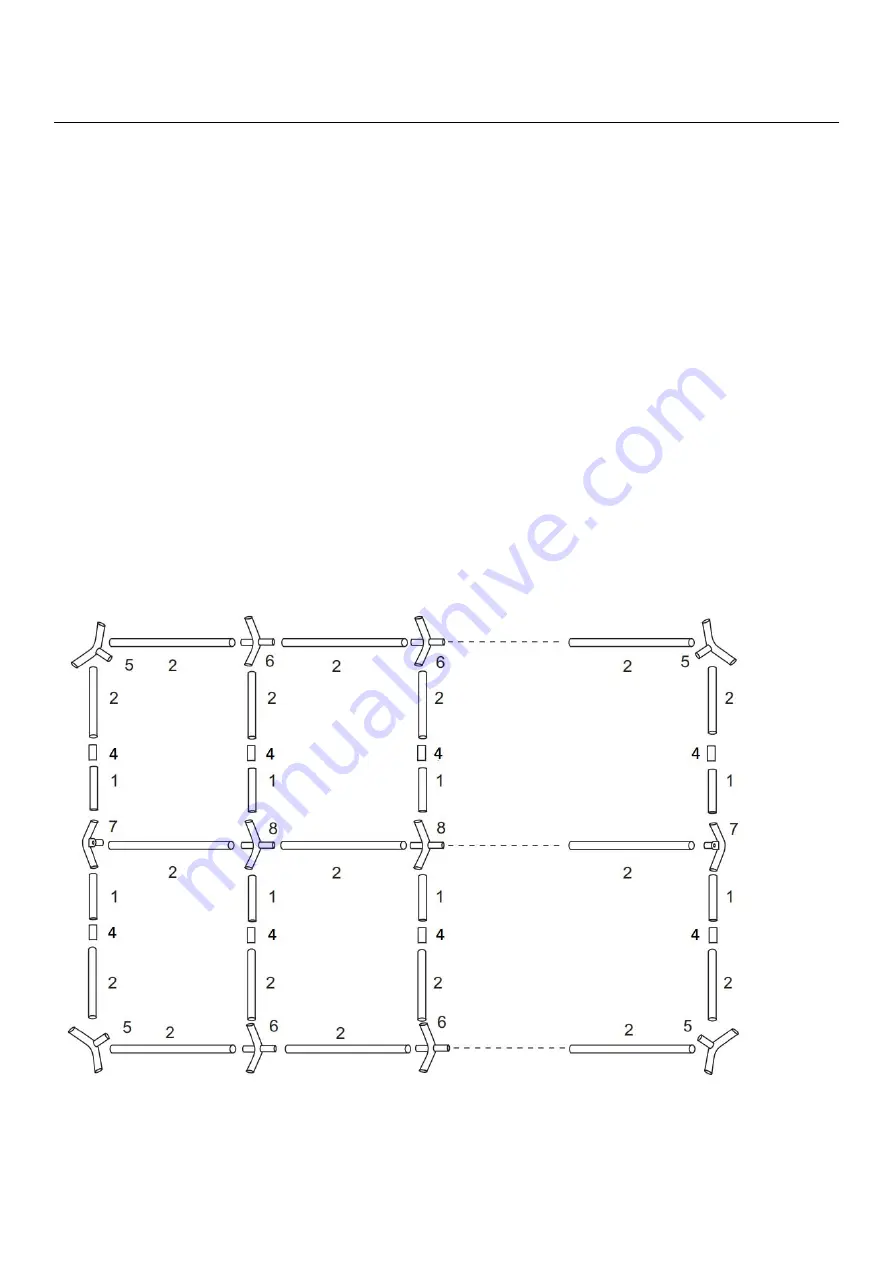
Assembly is easiest if you layout all parts on the ground as shown below. 5x6m has 3 section, 5x8m 4 sections,

5x10m has 5 sections and 5x12 has 6 sections.

Assemble the roof frame by mounting parts 4 to 8 on the pipes (parts 1 and 2). Use the bolts(9) to attach the parts.

Summary of Contents for 5m Series

Page 1: ...nd are not included in this product Periodically check the anchors to ensure stability of shelter In case of extreme weather conditions the tent cover must be removed Any shelter that is not anchored securely has the potential to fly away causing damage We are not responsible for any shelter that blows away This canopy is intended to protect against the effects of sun rain light snow etc It is not...

Page 2: ...ble authority Pay attention to the following points when choosing a location The pavilion must stand on a flat non slip and safe place choose a sheltered location Avoid damage to the material please place the pavilion so that it cannot rub or chafe on branches parts of buildings etc Put up the pavilion at a safe distance to fireplaces and pay attention to the direction of the wind Leave your pavil...

Page 3: ...Lift one side of the tent frame and attach the legs 3 Place the roof 18 onto the frame and use the bungees 13 to fasten it Be sure not to put too much tension on the bungees in order not to make attaching the other side more difficult ...

Page 4: ...tach the legs on the other side Make sure that the leg pipes are in vertical position to avoid overtention on another side Use the big ground pegs 11 to fasten the legs to the ground Attach the side covers to the pipes 3 using hooks 17 ...

Page 5: ...ach the side walls to the frame using the bungees 13 Attach the end walls directly to the roof using the short bungees 14 Use the small ground pegs 12 to fasten the end walls to the ground The guy rope runs from every corner of the tent and is braced to the ground using the Spiral peg 10 ...

Page 6: ...0mm 6 8 10 12 14 5 3 way corner 110 Leg connector 4 4 4 4 4 6 4 way corner 110 Leg connector 2 4 6 8 10 7 3 way corner 140 roof connectors 2 2 2 2 2 8 4 way corner 140 roof connectors 1 2 3 4 5 9 Bolt with wing nut 42 58 74 90 106 10 Spiral peg 4 4 4 4 4 11 Big ground Peg 6x180mm 6 8 10 12 14 12 Small ground Peg 4x180mm 22 28 34 40 46 13 Long Bungee Balls 70 88 106 124 142 14 Short Bungee Balls 22...

Page 7: ...5m series ECONOMY Prime 7 15 Guy rope 3m 4 4 4 4 4 16 Spanner 1 1 1 1 1 17 Hook 6 8 10 12 14 18 Roof 1 1 1 1 1 19 Side wall 4 6 8 10 12 20 End wall 2 2 2 2 2 ...

Reviews: