background image

CG INFINITY: CHAPTER ONE

13

Customizing CG Infinity

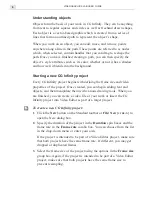
To better work with CG Infinity, it is important to customize the
program’s behavior with the Preferences dialog box (opened by double-
clicking the Status bar or clicking 

File: Preferences 

[

F

6

]

). This dialog box

has three tabs: 

CG Infinity

Memory

, and 

Display

.

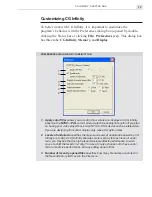
PREFERENCES DIALOG BOX: CG INFINITY TAB

1. Apply color filter

 allows you to control how colors are displayed in CG Infinity,

based on the 

NTSC

 or 

PAL

 color models. Select the appropriate option if you plan

on having your video played back on an NTSC or PAL device such as a television.
If you are designing for monitor display only, leave this option clear.

2. Levels of undo/redo

 specifies the maximum levels of undo/redo allowed by CG

Infinity (up to 99). As CG Infinity allocates more memory for each level of undo/
redo, you may find that too high a level adversely affects performance. In such
cases, restrict the level to 3-4 only. You can of course choose not to have undo/
redo to maximize performance, but any editing done is final.

3. Number of recently opened files

 specifies how many file names are stored in

the Recent History list found in the File menu.

1
2

3
4

5
6

Summary of Contents for VIDEOGRAPHICS LAB

Page 1: ......

Page 2: ......

Page 3: ...User Guide Ulead Systems Inc September 2005 ...

Page 4: ...demarks of Adobe Systems Incorporated QuickTime and the QuickTime logo are trademarks used under license QuickTime is registered in the U S and other countries All other product names and any registered and unregistered trademarks mentioned in this manual are used for identification purposes only and remain the exclusive property of their respective owners Sample files Files provided as samples on...

Page 5: ......

Page 6: ...ames in a project 17 Customizing Video Paint 21 Chapter 2 Painting 27 Working in different display modes 28 Making selections 32 Working with color 37 Using the Painting tools 41 Transforming selections 46 Using the Clone tool 47 Using the Retouch tool 48 Recording macros 50 Applying filters 52 Previewing your work 53 Shortcuts 57 Index 61 ...

Page 7: ...a video sequence With Video Paint you can quickly and easily create special effects such as lightning bolts lasers beams virtual sets and mattes You can also use the wide range of natural and particle based painting tools to work on single images for use in other projects such as Web pages and presentations Chapter 1 ...

Page 8: ...of the frames appears as a clip in the Filmstrip panel You can scroll through this panel to view the clip or select a specific frame to work on When you select a frame it opens automatically as an image in an edit window Once an image is displayed in an edit window you can begin to work on it paint or enhance it using various Video Paint tools Video Paint s program window ...

Page 9: ...Paste an image View in Composite mode View in Paint Layer mode Redo an undone action Undo a previous action View in Normal mode View in Onionskin mode View in Ruby Mask mode View in No Source Video mode Production Library Shape Selection tool Magic Wand tool Clone tool Zoom tool Painting tool Foreground background color Transform tool Lasso tool Grabber tool Retouch tool Eyedropper tool Preview ba...

Page 10: ...e markers appear above and below the Filmstrip panel indicating the frame s position The markers are placed to the left edge of the active frame The top marker indicates the frame s position timecode in the current view while the scroll bar indicates the frame s position relative to the entire clip Markers indicating the position of the current frame in view top and its position relative to the en...

Page 11: ...would work on the video source image in Composite mode Gener ally you want to stay in Composite mode unless you need to edit specific portions of the paint layer such as removing areas of paint no longer required in a frame Note You can have any number of edit windows open at the same time but only one per clip in the Filmstrip panel Saving your work In Video Paint the video clip you are working o...

Page 12: ...the same directory structure as the original to ensure the clips are correctly loaded Opening files into Video Paint To get started in Video Paint you need to open a file into the workspace You can open existing Video Paint video or image files When you open a file Video Paint allows you to select which frames in the file to open This ability to partially edit your work speeds up processing time p...

Page 13: ...File dialog box 5 Click Open to place the file or selected frames into the workspace The first frame of the sequence automatically appears in an edit window Adjusting the number of open frames If you have already opened a video or Video Paint project file and decided that you only want to work on a specific number of frames within the clip click File Edit Duration to select the frames you are inte...

Page 14: ...e frame size for the project using the options in the Frame size group box Again if the project is destined for Video Editor then the frame size should be identical to the Video Editor project 4 Click OK The dialog box closes and a new clip is created in the workspace with the first frame appearing in an edit window The color of these frames is determined by the current background color To change ...

Page 15: ... BMP Performing Cut and Copy operations When working on your project you will often want to copy changes you have made in one frame to others in the video sequence To do this you use the Cut and Copy buttons on the Standard toolbar or the Edit Cut and Copy commands Copy duplicates a selected area or floating selection while Cut removes it from the image Once cut or copied you can paste it into the...

Page 16: ...reedom of movement Pasting masks When you paste an image it contains a selection area mask plus the contents of the area itself the image data In Video Paint you can choose to paste only the mask without any image data by clicking Edit Paste As Mask or Mask Under Pointer After pasting all you will see is the selection marquee which now selects a portion of the active image This is useful if you wi...

Page 17: ...ates the currently active floating selection or if the selection is not floating its mask while Paint layer dupli cates the entire contents of the paint layer If you do not have a floating selection active then only Paint layer is enabled 4 Specify where you want the duplication to take place in the Apply group box You can choose to perform the duplication over frames appearing before or after the...

Page 18: ...ltiple frame actions option or decrease the number of frames to duplicate over Creating a matte frame 2 and then power duplicating it across the others Placing cues In Video Paint you can place cues at any frame in a project to mark it for later editing or identification To place a cue click the Cue bar located under the Preview bar of the ruler at the appropriate location in the Filmstrip panel a...

Page 19: ...ox Viewing edit windows Whenever you open a file the first frame of the sequence appears in an edit window at its original size 1x Video Paint allows you to control the size of this edit window as well as zoom in or out from the image This helps you to see more easily the areas you are editing as well as identify areas for further enhancement Zooming on an image When you edit an image you may want...

Page 20: ...lso press the and keys to zoom in and out on images regardless of the current tool selected Pressing the Z key while using another tool automatically switches that tool to the Zoom tool Releasing the Z key then switches the tool back Using the Global Viewer When an entire image cannot be displayed within the edit window scroll bars appear allowing you to navigate around the expanded image The Glob...

Page 21: ...ow By submenu The maximum zoom level available is determined by the size of the image and your current display mode An alternative to the Fit in Window By command is the Fit in Window button on the Attribute toolbar or View Fit in Window This automatically resizes the image to fit within the edit window at the largest possible size without introducing scroll bars Working with frames in a project W...

Page 22: ...g the additional frames 2 Click Frame Insert to open the Insert Frame dialog box 3 Specify the number of frames to insert in the Insert duration spin box and then select either the Before current frame or After current frame options to determine whether the inserted frames precede or follow the active frame 4 Specify the content of the new frames in the Link with group box The Empty frame option f...

Page 23: ... the duration accordingly This does not remove them from the actual source file When you click this command the Delete Frame dialog box opens allowing you to specify which frames in the sequence to remove You can enter the timecode of the frames in the Start and End spin boxes or use the Mark In and Mark Out buttons on the Preview control bar Replacing frames The Frame Replace Source Video command...

Page 24: ...ify what to replace the frames with in the Link with group box The Empty frame option replaces the frames with the current film color while the Source video option uses frames from the source video file starting from the position specified in the Timecode spin box Select the Only preview source video option if you do not want the preview video to display any edits currently in the Paint layer 4 Cl...

Page 25: ...e this option clear 2 Levels of undo redo specifies the maximum levels of undo redo allowed by Video Paint up to 99 As Video Paint allocates more memory for each level of undo redo you may find that too high a level adversely affects performance In such cases restrict the level to 3 4 only You can of course choose not to have undo redo to maximize performance but any editing performed is final 3 C...

Page 26: ...uence to the first frame after it has been played like a CD player When clear the sequence stops on the last frame after playing like coming to the end of a tape in the VCR 7 Play macro after recording plays a macro immediately after recording it Leave this clear if you are content with your macro recording or if you want to test it yourself on another frame PREFERENCES DIALOG BOX PREVIEW TAB The ...

Page 27: ...space is allocated for virtual memory as well as how much space is allocated in RAM for use by all programs 1 Define additional folders for virtual memory allows you to specify the folder used by the programs as additional working space For example when you don t have enough RAM the programs can use extra memory from the hard disk virtual memory as temporary RAM The first folder shown in the Memor...

Page 28: ...ghting and temperature can also affect a monitor s performance 1 Hi Color dithering allows you to improve the display of True Color images when you are in Hi Color display mode 2 View images with a common palette displays all images using the system palette This is only enabled when you are in 256 Color display mode and makes your work more efficient as there is no need to repaint any of the image...

Page 29: ...rated monitor both of these squares should look approximately the same 2 Examine the two color squares and if the two squares look different adjust the Monitor gamma spin box until the bottom square looks similar to the top square The monitor gamma value can be any number from 0 01 to 7 99 If none of the squares exactly match try and estimate the best match In general your value should fall within...

Page 30: ...VIDEOGRAPHICS LAB USER GUIDE 26 ...

Page 31: ...ls enable you to easily touch up and enhance any frame in your video project The painting tools them selves present a variety of functions from the advanced Retouch and Clone tools to the more common Paintbrush and Transform tools Chapter 2 ...

Page 32: ...various painting and retouching tasks Ruby Mask mode The Ruby Mask mode is useful when you want to create a video or image matte that protects certain areas of an underlying video from any edits you may perform Mattes are often used in conjunction with Video Editor A good example of this is a hold out matte that is used to remove the matte lines that often occur around objects which have been film...

Page 33: ...e Shape tab of the Brush panel Now when you paint the ruby mask is applied 5 Select the next frame and click Edit Duplicate Last Paint Layer The paint layer from the previous frame is copied to the current frame Once duplicated you can start painting on it as in the previous step 6 Repeat steps 4 and 5 until the matte is complete If the object you are creating the matte over does not move then you...

Page 34: ...y the onionskin in the Overlay combo box Use Succeeding frames if you are editing frames to the right of the active frame toward the last frame or Preceding frames if you are editing frames to the left toward the first frame 6 Specify a value in the Number of frames spin box The value you enter here determines how many frames the onionskin layers appear over In most cases a value of 3 4 is suffici...

Page 35: ...oses and the settings take effect immedi ately Painting over frames in Onionskin mode No Source Video mode When working on an image it can often get confusing trying to determine where the image starts and the edits end In such cases you can remove the image from view by selecting the No Source Video mode No Source Video mode removes the image from the edit window and replaces it with the current ...

Page 36: ... selection a dotted line appears around the edges of the selected area This dotted line is called the selection marquee The marquee can either be floating containing image data or non floating selecting the source video Floating selections appear in the paint layer of an image and are created whenever you move a selection area perform a transformation on a selection area paste a selection into an ...

Page 37: ... area the edges blend in slightly with the surrounding background An added feature of selecting in the paint layer is the Shrink button on the Attribute toolbar When you select this button any selection you make snaps to the edges of your edits as long as the edits are included in the selection Selecting regularly shaped areas The Shape tool allows you to select areas of an image based on a preset...

Page 38: ...your mouse allows you to draw precise curved segments clicking your mouse allows you to define straight line segments By combining both drawing techniques you can quickly outline selection areas that contain both irregular and straight segments When you have finished outlining the selection area double click to release the Lasso and Video Paint automatically selects all image data within the bound...

Page 39: ...large solid colored portions of an image such as a blue screen or patches of skin and clothing When you use the Magic Wand tool it operates in one of two modes Sample by Path or Sample by Area In Sample by Path mode dragging your mouse over an image creates a line that calculates the largest and smallest color values of the pixels under the line any values entered in the Similarity spin box are al...

Page 40: ...rs thereby selecting the entire image A value of 50 selects neighboring pixels that have values that differ from the pixel you click on by 50 For example if you click on a pixel with values R25 G60 B190 neighboring pixels with values between R0 G10 B140 and R75 G110 B240 are selected Adding to or subtracting from a selection area Once you ve created a selection area you may discover that you left ...

Page 41: ...ixel To move a selection marquee to another frame first copy it and then click Edit Paste As Mask see page 12 Working with color Before you start painting on images you need to select the color you wish to apply In Video Paint you can do this in a number of ways from picking colors out of a palette to selecting colors directly from an image At any time two colors are active the foreground and back...

Page 42: ...olor then replaces the current foreground color If you already know the RGB values of the color you want you can enter them directly in the appropriate RGB spin boxes Note When you run Video Paint for the first time the Color palette is docked to the program window in Compact mode and shows the colors of the default method To see all methods at the one time deselect the View Color Palette Compact ...

Page 43: ...ce or the amount of brightness from left to right When you move your mouse over any colors their respective RGB color values are displayed at the bottom of the dialog box and the color itself appears in the left color square If you click and hold your mouse button over a color a satura tion bar appears and allows you to select a specific color Releasing your mouse selects the color subsequently di...

Page 44: ... foreground and background squares on the Attribute toolbar The next time you select a color the active color square changes Attribute toolbar of the Eyedropper tool Loading and saving color tables There may be times during your work that you find yourself continually using the same colors with which to paint You can store these colors as color squares on the Attribute toolbar of the Eyedropper to...

Page 45: ...everal frames To view the painting tools click the Paint tool button on the Tool panel The Brush panel opens and all the various brushes are displayed along the Attribute toolbar To apply a paint tool select the brush to use and then click and drag over the areas of the image where you want the paint to appear For greater control over which areas are affected select the area and or zoom into the i...

Page 46: ... using BRUSH PANEL SHAPE TAB 1 Height specifies the height of a brush You can also drag the vertical slider to the right of the preview To keep aspect ratio click the Lock button 2 Width specifies the width of a brush You can also drag the horizontal slider at the bottom of the preview To keep aspect ratio click the Lock button 3 Eraser Mode removes previously applied paint from the paint layer 4 ...

Page 47: ...rmines how paint is applied to an image Depending on the tool you can choose one of the following Always replaces the original colors with the painted color Hue and Saturation applies only the hue and saturation values of the painted color Hue Only applies only the hue value of the painted color Saturation Only applies only the saturation values of the painted color Luminosity Only applies only th...

Page 48: ...he resulting color For example if the resulting color is black the inverse will be white Pigment applies the color which is produced from blending the painted color with the original colors much in the same way an artist creates new colors by mixing paints 2 Freehand defines the drawing mode as Freehand Freehand mode mimics painting by hand applying paint as you move your mouse 3 Straight Line def...

Page 49: ...vice installed these options are disabled 2 Spacing determines how close each drop of color is applied as a percentage to the current brush size The higher the value the farther away drops are applied Likewise a lower value applies color closer together For example a value of 100 places each drop of color next to each other creating a dotted line effect whereas a value of 300 places each drop of c...

Page 50: ... over it with a paintbrush in the Erase mode This removes the white from the paint layer revealing the underlying image This is a good technique for creating quick video mattes Transforming selections After you ve made a selection area you can change its shape size and orientation using the Transform tool When you click the Transform tool button on the Tool panel the Attribute toolbar changes to s...

Page 51: ...e available attributes for the selected tool 2 Hold down the SHIFT key and click your mouse over the area you wish to clone This area is marked with a crosshair and the mouse pointer changes to the clone pointer You can clone from the same image or from another edit window 3 Move to the area on the image where you want the clone to appear and start dragging your mouse The crosshair changes to indi...

Page 52: ...dow to another Using the Retouch tool The Retouch tools are not strictly painting tools in the sense that they do not paint over an image with a selected color Instead they are used to touch up areas of an image to either enhance them remove errors or perform special effects such as smudging and warping When you apply a Retouch tool the tool uses the shape and size of the current brush each time y...

Page 53: ...h by first creating a selection area You need to be in Composite mode before you can start using a Retouch tool Once you have edited an image you can switch to Paint Layer mode to work on just that area Original Colorize Pen Dodge Burn Blur Sharpen Tonal Adjustment Smudge Saturation Warping Smear Remove Scratch Remove Noise Color Transform Pen Remove Red Eye ...

Page 54: ...emoves intensity from colors making them lighter Warping distorts an image as you drag your mouse Transparency determines the transparency of the paint as it is applied Wet adds water to the paint making it blend more smoothly with the colors of an image Dry removes water from the paint making it appear more distinct from the colors of an image Smear controls the amount of paint overrun Note The a...

Page 55: ...so undo any actions which are ignored when you play the macro back 3 When finished click the Macro button again to end the recording The Add To Library dialog box opens 4 Select the folder in the Macro gallery where you want to store the macro and then enter a name for the macro in the entry line below the thumbnail image as well as a brief description in the Annotation box 5 Click OK The macro is...

Page 56: ...ver each frame click either the Progressive or Regressive options Progressive starts the playback of the macro from the first stroke of the macro to the last while Regressive starts from the last stroke to the first If you want to determine where the macro should start playing back from other than the top left corner of the edit window select the Manually place top left corner in frame option 6 Cl...

Page 57: ... from the Production Library and locate the filter you want to apply from one of the available folders You can also select the filter by going directly to its command in the Video Filters menu 3 Drag and drop the filter you want to apply onto the edit window to open the filter s dialog box By double clicking on the filter s thumb nail you can see a preview of the type of filter and its options 4 A...

Page 58: ...specify determines how many frames are previewed when you perform a flick Backward frames are flicked first followed by forward frames You may want to have a few backward frames included in the flick to give you a reference as to what occurs before the flick reaches your edited frames 3 Select the speed to perform the flick at using the Speed group box 4 Specify the area on the frame you want to f...

Page 59: ...elect the frames you want to preview When ready click the Preview Selection button or View Preview ENTER to create the pre view Note Using the Navigator you can also step through each frame in the sequence as well as preview the entire clip by clicking the Preview button Managing preview files You can quickly check on how much space your preview files occupy by clicking File Preview Files Manager ...

Page 60: ...VIDEOGRAPHICS LAB USER GUIDE 56 ...

Page 61: ...57 Shortcuts Video Paint has many shortcuts that allow you to access commands and open dialog boxes without having to go through the menus ...

Page 62: ... Preferences dialog box Ctrl Q Exits Video Paint Edit Menu Ctrl Z Undo the last command Ctrl Y Redo the last command Ctrl X Cuts the current selection Ctrl C Copies the current selection to the clipboard Ctrl V Pastes the contents of the clipboard as a selec tion Del Deletes the current selection Ctrl K Duplicates the last floating selection Ctrl L Duplicates the last Paint Layer Ctrl F Opens the ...

Page 63: ... in window by 1 2 x Frame Menu Ctrl Home Go to previous cue Ctrl Left arrow Go to previous frame Ctrl Right arrow Go to next frame Ctrl End Go to next cue Ctrl G Opens the Go To dialog box Esc Stops the current video from playing or flicking Window Menu Shift F5 Cascade Shift F4 Tile vertically Help Menu F1 Displays the contents for Video Paint Help ...

Page 64: ...it menu as a floating menu Double click on file Title Bar Maximizes or restores current window Double click on Toolbar or Tool Panel title bar Closes window Double click on Status Bar Displays Preferences dialog box Shift click on Filmstrip Scroll Bar Displays the next or previous frame in the Strip View Ctrl click on Filmstrip Scroll Bar Displays the next or previous set of frames in the Strip Vi...

Page 65: ...1 Cutting selections 11 D Deleting frames 19 Display modes 28 No Source Video 31 normal 28 onionskin 30 Ruby Mask 28 Duplicating 12 frames 19 E Edit windows 17 Eyedropper tool 40 F Files creating 10 saving 7 Filling an area with color 46 Filmstrip panel 6 settings 6 Filters applying 52 Flicking 54 Frames deleting 19 duplicating 19 inserting 18 replacing 19 G Global viewer 16 I Inserting frames 18 ...

Page 66: ...Preferences 21 Previewing 53 flicking 54 managing preview files 55 Projects new 10 packaging 8 rendering 10 R Recording macros 50 Replacing frames 19 Retouch tool 48 Ruby Mask mode 28 S Saving 7 Selecting colors 39 with the eyedropper 40 Selection area marquee hiding 32 Selection areas adding or subtracting to 36 color fill 46 color similarity 35 determining 36 composite mode 33 irregular shapes 3...

Page 67: ...er 16 inserting frames 18 lasso tool 34 macros 50 Magic Wand tool 35 opening videos 9 specific duration 9 packaging components 8 paint tools 41 painting 27 pasting 12 masks 12 power duplicate 13 preferences 21 previewing 53 flicking 54 projects new 10 rendering 10 replacing frames 19 retouch tool 48 saving 7 selection areas color fill 46 color similarity 35 composite mode 33 irregular shapes 34 ma...

Page 68: ...VIDEOGRAPHICS LAB USER GUIDE 64 ...

Page 69: ......

Page 70: ...ool 20 Using the Shape tool 21 Using the Freehand tool 22 Using the Path tool 23 Selecting and transforming objects 24 Selecting multiple objects 25 Grouping objects 25 Layering objects 25 Moving objects 26 Transforming objects 26 Using the Envelope tool 27 Adjusting shapes 28 Creating a moving path 30 Changing the shape of a moving path 31 Changing the size and style of an object over time 32 Cha...

Page 71: ...ssive titles and motion graphics that you can use in Video Editor projects or as standalone video and image files With CG Infinity you can easily produce television and film quality opening and ending credits as well as an extensive range of both regular and freehand graphical objects Chapter 1 ...

Page 72: ... need to create a new edit window At the center of the edit window is a frame indicating the size of the video frames for your CG project Everything outside the frame is part of the pasteboard area which can be used for storing objects or for placing objects outside of the frame before moving them into view You control the size of the pasteboard in the Preferences dialog box see page 13 While a CG...

Page 73: ...me mode Redo an undone action Undo a previous action Bring an object to the front Bring an object forward Send an object backward Send an object to the back Show the Time Control Panel Show the Object Style Panel Show the Production Library Object tool Shape tool Freehand tool Envelope tool Eyedropper tool Default object style Adjust tool Path tool Moving Path tool Text tool Zoom tool ...

Page 74: ...the frame size and video properties of the project Once created you can begin adding text and objects and then manipulate them with various drawing tools When you are finished you can create a video file of your work or insert the CG Infinity project into Video Editor as part of a larger project To create a new CG Infinity project 1 Click the New button on the Standard toolbar or File New CTRL N t...

Page 75: ...log box 2 Select the type of background you want from the Background source group box You can select a general background color by right clicking on the color square and selecting a color from the pop up menu that appears You can also enter the RGB values for a color directly into the RGB spin boxes To use an existing image or video file click on the appropriate option and then click the Select bu...

Page 76: ... and panels present click View Hide Menu Bar This removes the title and menu bars of the CG Infinity screen only leaving all other screen elements present You can still use the menu commands with their keyboard shortcut keys To return to the Normal screen mode press the ESC key Viewing objects In CG Infinity you can view objects in one of two modes Preview or Wireframe Preview mode displays object...

Page 77: ...Creating video and image files Once you have finished working on a CG Infinity project you can create a new video or image file that combines the project s objects with the current background To create a video file click File Create Video File This opens the Create Video File dialog box which has the same options as Video Editor To create an image file click File Create Image File This opens the C...

Page 78: ...CTRL V This places the object in the center of the current view To paste only certain attributes such as the fill color or shadow click Edit Paste Object Style This opens the Paste Object Style dialog box which allows you to select which attributes to paste Once you click OK the attributes are pasted to all selected objects If no objects are selected this command is disabled Two other paste comman...

Page 79: ...surement in pixels with the base reference point X 0 Y 0 at the top left corner of the frame in the edit window You can reset this reference point by dragging the intersecting ruler lines from the Base Point button at the corner of the rulers to any position in the edit window This is especially helpful if you have zoomed in on an object and want to reset your ruler at a new view Note Double click...

Page 80: ... vertical spacing between each point in the grid If you want your objects to snap to grid points or guides select the Snap to distance option and specify the range within which a snap should occur For example a range of 5 pixels pulls an object to a grid point whenever it is placed within 5 pixels of that grid point s position Notes Snap to works on the rectangular area of an object s bounding box...

Page 81: ...iate option if you plan on having your video played back on an NTSC or PAL device such as a television If you are designing for monitor display only leave this option clear 2 Levels of undo redo specifies the maximum levels of undo redo allowed by CG Infinity up to 99 As CG Infinity allocates more memory for each level of undo redo you may find that too high a level adversely affects performance I...

Page 82: ...e area marquee click View Title Safe Area 5 Object movement defines how far an object moves when you use the arrow keys to adjust its position 6 Object selection method defines how objects are selected with the Object tool Inside selects objects that fall within the marquee of a new selection and Touch selects objects that are touched by the marquee of a selection area In most cases use Touch as i...

Page 83: ... in its ability to create and manipulate objects Using a wide range of drawing tools you can easily create these objects by tracing over existing images drawing your own shapes or using the Text tool to create impressive titles and text effects Chapter 2 ...

Page 84: ...s particularly useful for text objects Leave this clear if you want a sharp edge such as with square or rectangular objects 3 Transparency controls how transparent an object appears The first option Normal Transparency provides an even transparency over the entire object based on the value entered in the neighboring Transparency spin box A value of 0 has no transparency and 100 full transparency T...

Page 85: ...he third option Gradient fills an object with a special gradient pattern To choose the gradient click the color square to open the Magic Gradient dialog box and select a gradient from one of the available methods The final option Texture fills an object with a special texture pattern To choose this texture click on the color square to open the Magic Textures dialog box and select a texture from on...

Page 86: ...ECT STYLE PANEL SHADOW TAB 1 Shadow options determine the type of shadow to apply to an object The first option None does not apply any shadow while the second option Drop applies a drop shadow You can specify the position of the shadow in the X and Y spin boxes as well as control its transparency and the amount of soft edge in the Transpar ency and Soft edge spin boxes The third option Glow appli...

Page 87: ...changes accordingly to reflect the new style You can also change the default style by dragging and dropping a style directly from the Style gallery in the Production Library to the graphic on the Tool panel If you wish to apply the default style to another object first select the object and then choose the Use Default Style command from the right mouse pop up menu Creating text and shape objects C...

Page 88: ... 2 Select the font you want to use as well as any other font characteristics such as size bold and italics You can also specify the alignment of the text as well as the kerning and leading Note Kerning decreases the amount of space between letters in a word making it appear tighter while leading affects the spacing between words on different lines The default 100 uses the font s own leading with l...

Page 89: ...t corner down as you draw The second option Equal Sides ensures that the sides of the shape are all of equal length If not selected you can draw a shape with variable width and height The final option Fixed Size allows you to specify the exact width and height of an object in the neighboring Width and Height spin boxes Selecting this option disables the Equal Sides option Another option Sides is o...

Page 90: ...ety of shapes with the Shape tool Using the Freehand tool The Freehand tool allows you to create any kind of shape you want by allowing you to draw it with your mouse This is particularly useful for tracing over elements in a background video or image file such as a person s head or a corporate logo Once you have finished drawing your path CG Infinity then places nodes in positions on the path whe...

Page 91: ...ase the value in the Accuracy spin box on the Attribute toolbar 4 When you are satisfied with the accuracy of your path switch to the Object tool or click outside the area to place the shape as an object If you chose an Open Path you need to specify a line width and fill color in the Object Style Options panel to see the path clearly Using the Path tool The Path tool is similar to the Freehand too...

Page 92: ...e Open Path button on the Attribute toolbar This fills the line of the shape only leaving the contents clear To view an open path you need to specify a line width in the Object Style Options panel Selecting and transforming objects Once you have created an object you can move and manipulate it in a variety of ways The easiest is with the Object tool which allows you to select objects and then move...

Page 93: ...al copies Grouping objects is especially useful at the end of a project when you have layered them in their final positions To group objects select them and then click Edit Group To ungroup them select the grouped object and then click Edit Ungroup Layering objects An important part of working with objects is being able to layer them on top of and behind one another to create a variety of effects ...

Page 94: ...g box of a selected object Depending on the type of transform you are performing these handles appear either on the sides and corners of the bounding box or just the corners To manipulate the actual path of an object you need to use the Adjust tool see page 28 Using the Object tool The Object tool provides five options on the Attribute toolbar for resizing and rotating an object The first option R...

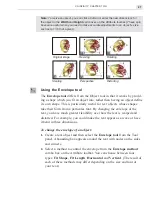
Page 95: ...r form from a particular font By changing the envelope of the text you have much greater flexibility over how the text is warped and distorted For example you could make the text appear as a wave or have it bend in three dimensions To change the envelope of an object 1 Create a text object and then select the Envelope tool from the Tool panel A bounding box appears around the text with nodes on th...

Page 96: ... Adjust tool The Adjust tool is particularly useful if you have traced an object or created your own freehand drawing and need to modify it so that it better takes the shape you want To adjust a path 1 Select the Adjust tool from the Tool panel The Attribute toolbar changes to display the options for adjusting a path Nodes also appear on the path of the selected object You cannot adjust the path o...

Page 97: ...ctive only if the Curved Node option is selected This option is best for performing general changes to a path s curvature Smooth Node changes the curvature of the path between the preced ing following and active nodes allowing you to change the length of the control handles independently from each other they still remain on a linear path Use this option for greater control over the curvature with ...

Page 98: ...tool and then click Edit Delete DELETE If there is no moving path the object is deleted To create a moving path 1 Position the object where you want it to start its movement and then select the Moving Path tool from the Tool panel The Attribute toolbar changes to display the various options available and Start and End nodes appear on the selected object Note Selecting the Moving Path tool should o...

Page 99: ...same options as the Adjust tool see page 28 To create greater move ment you can add nodes anywhere along the path and edit them as you would with the Adjust tool To assign the path of an object as a moving path first select the object and then copy it Now select the object you want to move and click Edit Paste Object as Moving Path The path of the copied object now appears in the center of the sel...

Page 100: ...ng the Object Style Panel as well as the resize buttons on the Attribute toolbar If you are changing the style any changes to the fill color options produces a fade effect from one to the other as long as two fill colors are of the same type for example going from a gradient fill to another gradient fill If the types are different no fade occurs and the style changes only at the second key frame p...

Page 101: ...ect has less distance to travel within the same time period To change the speed of an object 1 Select the object you want to change with the Moving Path tool The moving path of the object appears 2 Click a key frame in the Time Control Panel The object moves to that position on the moving path 3 Drag on the bounding box of the object and move it to where you want it to appear at that point in the ...

Page 102: ...g File Properties To change the start time of a moving object 1 Select the object you want to change with the Moving Path tool The moving path of the object appears 2 Move the Preview slider in the Time Control Panel to the frame where you want the object to begin its movement and click the Add Key frame button The object moves to that position on the moving path 3 Drag on the bounding box of the ...

Page 103: ...end 4 Move the Preview slider to the start or click on the Start Key frame to return the object back to its beginning position 5 Click the Play button to see the motion of the object Performing minor adjustments in time After laying out all your objects and specifying their various moving paths you may find that you need to go back and adjust the timing of a particular object by a few frames but d...

Page 104: ...VIDEOGRAPHICS LAB USER GUIDE 36 ...

Page 105: ...37 Shortcuts CG Infinity has many shortcuts that allow you to access commands and open dialog boxes without having to go through the menus ...

Page 106: ... and places it onto the clipboard Ctrl C Copies a selection onto the clipboard Ctrl V Pastes the clipboard data into the current project as an object Ctrl A Selects all objects in the current project Del Deletes a selection or object View Menu Resizes the image on the screen for better detail Resizes the image on the screen to see more of it at one time Ctrl U Removes all program element on the sc...

Page 107: ...w Double click toolbar or panel title bar Docking or floating the toolbar or panel Double click any toolbar Makes toolbar floating if docked or docks toolbar when floating Double click Status Bar Opens the Preferences dialog box Esc Closes dialog boxes without making changes ...

Page 108: ...VIDEOGRAPHICS LAB USER GUIDE 40 ...

Page 109: ...or tab 17 general tab 16 shadow tab 18 object tool 26 objects 6 aligning 12 changing across time 32 changing shape 28 defining style 16 freehand 22 layering 25 moving 26 shape 21 text 20 timing 33 34 transforming 26 working with 15 pasting object styles 10 objects 10 path tool 23 projects 6 9 reference background 7 rulers 11 saving 9 selecting objects 24 send to back 25 shadow tab 18 shape tool 21...

Page 110: ...6 adding color 17 adding shadows to 18 aligning 12 alignment 11 changing across time 32 default styles 19 defining attributes 16 defining style 16 dimensions 16 freehand 22 moving 26 moving paths 30 shape 21 text 20 timing 33 34 transforming 26 working with 15 P Pasting CG objects 10 styles 10 Path tool 23 Placing an object on a moving path 30 Projects 6 R Reference background 7 Ruler Unit 11 S Sa...

Reviews: