


03.06.2019
03.06.2019
11
10
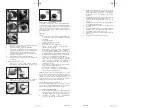
3.
Unscrew the dust removal element knob, turning it
anticlockwise, and take off the dust removal element.
4.
Remove the fabric filter/paper bag.
5.
Unscrew the HEPA filter, turning it clockwise to
remove it. Turn it anticlockwise to secure it.
6.
Install the dust removal element. Tighten the dust
removal element knob to secure the connection.
7.
Reinsert the fabric filter/paper bag.
8.
Secure the head on the vacuum cleaner tank and
secure with the clamps.
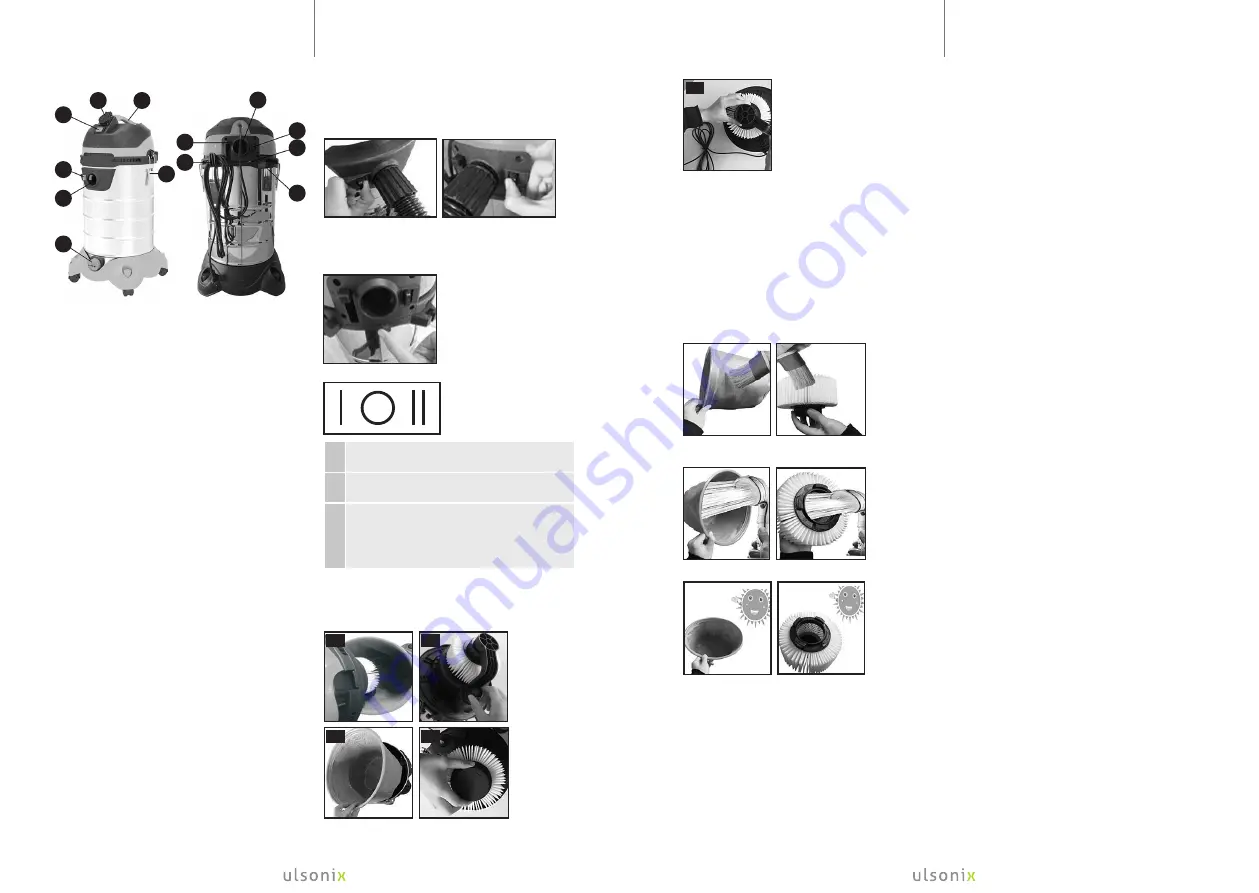
Washing the fabric/HEPA filter
1.
Remove dirt from the outside of the filter (preferably
with a soft brush).
2.
Rinse the dirt from the inside of the filter (shower
head spray is recommended).
3.
Dry the filter before use.
»
Glass/cans/needles/toothpicks,
»
Elements which may easily block the inside of the
hose (e.g., cords)
•
To avoid wear, do not use the hose or pipe to collect
dirt directly. Install the proper nozzle for the surface
being cleaned.
•
Do not block the air outlet (to avoid damage caused
by overheating).
•
Before use, check that the HEPA filter or fabric filter
has been installed. Failure to use the filter may cause
motor contamination or may block the engine.
In order to avoid motor overheating:
•
Do not use the device for more than half an hour.
Allow the device to cool down completely.
•
Do not use the device when the tank is full.
•
Do not use the device if the suction port, hose, pipe
or nozzle is blocked.
Filling the tank with water
When the tank is full of water, suction will stop and the
device will start to emit an unusual sound. The engine will
run at high speed. If this is the case, turn off the vacuum
cleaner immediately and disconnect it from the power
supply. Drain the water using the special water drain. Then
you may continue using the device.
If the vacuum cleaner tips over or starts vibrating
If the vacuum cleaner tips over or starts vibrating, turn it
off, disconnect it from the power supply, place it on a flat
horizontal surface and continue using the device.
3.4. CLEANING AND MAINTENANCE
a)
Unplug the mains plug and allow the device to cool
completely before each cleaning, adjustment or
replacement of accessories, or if the device is not
being used.
b)
Use only non-corrosive cleaners to clean the surface.
c)
After cleaning the device, all parts should be dried
completely before using it again. Do not use heat
sources to dry the device, as it may cause damage or
fire.
d)
Store the unit in a dry, cool place, free from moisture
and direct exposure to sunlight.
e)
Do not spray the device with a water jet or submerge
it in water.
f)
Do not allow water to get inside the device through
vents in the housing of the device.
g)
Clean the vents with a brush and compressed air.
h)
The device must be regularly inspected to check its
technical efficiency and spot any damage.
i)
Use a soft cloth for cleaning.
j)
Empty and clean the tank before and after each use.
k)
Regularly check the condition of the filter.
6
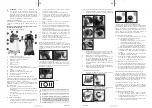
3.1. DEVICE DESCRIPTION
7
8
9
11
12
13
3
2
4
5
6
1
10
1.
Water drain plug
2.
Suction hose port
3.
Suction hose port lock
4.
I/O/II switch
5.
Electrical socket
6.
Carrying handle
7.
Locking clamp
8.
Power cord hook
9.
Slider- dust removal (from HEPA filter)
10. Blower connection
11. Blower connection lock
12. Blower control lever
13. Pipe holder
3.2. PREPARING FOR USE
Keep the device away from hot surfaces. Always use the
device on an even, stable, fireproof and dry surfaces.
Make sure that the device power supply matches its
nameplate specifications!
Before starting work, make sure that:
•
a fabric filter or HEPA filter is installed in the device
•
the clamps fixing the head to the tank are locked
•
the castors are fixed in the machine feet
3.3. DEVICE USE
1.
Connect the hose to the appropriate port as needed
(suction or blow) according to the hose port
instructions.
2.
Connect an additional device to the electric socket of
the vacuum cleaner if necessary.
3.
Connect the vacuum cleaner to the power supply.
4. Turn on the device using the I/O/II switch. The
description of the individual switch positions are
described later in this chapter.
5.
Start vacuuming.
6.
After finishing working with the vacuum cleaner:
a)
Switch off the vacuum cleaner using the I/O/II switch
b) Disconnect the vacuum cleaner from the power
supply and disconnect the additional device from
the vacuum cleaner's electrical socket
c)
Disconnect the flexible hose, pipe and pipe end.
Clean these parts.
d) Remove the head. The description of how to
dismantle and install the head can be found later in
this chapter.
e)
Clean the tank with a soft cloth.
f)
Remove, wash and dry the filter. The cleaning
method is described later in this chapter.
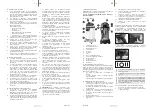
How to connect/disconnect the flexible hose
To connect/disconnect the flexible hose to the port, push
the locking button to the left on the suction port or to the
right on the blow port, and then insert/remove the flexible
hose end.
Controlling the blowing power
To increase the blowing power, slide the control lever to the
left. To reduce the blowing power, slide the control lever
to the right.
I/O/II switch functions
How to disassemble and assemble the head
1.
Turn the vacuum cleaner off and unplug it.
2.
Unclip the locking clamps and lift the head of the
device by pulling the carrying handle.
I
The vacuum cleaner is working, the electrical socket
is live.
O The vacuum cleaner is not working, the electric
socket is live.
II
The electric socket is live, the vacuum cleaner
switches on 7-10 seconds from the start of the
connected device. 7-10 seconds after switching off
the connected device, the vacuum cleaner switches
off.
2
3
4
5
Dust removal function (from HEPA filter)
The function is intended to facilitate maintenance and
cleaning of the HEPA filter. To use the function:
Turn off the vacuum cleaner and disconnect it from the
power supply, push and release the dust removal slider. The
slider quickly returns to the original position. Repeat the
operation several times.
Operating tips:
•
Do not vacuum the following items as it may lead to
technical failure or cause unpleasant smells:
»
Moisture absorbers,
»
Construction waste or extinguishing powder,
»
Animal waste, etc.,
EN
EN


