background image


Troubleshooting 


Problem 

Possible Cause 

Solution 

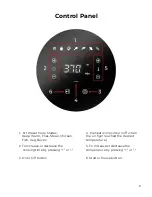
The air fryer does not 
work 

The appliance is not 
plugged in 

Plug the power plug 
into a grounded wall 
socket 

Did not set the time 

Tap the Time Buttons to 
set the cooking time 

The basket is not put 
into the appliance 
properly 

Place the basket into 
the appliance properly 

The ingredients fried in 
the air fryer are not fully 
cooked 

Too much food at once 
Or 
The set temperature is 
too low 

Put smaller batches of 
food into the basket for 
more evenly cook 
Tap the Temp 
Button to increase the 
cooking temperature 

The cooking time is too 
short 

Tap the Time+ Button to 
increase the cooking 
time 

The ingredients are fried 
unevenly in the air fryer 

Certain types of food 
need to be shaken 
halfway through the 
cooking time 

Take out the frying tray 
and shake it during a 
cooking process 

Fried food is not crispy 
when they come out of 
the air fryer 

You used a type of food 
meant to be prepared in 
a traditional deep fryer 

Use oven snacks or 
lightly brush some oil 
onto the snacks for a 
crispier result 

Failed to slide the pan 
into the appliance 
properly 

The basket is overfilled 

Do not fill the basket 
beyond max line 

White smoke comes out 
of the appliance 

You are preparing 
greasy ingredients 

When you fry greasy 
ingredients in the air 
fryer, a large amount of 
oil will leak into the pan. 
The oil produces white 
smoke and the pan may 
heat up more than 

Summary of Contents for TXG-AF15T

Page 1: ...1 Presto 1 5L 1 6 QT Air Fryer User Manual Friteuse À Air Presto 1 5L 1 6 QT Manuel de l utilisateur ...

Page 2: ...2 Table Of Content English Specification 1 Product Instruction 3 Cleaning 7 Troubleshooting 8 Français Spécifications 10 Instruction sur le produit 12 Nettoyage 16 Dépannage 17 ...

Page 3: ... that they do not play with the appliance Cleaning and user maintenance shall not be done by children unless they are older than 8 and supervised 5 Do not let the cord hang over the edge of table or counter Keep away from hot surfaces 6 To protect against electric shock do not immerse cord plugs or appliance in water or other liquid Do not plug in the appliance or operate the control panel with we...

Page 4: ...istance from the steam and from the air outlet openings 14 Also be careful of hot steam and air when you remove the pan from the appliance 15 After using the appliance the metal cover inside is very hot avoid contact with it after cooking Unplug from outlet when not in use and before cleaning Allow to cool before putting on or taking off parts and before cleaning the appliance 16 Immediately unplu...

Page 5: ...3 Product Diagram 1 Air Fryer Basket 4 Touchscreen Panel 2 Air Fryer Tray 5 Air Inlet 3 Handle 6 Power Cord ...

Page 6: ...k Chicken Fish Veg Bacon 4 Preheat icon will turn off when the air fryer reached the desired temperature 2 To Increase or decrease the cooking time by pressing or 5 To Increase or decrease the temperature by pressing or 3 On or Off button 6 Start or Pause button ...

Page 7: ...all packaging materials stickers and labels 2 Clean the cooking chamber with hot water dishwashing liquid and a non abrasive sponge 3 Wipe the inside and outside of the appliance with a cloth Using The Appliance 1 Place the appliance on a stable horizontal and even surface 2 Remove the cooking chamber from the air fryer Place crisping insert in the bottom of the Air Fryer See figure 3 4 ...

Page 8: ... 6 The unit will begin to preheat and preheat will light on the screen At the point the screen will show the current temperate of the unit and then begin to climb to the selected temperature Once the selected temperature is reached the until will beep and begin cooking NOTE If previously cooking in the unit at a higher temperature than selected the unit will need to cool down before the cooking pr...

Page 9: ...r at least 30 minutes 2 Clean the appliance after every use Do not clean the inside of the appliance with any metal kitchen utensils or abrasive cleaning materials as this may damage the non stick coating 3 Wipe the outside of the appliance with a moist cloth 4 Clean the cooking chamber and crisping insert with hot water some liquid detergent and a non abrasive sponge You can remove any remaining ...

Page 10: ...p the Time Button to increase the cooking time The ingredients are fried unevenly in the air fryer Certain types of food need to be shaken halfway through the cooking time Take out the frying tray and shake it during a cooking process Fried food is not crispy when they come out of the air fryer You used a type of food meant to be prepared in a traditional deep fryer Use oven snacks or lightly brus...

Page 11: ...ance or the end result The pan still contains grease residues from previous use White smoke is caused by grease heating up in the pan Make sure you clean the pan and basket properly after each use Contact us at www ultimacosa com ULTIMACOSA ...

Page 12: ...pour s assurer qu ils ne jouent pas avec l appareil Le nettoyage et l entretien par l utilisateur ne doivent pas être effectués par des enfants sauf s ils ont plus de 8 ans et sont surveillés 5 Ne laissez pas le cordon pendre sur le bord de la table ou du comptoir Tenir à l écart des surfaces chaudes 6 Pour vous protéger contre les chocs électriques n immergez pas le cordon les fiches ou l apparei...

Page 13: ... votre visage à une distance sûre de la vapeur et des ouvertures de sortie d air 14 Faites également attention à la vapeur et à l air chauds lorsque vous retirez la casserole de l appareil 15 Après l utilisation de l appareil le couvercle métallique à l intérieur est très chaud évitez tout contact avec lui après la cuisson Débranchez l appareil lorsqu il n est pas utilisé et avant de le nettoyer L...

Page 14: ...12 Diagramme du produit 1 Panier pour friteuse 4 Panneau d écran tactile 2 Plateau pour friteuse à air 5 Entrée d air 3 Poignée 6 Cordon d alimentation ...

Page 15: ...n légumes et bacon 4 Icône de préchauffage s éteint lorsque la friteuse à air atteint la température souhaitée 2 Pour augmenter ou diminuer le temps de cuisson en appuyant sur ou 5 Pour augmenter ou diminuer la température en appuyant sur ou 3 Bouton marche ou arrêt 6 Bouton de démarrage ou de pause ...

Page 16: ...ns 400 F 6 Mins 300 F 12 Mins 400 F 10 Mins 400 F 10 Mins Avant la première utilisation 1 Retirez tous les matériaux d emballage les autocollants et les étiquettes 2 Nettoyez la chambre de cuisson avec de l eau chaude du liquide vaisselle avec une éponge non abrasive 3 Essuyez l intérieur et l extérieur de l appareil avec un chiffon ...

Page 17: ... une finition plus croustillante REMARQUE Ne remplissez pas trop la chambre de cuisson car cela pourrait nuire à la qualité des aliments 4 Remettez la chambre de cuisson dans la friteuse à air en la faisant glisser 5 Branchez l appareil dans une prise murale à trois broches avec mise à la terre L icône On Off s allume 6 L appareil commencera à préchauffer et le mot preheat s allumera à l écran À c...

Page 18: ...uisson pendant quelques minutes supplémentaires Attention Il peut y avoir un excès de liquide au fond du panier une fois la cuisson terminée Veuillez ne pas retourner le panier à l envers Nettoyage 1 Retirez la fiche principale de la prise murale et laissez l appareil refroidir pendant au moins 30 minutes 2 Nettoyez l appareil après chaque utilisation Ne nettoyez pas l intérieur de l appareil avec...

Page 19: ...ns la friteuse à air ne sont pas entièrement cuits Trop de nourriture à la fois Ou La température réglée est trop basse Mettez de plus petits lots d aliments dans le panier pour une cuisson plus uniforme Appuyez sur le bouton Température pour augmenter la température de cuisson Le temps de cuisson est trop court Appuyez sur le bouton Temps pour augmenter le temps de cuisson Les ingrédients sont fr...

Page 20: ...re des ingrédients gras dans la friteuse à air une grande quantité d huile s écoule dans la poêle L huile produit une fumée blanche et la poêle peut chauffer plus que d habitude Cela n affecte pas l appareil ni le résultat final La casserole contient encore des résidus de graisse provenant d une utilisation précédente La fumée blanche est due au réchauffement de la graisse dans la casserole Veille...

Reviews: