Attaching Main Assembly to Wall (cont.)
9. You will now use the assembly as a template to locate and mark the remaining three pilot holes.
a. Rotate the assembly to a horizontal position.
b. Place a level on top of the back plate.
c. Ensure that the assembly is level and, using a pencil, mark the position of the remaining
three pilot holes. Verify that all holes are centered over studs.
10. Rotate the assembly out of the way and pre-drill the remaining three pilot holes.
11. Rotate the assembly back into place. Insert the remaining Lag Bolts and Large Washers into the
pilot holes and tighten each Lag Bolt about half way. Do not completely tighten the bolts until all
four bolts have been started. Then tighten all Lag Bolts.
12. Pat yourself on the back. You have successfully mounted the Dip Station Assembly to the wall.
Attaching Backrest, Armrests and Grips to Main Assembly
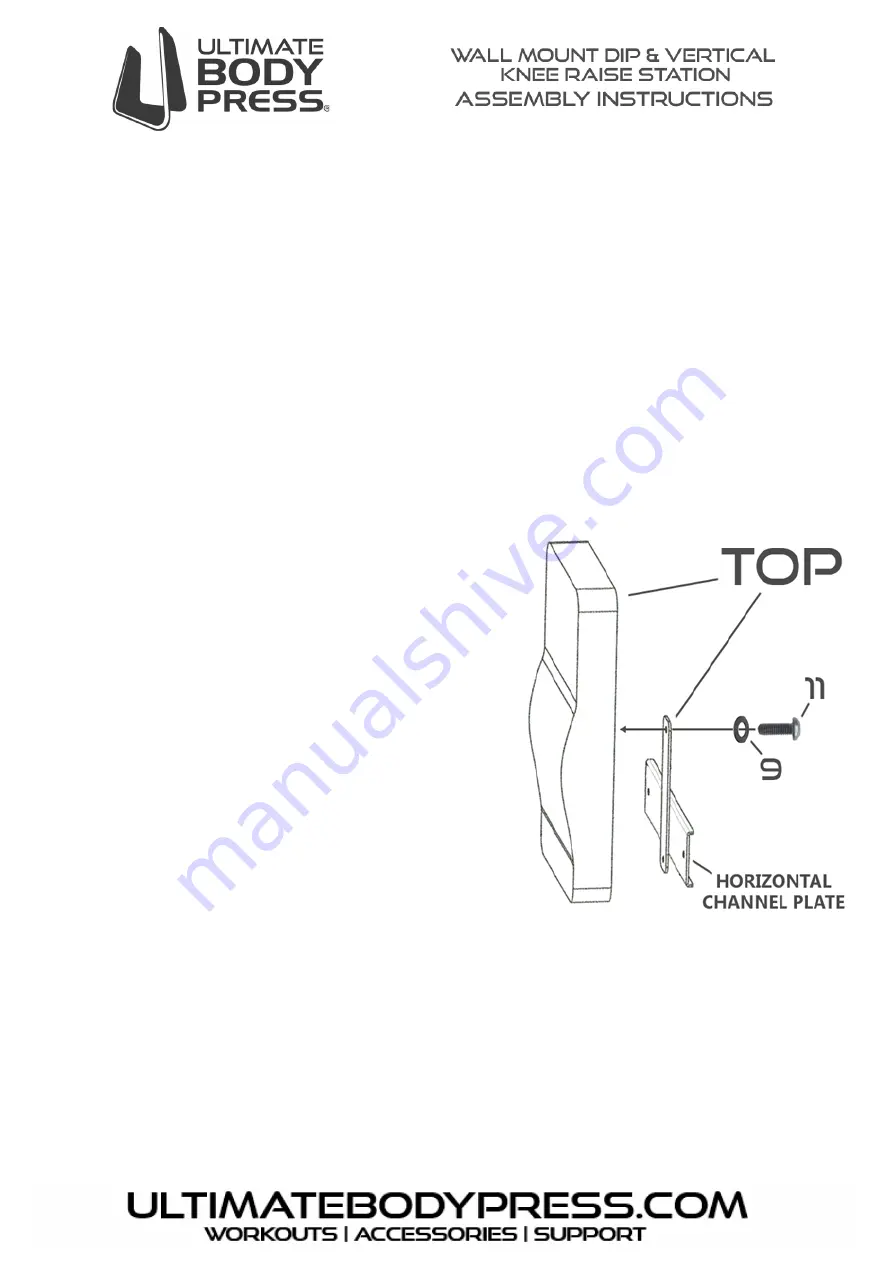
1.
Locate the Backrest (Part #3) and Backrest
Mounting Bracket (Part #4). Note that both pieces
have a top and a bottom and need to be oriented
correctly for proper assembly. Attach the Backrest
to the Mounting Plate using two Small Allen Bolts
and Small Washers. Before tightening, verify that
the Horizontal Channel Plate is approximately 3
1/2 inches from the lower edge of the Backrest. If
the Horizontal Channel Plate appears centered on
the backrest, reattach as shown before attempting
to mount the Backrest to the Dip Station Assembly.
2. Mount the Backrest and Horizontal Channel Plate
Assembly to the back plate of the Dip Station
Assembly using two Small Allen Bolts and Small
Washers. Verify that the thicker lumber support
area of the backrest is closest to the floor.
3. Locate the two Armrests (Part #5). You will notice a
seam on one end of the Armrests. The seams
should face the wall so they are out of view when the Armrests are attached to the Dip Station
Assembly.
4. Attach the two Armrests to the Dip Station Assembly using 4 Large Allen bolts and 4 Small
Washers.
5. Locate the Vertical Hand Grips (Part #6). Insert them into the 1-inch holes in front of the Armrests.
Attach the Grips using 2 Small Allen bolts and 2 Small Washers.
6. Carefully examine your installation to ensure that all bolts are tightened and that the dip station is
securely fastened to the wall.


