background image


Page 

9

 of 

24


Issue: 5 - 13/02/2019 
 

7. Installation and Set-Up 


7.1  Setting up mattress 


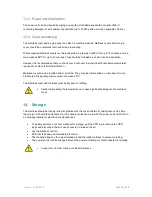
For the comfort and safety of the patient do not put them onto the mattress until you are sure that the 

mattress is properly secured and the system indicates that it is fully inflated. The mattress is designed 

to completely replace any existing mattress which may be in use on a bed. 


Remove any existing mattress and ensure that there are no protruding parts or sharp objects on the 

bed which could cause damage to the mattress. Lay the mattress on the bed patient surface ensuring 

that the air pipe connector is situated on the bottom left hand side of the bed foot end (as viewed from 

the foot of the bed). There are security straps fitted to the base cover of the mattress which should be 

fastened loosely to convenient points on the bedframe patient surface. 


Caution: Ensure when fixing the mattress to the bed the security straps are only 
fitted to the moving parts of the mattress platform. Straps secured to the fixed parts 
of the mattress platform will damage the bed/mattress when operated. 


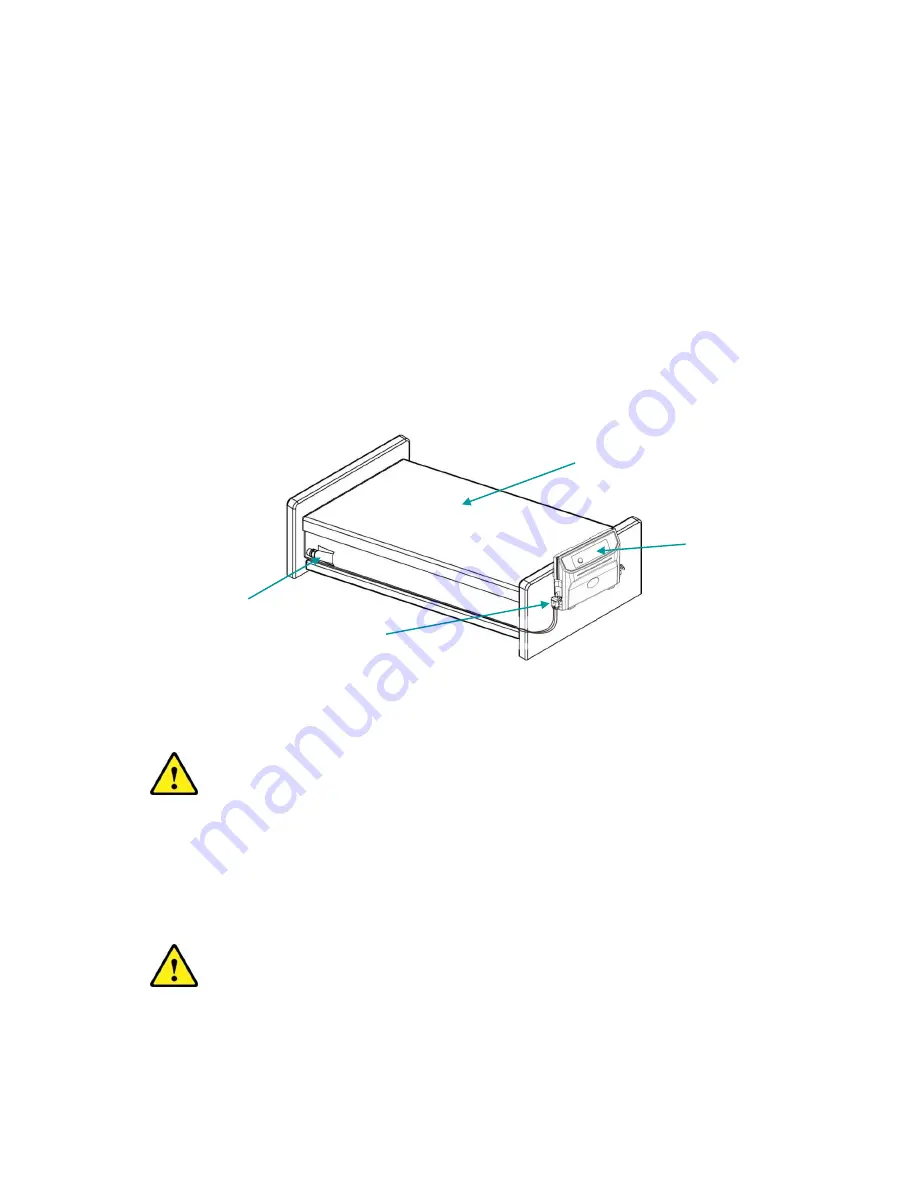
7.2  Setting up power unit 


Whilst holding the power unit, unfold the hanging hooks on the rear of the power unit and hang it from 

the beds footboard. If required the power unit can be placed on the floor at the foot of the bed. 


Caution: Ensure that the power cable is routed in such a manner so that it cannot 
be twisted, trapped, crushed or stressed. 
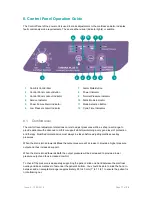


Pump Unit 

Mattress 

CPR Tag 

Air Pipe Connector 

HEAD END 

FOOT END 

Summary of Contents for Tamora Plus II

Page 1: ...Tamora Plus II Dynamic Mattress Replacement System UPRA367803 2 ________________________________________________ User Manual Issue 5 13 02 2019 UPRA367803 2 UM 5...

Page 2: ...Page 2 of 24 Issue 5 13 02 2019...

Page 3: ...level 11 8 2 Control panel lockout 12 8 3 Function mode switch 12 8 3 1 Alternate 12 8 3 2 Static 12 8 4 Alternate cycle time selection 12 8 5 Alarm mute 12 9 CPR Mode 13 10 Transport Mode 13 11 Alar...

Page 4: ...f the product 2 Intended Use The intended use of this product is to prevent and or manage pressure ulcers while optimising patient comfort for patients up to 200kg 31 5 stone 2 1 Contraindications The...

Page 5: ...e Management Fixings Air Pipe Connector 3 x Static Head Cells 13 x Standard Cells Removable Cover 2 Foam Base Compartment FOOT END HEAD END Knitted Cell Retention Bands Air Pipe Connection Point ON OF...

Page 6: ...that requires correct procedures or practises in order to prevent personal injury BF symbol indicates this product is according to degree of protection against electric shock for type BF equipment The...

Page 7: ...power cable e g by kinking shearing or other mechanical damages The power cable for this product must be unplugged from the mains power outlet socket and suitably stowed before moving cleaning or main...

Page 8: ...lassification Class II Type BF Warranty 2 years Operation environment 50C to 400C 15 RH 93 RH no condensation Storage environment 25 70 93 RH no condensation Environment pressure 70 kPa 101 3 kPa Wate...

Page 9: ...foot end as viewed from the foot of the bed There are security straps fitted to the base cover of the mattress which should be fastened loosely to convenient points on the bedframe patient surface Ca...

Page 10: ...pipe connector to the power unit and then ensure that the air tubes are free from any kind of obstruction and are not kinked Plug the power cable into a suitable electrical socket and switch ON using...

Page 11: ...within a safe pre set range to provide patients with enhanced comfort or support whilst maintaining a very good level of protection and therapy Qualified clinical advice must always be taken before a...

Page 12: ...d cycle time until another mode is selected 8 3 2 Static Pressing the Mode button until the Static indicator illuminates puts the system into Static mode Within this mode the mattress will maintain a...

Page 13: ...r pressures in the mattress will now equalise but maintain a degree of comfort This will maintain the cells in their present state for approximately 48 hours It is important to restore the Tamora Plus...

Page 14: ...that the mains switch is turned ON Check power unit for any blown fuses Low Pressure indicator is flashing and sounding Check to ensure that the CPR tag is securely fitted in place Check whether powe...

Page 15: ...unit in water Caution When cleaning disinfecting ensure that only a damp cloth is used Caution After cleaning dry the mattress out of direct exposure to sunlight Caution Using inappropriate detergent...

Page 16: ...le dried or air dried They may be tumble dried on a low heat for up to 90 minutes Drying temperature must not exceed 400C The mattress cover and mattress must be dry prior to refitting Caution Exceedi...

Page 17: ...or break For replacement please contact Ultimate Healthcare or your local distributor 15 2 Fuse replacement 1 Disconnect the plug from mains power when a blown fuse is suspected 2 Remove the cover of...

Page 18: ...Page 18 of 24 Issue 5 13 02 2019 16 EMC Information...

Page 19: ...Page 19 of 24 Issue 5 13 02 2019...

Page 20: ...Page 20 of 24 Issue 5 13 02 2019...

Page 21: ...Page 21 of 24 Issue 5 13 02 2019...

Page 22: ...Page 22 of 24 Issue 5 13 02 2019 Notes...

Page 23: ...Page 23 of 24 Issue 5 13 02 2019 Notes...

Page 24: ...ue 5 13 02 2019 Ultimate Healthcare Ltd Calmore Industrial Estate Nutwood Way Totton Southampton Hampshire SO40 3WW Tel 0333 321 8996 Fax 023 8066 2388 Email info ultimatehealthcare co uk www ultimate...

Reviews: