background image

GB/IE

TYRE HOLDER

Congratulations!

With your purchase you have chosen a product 

of very high quality.


§

INTRODUCTION

Get familiar with this product before 

assembling. Read the following 

assembly instructions and safety 

precautions carefully. Use the product only 

as described and only for the intended use 

as mentioned. Keep this manual for future 

reference. When passing on this product to third 

parties make sure to also hand over all relevant 

documentation.


§

INTENDED USE

The tyre holder is intended for storing tyre with / 

without wheels. Any use other than mentioned 

before or modifications to the product are not 

permitted and can cause injuries and / or 

damage to the product. The manufacturer is not 

liable for any damage resulting from unintended 

use. The product is not intended for commercial 

use. 


§

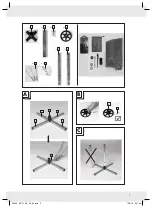
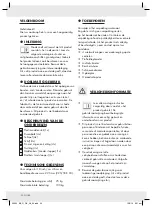
PART DESCRIPTION

1

  Plastic centrepiece (1x)

2

  Crossbeam (4x)

3

  Screw (4x)

4

  Disc (4x)

5

  Pin with rings and chain (4x)

6

  Washer (4x)

7

  Center length of pipe (without stopper) (1x)

8

  End length of pipe (with stopper) (1x)


§

TECHNICAL DATA

For 18 inch / approx. 46 cm wheel rims and tire 
section width of max. 225 mm (225/55 R 18).

Maximum load per each disc:  25 kg
Maximum total load: 

100 kg


§

ACCESSORIES

Remove all packaging materials.

Make sure there is no packaging residue left 

within the tyre holder. Check the delivery content 

for completeness and any potential transport 

damage. In case the product is incomplete or 

damaged, contact your dealer.


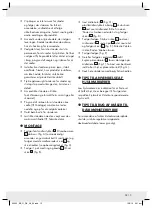
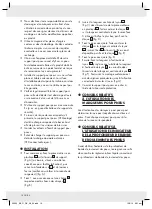
4 wheel markers for attachment to the valves 


Tire tread depth gauge


Air pressure tester


Protective cover


Screwdriver


Storage pouch


Hardware bag

SAFETY INFORMATION


Carefully read these assembly 

instructions before using the 

product. The instructions contain 

important information related to your safety 

and to the use and maintenance of the 

product.


Persons or children who are not capable of 

using this product safely due to their limited 

physical, sensory or mental capabilities, or 

lack of knowledge or experience, must not 

use this product unless they have been given 

supervision or instructions on the safe use of 

the product by a person responsible for their 

safety.


Observe all safety precautions in order to 

avoid damage from improper use! Observe 

all warnings on the product.


Keep the assembly instructions for future 

reference. When passing on this product to 

third parties make sure to also hand on these 

assembly instructions.


59005_BE_FI_DK_NL_04.indb   5

15/5/14   9:31 am

Summary of Contents for 59005

Page 1: ...GE POUR ROUES Instructions de montage et consignes de sécurité VELGENBOOM Montage en veiligheidsinstructies IAN 59005 3 done by Mukade Technical Documentation page size A5 Inter Union Technohandel GmbH Klaus von Klitzing Str 2 D 76829 Landau Pfalz www inter union de info inter union de IAN 59005 IU Art Nr 976333 Model No AZ 600 Version 07 2014 IAN 59005 59005_BE_FI_DK_NL_04 indb 1 2 15 5 14 9 31 a...

Page 2: ...hjeet Sivu 8 SE Monterings och säkerhetsanvisningar Sidan 11 DK Montage og sikkerhedsanvisninger Side 14 FR BE Instructions de montage et consignes de sécurité Page 17 NL BE Montage en veiligheidsinstructies Pagina 20 59005_BE_FI_DK_NL_04 indb 3 15 5 14 9 31 am ...

Page 3: ...3 A B C 1 1 x 2 4 x 3 4 x 4 4 x 5 4 x 6 4 x 7 1 x 8 1 x 1 2 2 2 2 4 5 3 59005_BE_FI_DK_NL_04 indb 3 15 5 14 9 31 am ...

Page 4: ...4 E G D F 5 8 7 7 59005_BE_FI_DK_NL_04 indb 4 15 5 14 9 31 am ...

Page 5: ...R 18 Maximum load per each disc 25 kg Maximum total load 100 kg ACCESSORIES Remove all packaging materials Make sure there is no packaging residue left within the tyre holder Check the delivery content for completeness and any potential transport damage In case the product is incomplete or damaged contact your dealer 4 wheel markers for attachment to the valves Tire tread depth gauge Air pressure ...

Page 6: ...he crossbeam 2 of the stand fig A if necessary use a rubber mallet to facilitate attachment and secure it with the screws 2 and screwdriver provided see storage pouch fig A Attach 1 pin with rings and chain 5 each to each of the discs 4 fig B Insert the center length of pipe 7 fig C into the opening of the plastic centrepiece 1 slide the disc 4 over the center length of pipe Insert the pin 5 throu...

Page 7: ...of at local recycling facilities Contact your local authority or municipality to get more information on the disposal of waste equipment WARRANTY This product comes with a warranty of 3 years starting on the date of purchase It extends only to the original end user and is not transferable Keep the purchase receipt as prove The warranty covers material or manufacturing defects but does not extend t...

Page 8: ... 18 Suurin sallittu kuormitus per välilevy 25 kg Suurin kokonaiskuormitus 100 kg LISÄTARVIKKEET Poista kaikki pakkausmateriaalit Tarkista että rengastelineen väliin ei jää osia pakkauksesta Tarkista myös että toimituksen sisällöstä ei puutu osia ja ettei osissa ole kuljetuksesta johtuvia vaurioita Jos tuote on puutteellinen tai vaurioitunut ota yhteyttä jälleenmyyjään 4 venttiileihin kiinnitettävä...

Page 9: ...non Tekniset tiedot ASENNUS Yhdistä ensin muovinen keskiosa 1 ja jalustaputket 2 toisiinsa kuva A käytä tarvittaessa kumivasaraa ja kiinnitä ne ruuveilla 2 käyttäen apuna toimitukseen sisältyvää ruuvimeisseliä katso säilytyspussi kuva A Kiinnitä yksi rengasketjullinen tappi 5 jokaiseen välilevyyn 4 kuva B Kiinnitä keskiputki 7 kuva C muovisen keskiosan aukkoon 1 aseta välilevy 4 putken alaosaan Pi...

Page 10: ...ikallisiin kierrätyspisteisiin Lisätietoja käytettyjen tuotteiden hävittämisestä voit kysyä paikkakuntasi viranomaisilta TAKUU Tuotteessa on 3 vuoden takuu ostopäivästä lähtien Se koskee vain ensimmäistä omistajaa eikä ole siirrettävissä mahdolliselle uudelle omistajalle Säilytä ostokuittia todisteena tekemästäsi hankinnasta Takuu kattaa vain materiaali ja valmistusvirheet mutta ei osien normaalia...

Page 11: ...lastning 100 kg TILLBEHÖR Ta bort allt förpackningsmaterial Se till att det inte finns några förpackningsrester kvar inuti däckhållaren Kontrollera att innehållet är komplett och efter eventuella transportskador Om produkten är ofullständig eller skadad kontakta din återförsäljare Hjulmarkörer för fastsättning på ventilerna Däckmönsterdjupmätare Lufttryckstestare Skyddskåpa Skruvmejsel Förvaringsf...

Page 12: ...G Fäst först mittendelen av plast 1 vid stativets tvärbalk 2 bild A om nödvändigt använd en gummiklubba för att underlätta ihopsättning och skruva fast den med de medföljande skruvarna 2 och skruvmejseln se förvaringspåse bild A Fäst 1 stift med ringar och kedja 5 vid vardera skiva 4 bild B Sätt i mittröret 7 bild C i öppningen i mittdelen i plast och skjut skivan 4 över mittröret Sätt i tappen De...

Page 13: ...rial Kassera vid lokala återvinningsanläggningar Kontakta din lokala myndighet eller kommun för att få mer information om omhändertagande av uttjänta produkter GARANTI Denna produkt levereras med en garanti på 3 år från och med inköpsdatumet Det gäller endast för den ursprungliga slutanvändaren och kan inte överlåtas Förvara inköpskvittot som köpbevis Garantin omfattar material eller fabrikationsf...

Page 14: ...Maksimal belastning pr skive 25 kg Maksimal total belastning 100 kg TILBEHØR Fjern al emballage Sørg for at der ikke findes rester af emballage inden i standeren Tjek at alle komponenter er indeholdt i leveringen og at der ikke er opstået transportskader I tilfælde af at leveringen er mangelfuld eller beskadiget skal du kontakte din forhandler 4 hjulmarkører til at sætte på ventilerne Måler til dæ...

Page 15: ...lladte Tekniske data MONTAGE Fastgør først midterstykket 1 til tværbommen 2 på basis fig A om nødvendigt anvendes en gummimukkert til samlingen og fastgør med de medleverede skruer 2 og skruetrækker se opbevaringstaske fig A Fastgør 1 pal med ring og kæde 5 til hver skive 4 fig B Isæt midterrøret 7 fig C i plastikmidterstykkets åbning 1 skub skiven 4 ned over midterrøret Bitte 5 in einen Kasten sc...

Page 16: ...tem Kontakt dine lokale myndigheder for at få information om bortskaffelse af brugt udstyr GARANTI Der ydes 3 års garanti på dette produkt startende fra købsdatoen Garantien gælder kun for den oprindelige køber og kan ikke overføres Gem købskvitteringen som garantibevis Garantien dækker materialer eller fabriksfejl men omfatter ikke sliddele eller skader der er opstået som følge af forkert anvende...

Page 17: ...de 225 mm max 225 55 R 18 Charge maximale par disque 25 kg Charge totale maximale 100 kg ACCESSOIRES Retirez tous les matériaux d emballage Assurez vous qu il ne reste aucun résidu d emballage dans le support pour pneus Veuillez vérifier si la livraison est au complet et que toutes les pièces ne présentent aucun endommagement lié au transport En cas de produit endommagé ou incomplet veuillez conta...

Page 18: ...erse 2 du support fig A au besoin utilisez un maillet en caoutchouc pour faciliter la fixation puis serrez la à l aide des vis 2 et du tournevis fournis veuillez vous référer à la sacoche de rangement fig A Fixez 1 axe avec anneaux et une chaîne 5 respectivement à chacun des disques 4 fig B Insérez la longueur centrale du tuyau 7 fig C dans l ouverture de la pièce maîtresse en plastique 1 faites c...

Page 19: ... environnement Mettre au rebut au centre de recyclage de votre localité Adressez vous à vos autorités locales ou municipales pour obtenir de plus amples informations sur la mise au rebut des équipements usagers Garantie Garantie de 3 ans sur cet appareil à partir de la date d achat uniquement valable pour le premier acquéreur non transmissible Veuillez conserver le ticket de caisse comme preuve la...

Page 20: ...25 55 R 18 Maximale belasting per schijf 25 kg Maximale totale belasting 100 kg TOEBEHOREN Verwijder al het verpakkingsmateriaal Zog dat er zich geen verpakkingsresten op het bandenrek bevinden Controleer de verpakkingsinhoud op volledigheid en eventuele transportschade Als het product niet volledig of beschadigd is neem contact op met uw handelaar 4 wielmarkeringen voor aanbrenging op de ventiele...

Page 21: ...evestig eerst het plastic middenstuk 1 aan de dwarsbalk 2 van het voetstuk fig A indien nodig gebruik een rubber hamer en maak vast met de meegeleverde schroeven 2 en schroevendraaier zie opbergtas fig A Bevestig 1 pin met ringen en ketting aan 5 elk van de schijven 4 fig B Breng de middenbuis 7 fig C in de opening van het plastic middenstuk 1 schuif de schijf 4 over de middenbuis Steek de pin 5 d...

Page 22: ...deze in bij uw lokaal inzamelpunt Neem contact op met uw gemeente voor meer informatie over het verwijderen van afgedankte apparatuur GARANTIE De garantie voor dit product is geldig voor een periode 3 jaar vanaf de datum van aankoop Deze garantie geldt alleen voor de originele eindgebruiker en is niet overdraagbaar Bewaar de aankoopbon als bewijs De garantie dekt om het even welke materiaal of fab...

Reviews: