

GB
GB
GB
GB
GB
GB
GB
SI
Uvod
Pred prvim začetkom uporabe se seznanite z izdelkom.
V ta namen pozorno preberite naslednja navodila za
uporabo in varnostna opozorila. Napravo uporabljajte
samo skladno z opisom in le za navedena področja uporabe.
To navodilo dobro shranite. Če napravo predate tretjim osebam,
jim izročite tudi vse dokumente.
Namen uporabe
Naprava je namenjena za preverjanje zračnega tlaka in globine
profila na avtomobilskih gumah. Uporaba v druge namene ali
spreminjanje naprave ni v skladu z določili in lahko vodi do ne-
varnosti poškodb oseb in / ali povzročitve škode na napravi. Za
škodo, nastalo pri nestrokovni uporabi, proizvajalec ne prevzame
jamstva. Naprava ni namenjena za profesionalno uporabo.
Opis delov
1
zamenjava baterij
2
merjenje pritiska v gumah v psi
3
merjenje pritiska v gumah v BAR
4
merjenje pritiska v gumah v kPa
5
globina profila avtomobilskih gum v mm
6
LCD prikazovalnik
7
Merilna konica (za vse globine profilov pnevmatik)
8
Pomični uravnalnik
9
Obesek za ključe
10
Tipalo za zračni pritisk
11
Pokrov predala za baterijo
12
Pasna zaponka
Obseg dobave
1 x Indikator zračnega tlaka v gumah s klipom za pas in
obeskom za ključe
HU
HU
HU
HU
HU
HU
HU
Az elemek hibás mentesítése miatt előálló
környezeti károsodások!
Az elemeket nem szabad a háztartási szeméttel mentesíteni.
Mérgező hatású nehézfémeket tartalmazhatnak és ezért külön-
leges kezelöést ígénylő hulladékoknak számítanak. A nehézfé-
mek szimbólumai a következők: Cd = kádmium, Hg = higany,
Pb = ólom. Ezért juttassa el az elhasznált elemeket egy községi
gyűjtőhelyre.
EMC
Az elem cseréje
Ha az LC-diszplén
6
megjelenik a
1
Nyissa fel az elemrekeszt és vegye ki belőle az elhasznált
elemet.
Helyezzen az elemrekeszbe egy új elemet (típus: 3 V ,
CR2032).
Utalás:
Eközben ügyeljen a helyes polarításra. Azt az
elemrekeszben megjelölték.
Zárja le az elemrekesz fedelét
11
.
Tisztítás és ápolás
Semmiesetre se használjon erre a célra folyadékokat és tisztí-
tószereket, mivel azok a készüléket megkárosítják.
A készüléket csak kivülről tisztítsa meg egy puha és száraz
törlőkendővel.
A készülék erősebb szennyeződése esetén használjon erre a
célra egy enyhén megnedvesített törlőkendőt.
Megsemmisítés
A csomagolás környezetbarát anyagokból áll,
melyeket a helyi újrahasznosító gyűjtőhelyeken tud
leadni.
A kiszolgált termék megsemmisítésének lehetőségeiről tájéko-
zódjon a községi vagy városi önkormányzatnál.
A kiszolgált terméket a környezetvédelem érdekében
ne dobja a háztartási hulladékba, hanem gondoskod-
jon a szakszerű hulladékkezelésről. A gyűjtőhelyekről
és azok nyitvatartási idejéről az illetékes önkormány-
zatnál tájékozódhat.
A hibás vagy elhasznált elemeket a 2006 / 66 / EC irányelv
értelmébenreciklálni kell. Juttassa vissza az elemeket és / vagy
a készüléket az ajánlott gyűjtőcégeken keresztül.
A gumiabroncs légnyomásának
a mérése
Utalás:
A gumiabroncs-légnyomás helyes mérését csak hideg
gumiaboncsoknál lehet elvégezni.
Tolja a készülék oldalsó részén található szabályzót
8
annyiszor enyhén lefelé, amig az LC-diszplé
6
a kívánt
mértékegységet (BAR, psi, kPa) kijelzi.
Dugja a készüléket a légnyomás-érzékelőjével
10
a gumi-
abroncs szelepére úgy, hogy abból levegő áramolhasson ki.
Várjon egy pillanatig, és utána a gumiabroncs légnyomá-
sának az LC-diszplén
6
való leolvasása céljából távolítsa
el a készüléket a gumiabroncs szelepéről. További mérések
alkalmával a készülék a gumiabroncs-légnyomás mért érté-
keit az LC-diszplén
6
aktualizálja.
A gumiabroncs profilmélységének
a mérése
Tolja készülék oldalán található toló-szabályzót
8
ütközé-
sig felfelé. A mérőhegy
7
láthatóvá válik és az LC-diszplén
6
megjelenik “mm“-ben a kijelzés.
Illessze a mérőhegyet
7
az abroncs profil közepén a futó-
felület egy profil hornyába (a futófelület a gumiabroncsnak
az a tartománya, amely előre haladás közben az úttesttel
érintkezik).
Nyomja a gumiabroncs-légnyomás ellenőrzőt a mintázat
felületére és utána távolítsa el a készüléket óvatosan a
gumiabroncsról.
Most az LC-diszplén
6
mm-ben leolvashatja a mintázat
mélységét. 4 mm-nél kisebb mintázatmélységnél az LC-
diszplé villog
6
, 2 mm-nél kisebb mintázatmélységnél
ezenkívül egy hangjelzés is felhangzik.
A készülék kikapcsolása
Ha a készüléket kb. 35 másodpercig nem működtetik, akkor az
automatikusan kikapcsol.
A készüléket ugyanúgy kézzel is kikapcsolhatja. Ebből a
célból tolja a kapcsolót lefelé és tartsa azt mindaddig
ebben a helyzetben, amíg az LC-diszplé kialszik
6
.
VIGYÁZAT! ROBBANÁSVESZÉLY!
Tartsa
az elemet a gyerekektől távol, ne dobja az ele-
meket tűzbe, ne zárja az elemeket rövidre és ne
szedje azokat szét.
Az előbbiekben megnevezett utalások figyelmen kivül ha-
gyása esetén az elem a végső feszültsége alá merülhet le.
Ebben az esetben kifutás veszélye áll fenn. Ha a készülé-
kében az elem kifutott, a készülék megkárosodásának az
elkerülése végett vegye ki azonnal belőle az elemet!
Kerülje el az elemnek a bőrhöz, szemekhez és a nyálkahár-
tyához való hozzáérését. Elemsavval való érintkezés esetén
mossa le az érintett helyet bőven vizzel és / vagy forduljon
orvoshoz!
Üzembevétel
Az elem behelyezése
Utalás:
Az üzembevétel előtt távolítsa el az elem és az elem-
rekesz között található elem szigetelő csíkot.
Nyissa fel az elemrekeszt.
Vegye le az elemrekesz fedelét
11
.
Távolítsa el az elem szigetelő csíkot.
Helyezze be az elemet a polarításának megfelelően.
A “
+
“-megjelölés a felső oldalon kell legyen.
Helyezze be az elemet az elemrekeszbe.
Zárja le az elemrekeszt úgy, hogy az elemrekesz fedelét
11
ráhelyezi és felfelé tolja addig, amíg az érezhetően bepattan.
Ha a készülék semmiféle funkciót se mutat, akkor vizsgálja
meg, hogy az elemet helyesen helyezte e be és esetleg
helyezze azt újra be.
Kezelés
A készülék bekapcsolása
Tolja a készülék oldalsó részén található toló-szabályzót
8
enyhén lefelé. Amikor egy hangjelzés hallatszik és az LC-
diszplén
6
a 0,0 psi, 0,00 BAR vagy 0 kPa kijelzés meg-
jelenik, a készülék készen áll a használatra.
Ez a készülék nem arra való, hogy korlátozott pszihikai,
szenzórikus vagy szellemi képességekkel, vagy hiányos
tapasztalattal és / vagy tudással rendelkező személyek
(gyerekeket beleértve) használják, kivéve ha rájuk egy a
biztonságukért felelős személy felügyel, vagy tőle utasítá-
sokban részesülnek arra vonatkozóan, hogy a készüléket
hogyan kell használni. A gyerekekre felügyelni kell annak
a biztosítása végett, hogy a készülékkel ne játszhassanak.
A termék nem játákszer.
Ne tegye ki a készüléket
- szélsőséges hőmérsékletek,
- erős rezgések,
- erős mechanikai terhelések,
- a közvetlen napsugarak hatásának.
Ellenkező esetben a készülék megkárosodása fenyeget.
Vegye figyelembe, hogy azokra a károsodásokra, amelyeket
szakszerűtlen kezelés, a Használati utasítás figyelmen kívül
hagyása, vagy feljogosítással nem rendelkező személyek
beavatkozása okozott a garancia nem érvényes.
A készüléket semmiképpen se szedje szét. Szakszerűtlen javí-
tások által a használó számára jelentős veszélyek jöhetnek
létre. Javításokat csak szakemberekkel végeztessen.
Az elemekre vonatkozó
biztonsági tudnivalók
Hosszabb ideig tartó nemhasználás esetén távolítsa el az
elemet a termékből.
VIGYÁZAT! ROBBANÁSVESZÉLY!
Sohase
töltse fel újra az elemet!
A behelyezésnél ügyeljen a helyes polarításra! Azt az
elemrekeszben megjelölték.
Ha szükséges, a behelyezés előtt tisztítsa meg az elem és
a készülék érintkezőit.
A lemerült elemeket távolítsa el azonnal a készülékből.
Fokozottan kifutás veszélye áll fenn!
Az elemek nem tartoznak a háztartási szemétbe!
A törvény minden fogyasztót az elemek szabályszerűen
mentesítésére kötelez!
A szállítmány tartalma
1 x gumiabroncs-légnyomás ellenőrző, övcsattal és kulcstartóval
1 x 3 V-os
CR2032 elem
1 x használati utasítás
Műszaki adatok
A gumiabroncs-légnyomás mérése
Mértékegység: Mérési
tartomány: Pontosság:
BAR
0-tól 8,3-ig
± 0,1 bar
psi
0-tól 120-ig
± 2 psi
kPa
0-tól 830-ig
± 10 kPa
A nyomás engedélyezett mértékegysége a Pa.
A gumiabroncs- mintázat mérése
Mérési tartomány:
Pontosság:
0-tól 15,8 mm-ig
± 0,4 mm
Feszültségellátás
Elem: 1 x 3 V-os CR2032 elem
Biztonsági tudnivalók
ŐRIZZE MEG JÓL A JÖVŐ SZÁMÁRA AZ ÖSSZES
BIZTONSÁGI TUDNIVALÓT ÉS UTASÍTÁST!
Általános biztonsági tudnivalók
ÉLET- ÉS BALESET-
VESZÉLY KISGYEREKEK ÉS GYEREKEK
SZÁMÁRA!
Sohase hagyja a gyerekeket
felügyelet nélkül a csomagolóanyagokkal. A csomagoló-
anyagok által fulladásveszély áll fenn durch. A gyerekek
gyakran lebecsülik a veszélyeket. Tartsa a gyerekeket a
terméktől mindig távol.
ÉLETVESZÉLY!
Az elemek lenyel-
hetők, és az életveszélyes lehet. Ha valaki egy elemet
lenyelt, azonnal orvoshoz kell fordulni.
Bevezető
Az első üzembevétel előtt ismerkedjen a készülékkel.
Ebből a célból olvassa el figyelmesen a következő
Használati utasítást és a biztonsági tudnivalókat. A
készüléket csak a leírtaknak megfelelően és a megadott alkalma-
zási területeken használja. Őrizze meg jól ezt az utasítást. A ké-
szülék továbbadása esetén harmadiknak kézbesítse vele annak
a teljes dokumentációját is.
Rendeltetésszerű alkalmazás
Ez a készülék szgk.-gumiabroncsok légnyomásának és a mintá-
zatuk mélységének az ellenőrzésére készült. Más alkalmazások
vagy a készülék megváltoztatása nem rendeltetésszerűnek szá-
mítanak és sérülésveszélyekhez és / vagy a készülék megkáro-
sodásához vezethetnek. A rendeltetésétől eltérő alkalmazásokból
származó károkért a gyártó nem áll jót. A készülék nem ipari
használatra készült.
A részek megnevezése
1
elemcsere
2
gumiabroncs légnyomás psi-ben
3
gumiabroncs légnyomás BAR-ban
4
gumiabroncs légnyomás kPa-ban
5
gumiabroncs-mintázat mélysége mm-ben
6
LC-diszplé
7
mérő hegy (a gumiabroncs profilmélység méréshez)
8
toló-szabályzó
9
kulcstartó
10
légnyomás érzékelő
11
elemrekesz-szelep
12
övkapocs
PL
PL
PL
PL
Nie należy wyrzucać zużytego produktu, w celu
ochrony środowiska, do domowego kosza na śmieci,
lecz w odpowiednio do tego przeznaczonych miej-
scach. Informacji o punktach zbiorczych i ich godzi-
nach otwarcia udziela odpowiedni urząd.
Uszkodzone lub zużyte baterie muszą być poddane procesowi
recyklingu zgodnie z wytyczną 2006 / 66 / EC. Baterie i / lub
urządzenie należy zdać w lokalnym punkcie zbiorczym.
Zagrożenie dla środowiska na skutek
niewłaściwego usuwania baterii!
Baterii nie wolno wyrzucać do odpadów komunalnych. Mogą
one zawierać trujące metale ciężkie i dlatego należy je trakto-
wać jak odpady niebezpieczne. Chemiczne symbole metali
ciężkich są następujące: Cd = kadm, Hg = rtęć, Pb = ołów.
Dlatego też zużyte baterie należy przekazywać do komunalnych
punktów gromadzenia odpadów niebezpiecznych.
EMC
Wyłączenie urządzenia
W przypadku nie stosowania urządzenia przez okres dłuższy,
aniżeli ok. 35 sekund, urządzenie wyłącza się automatycznie.
Państwo mogą rόwnież wyłączyć urządzenie manualnie.
Proszę przesunąć w tym celu przełącznik w dόł oraz trzy-
mać go w tej pozycji tak długo, aż zgaśnie wyświetlarka
LC
6
.
Wymiana baterii
Proszę dokonać wymiany baterii, kiedy w wyświetlarce LC
6
ukaże się symbol
1
Proszę otworzyć pojemnik na baterie oraz usunąć zużyte
baterie.
Proszę założyć w pojemniku na baterie nową baterię
(typ: 3 V , CR2032).
Wskazόwka:
Proszę przy tym zwracać uwagę na
właściwą polaryzację. Jest ona oznakowana w pojemniku
na baterie.
Proszę zamknąć przykrywę pojemnika na baterie
11
.
Czyszczenie i konserwacja
W żadnym przypadku nie stosuj żadnych płynów czy
środków czyszczących, ponieważ mogą one doprowadzić
do uszkodzenia urządzenia.
Urządzenie należy czyścić jedynie z zewnątrz za pomocą
miękkiej suchej szmatki.
W przypadku mocnego zabrudzenia, zastosuj lekko zwil-
żoną szmatkę.
Usuwanie
Opakowanie wykonane jest z materiałów przyja-
znych środowisku, które można usuwać w miejsco-
wych punktach przetwarzania materiałów wtórnych.
Informacje o możliwościach dotyczących wyrzucania otrzymać
można w urzędzie miejskim lub gminnym.
wskazana zostanie w wyświetlarce LC
6
wartość pomia-
rowa 0,0 psi, 0,00 BAR lub 0 kPa.
Pomiar ciśnienia w oponach
Wskazόwka:
Prawidłowy pomiar ciśnienia w oponych może
być dokonany jedynie w zimnych oponach.
Proszę przesuwać lekko w dόł odpowiednio wiele razy
rezystor suwakowy
8
, bocznie usytuwany na urządzeniu,
aż do ukazania się w wyświetlarce LC
6
wymaganej
wartości (BAR, psi, kPa).
Proszę w ten sposόb nałożyć niniejsze urządzenie z
czujnikiem ciśnienia powietrza
10
na wentyl opony, aby
powietrze mogło uchodzić.
Proszę odczekać chwilkę oraz usunąć następnie urządzenie
z wentyla opony, aby odczytać wynik pomiarowy ciśnienia
w oponie na wyświetlarce LC
6
. W trakcie następnych
pomiarόw wynik pomiarowy ciśnienia w oponie zostaje w
wyświetlarce LC
6
aktualizowany.
Pomiar głębokości bieżnika opony
Przesuń element przesuwny
8
, umieszczony na boku urzą-
dzenia do końca w górę. Grot pomiarowy
7
uwidacznia
się i w wyświetlaczu LCD
6
ukazuje się wskaźnik “mm“.
Włóż grot pomiarowy
7
w profil rowka na środku bieżnika
opony (bieżnik jest obszarem kontaktu opony z podłożem w
ruchu prostoliniowym).
Proszę nacisnąć miernik ciśnienia powietrza w oponach
na gόrną powierzchnię profila oraz usunąć następnie
ostrożnie urządzenie z opony.
Teraz mogą państwo odczytać głębokość profila w milime-
trach w wyświetlarce LC
6
. W przypadku głębokości pro-
fila mniejszej, aniżeli 4 mm wyświetlarka LC
6
migocze,
w przypadku głębokości profila mniejszej, aniżeli 2 mm
rozlega się oprόcz tego sygnał akustyczny.
OSTROŻNIE! ZAGROŻENIE EKSPLOZJĄ!
Baterię należy przechowywać z dala od dzieci,
nie należy wrzucać baterii do ognia, nie należy
zwierać styków oraz nie należy jej demontować.
Nie przestrzegając powyżej wspomnianych wskazόwek,
może dojść do rozładowania baterii spowodowane jej
napięciem końcowym. Istnieje wtedy zagrożenie wycieku
baterii. W przypadku, kiedy doszło do wycieku baterii w
państwa urządzeniu proszę ją natychmiast wyjąć, aby
zapobiec wywołaniu szkόd na urządzeniu!
Proszę unikać kontaktu ze skόrą, oczami oraz śluzόwką.
W przypadku kontaktu z kwasem akumulatorowym proszę
dokładnie zmyć te miejsca dostateczną ilością wody oraz /
lub zasięgnąć porady lekarza!
Uruchomienie
Założenie baterii
Wskazówka:
Przed uruchomieniem należy usunąć pasek
izolacyjny pomiędzy baterią oraz komorą na baterię.
Otwórz komorę na baterię.
Ściągnij pokrywę komory na baterię
11
.
Usuń pasek izolacyjny.
Załóż baterię zgodnie z polaryzacją. Znak “
+
“ musi znaj-
dować się u góry.
Załóż baterię do komory na baterię.
Zamknij komorę na baterię, nałóż pokrywę komory na ba-
terię
11
oraz przesuń ją w góre, aż wyraźnie zaskoczy.
Jeśli urządzenie nie wykazuje żadnej funkcji, sprawdź, czy
baterie zostały prawidłowo założone i w razie potrzeby
załóż je ponownie.
Obsługa
Załączenie urządzenia
Proszę nacisnąć lekko w dόł rezystor suwakowy
8
, bocznie
usytuwany na urządzeniu. Urządzenie jest gotowe do
zastosowania, kiedy rozlegnie się sygnał akustyczny oraz
życiu. Jeżeli bateria została połknięta, to należy natychmiast
skorzystać z pomocy lekarskiej.
Urządzenie nie jest przeznaczone dla osób (włącznie z
dziećmi) o ograniczonych zdolnościach psychicznych,
umysłowych i sensorycznych, jak również dla osób z ogra-
niczonym doświadczeniem i wiedzą, chyba że uzyskają od
odpowiedzialnych osób odpowiednie wskazówki dotyczące
właściwego użytkowania tego urządzenia. Należy dopil-
nować, aby dzieci nie bawiły się tym urządzeniem. Produkt
nie jest zabawką.
Nie wystawiaj tego urządzenia na:
- ekstremalne temperatury,
- silne wibracje,
- silne obciążenia mechaniczne,
- bezpośrednie działanie promieni słonecznych.
Nieprzestrzeganie tych zasad grozi uszkodzeniem urzą-
dzenia.
Pamiętaj o tym, że uszkodzenia spowodowane niewłaści-
wym posługiwaniem się urządzeniem, nieprzestrzeganiem
instrukcji obsługi lub ingerencją w urządzenie osób nieau-
toryzowanych są wyłączone z gwarancji.
W żadnym wypadku nie rozbieraj urządzenia na części.
Wskutek nieprawidłowych napraw mogą powstać poważne
niebezpieczeństwa dla użytkownika. Wykonywania napraw
zlecaj wyłącznie fachowcom.
Wskazόwki bezpieczeństwa
dotyczące baterii
Wyjmij baterię w przypadku długotrwałego nie używania
produktu.
OSTROŻNIE! ZAGROŻENIE EKSPLOZJĄ!
Proszę nigdy nie ładować ponownie baterii!
Podczas zakładania należy zwracać uwagę na prawidłową
polaryzację! Jest ona oznakowana w schowku na baterie.
W razie potrzeby proszę przed założeniem oczyścić baterie
oraz miejsca kontaktowe niniejszego urządzenia.
Proszę usunąć niezwłocznie zużyte baterie z urządzenia.
Istnieje wzmożone zagrożenie wycieku baterii!
Baterii nie należy usuwać do odpadόw domowych!
Każdy konsument jest prawnie zobowiązany do usuwania
baterii zgodnie z obowiązującymi przepisami!
Zakres dostawy
1 x Miernik ciśnienia powietrza w oponach z mocowaniem do
paska oraz breloczkiem do kluczy
1 x Baterie 3 V
CR2032
1 x Instrukcja obsługi
Dane techniczne
Pomiar ciśnienia w oponach
Jednostka: Zakres
pomiaru: Dokładność:
BAR
0 do 8,3
± 0,1 bar
psi
0 do 120
± 2 psi
kPa
0 do 830
± 10 kPa
Dopuszczalną jednostką ciśnienia jest Pa.
Pomiar głębokości bieżnika opony
Zakres pomiaru:
Dokładność:
0 do 15,8 mm
± 0,4 mm
Zaopatrzenie w napięcie
Baterie: 1 x 3 V CR2032
Wskazόwki dotyczące
bezpieczeństwa
PRZECHOWUJ WSZYSTKIE WSKAZÓWKI DOTYCZĄCE
BEZPIECZEŃSTWA I INSTRUKCJE NA PRZYSZŁOŚĆ!
Wskazówki ogólne dotyczące
bezpieczeństwa
NIEBEZPIECZEŃ-
STWO UTRATY ŻYCIA I NIESZCZĘŚLI-
WEGO WYPADKU DLA MAŁYCH DZIECI
I DZIECI!
Nigdy nie pozostawiaj dzieci bez nadzoru z
materiałem opakowania. Istnieje niebezpieczeństwo
uduszenia się materiałem opakowania. Dzieci często nie
dostrzegają niebezpieczeństwa. Trzymaj dzieci z daleka
od produktu.
NIEBEZPIECZEŃSTWO UTRATY
ŻYCIA!
Baterie mogą zostać połknięte, co może zagrażać
Wstęp
Przed uruchomieniem urządzenia po raz pierwszy
zapoznaj się z nim. W tym celu przeczytaj uważnie
poniższą instrukcję obsługi oraz wskazówki dotyczące
bezpieczeństwa. Użytkuj urządzenie tylko tak, jak to opisano i
tylko w podanych dziedzinach zastosowania. Przechowuj
starannie niniejszą instrukcję. Przy przekazywaniu urządzenia
osobom trzecim, przekaż wraz z nią również całą przynależną
dokumentację.
Eksploatacja zgodna
z przeznaczeniem
Niniejsze urządzenie przeznaczone jest do przeprowadzenia
kontroli ciśnienia powietrza oraz głębokości bieżnika opon
samochodόw osobowych. Inne zastosowanie albo moderniza-
cja urządzenia oznacza użycie niezgodne z przeznaczeniem.
Mogą one doprowadzić do okaleczenia i / albo uszkodzenia
urządzenia. Za szkody powstałe na skutek użytkowania niezgod-
nego z instrukcją, wytwórca sprzętu nie ponosi żadnej odpo-
wiedzialności prawnej. Urządzenie jest przeznaczone wyłącznie
do celów prywatnych.
Opis części
1
Wymiana baterii
2
Pomiar ciśnienia w oponie w psi
3
Pomiar ciśnienia w oponie w BAR
4
Pomiar ciśnienia w oponie w kPa
5
Głębokość bieżnika w mm
6
Wyświetlarka LC
7
Grot pomiarowy (do głębokości bieżnika opony)
8
Rezystor suwakowy
9
Brelok do kluczy
10
Czujnik ciśnienia
11
Przykrywa pojemnika na baterie
12
Klips do pasa
PL
PL
PL
hazardous waste treatment rules and regulations. The chemical
symbols for heavy metals are as follows: Cd = cadmium, Hg=
mercury, Pb = lead. That is why you should dispose of used
batteries at a local collection point.
EMC
Open the battery compartment and take out the exhausted
battery.
Insert a new battery (type: 3 V , CR2032) into the battery
compartment.
Note:
Make sure you fit the battery the right way round
(polarity). The correct polarity is shown inside the battery
compartment.
Close the battery compartment cover
11
.
Cleaning and care
Do not under any circumstances use liquids or cleaning
agents, as they will damage the device.
Clean only the outside of the device with a soft, dry cloth.
Use a slightly dampened cloth to remove more stubborn dirt.
Disposal
The packaging is made entirely of recyclable
materials, which you may dispose of at local
recycling facilities.
Contact your local refuse disposal authority for more details of
how to dispose of your worn-out product.
To help protect the environment, please dispose of
the product properly when it has reached the end
of its useful life and not in the household waste.
Information on collection points and their opening hours can
be obtained from your local authority.
Faulty or used batteries must be recycled in accordance with
Directive 2006 / 66 / EC. Please return the batteries and / or
the device to the available collection points.
Environmental damage through incorrect
disposal of the batteries!
Batteries may not be disposed of with the usual domestic
waste. They may contain toxic heavy metals and are subject to
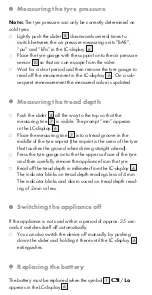
Measuring the tyre pressure
Note:
The tyre pressure can only be correctly determined on
cold tyres.
Lightly push the slider
8
downwards several times to
switch between the air pressure measuring units “BAR”,
“psi” and “kPa” in the LC-display
6
.
Place the tyre gauge with the support onto the air pressure
sensor
10
so that air can escape from the valve.
Wait for a short period and then remove the tyre gauge to
read off the measurement in the LC-display
6
. On a sub-
sequent remeasurement the measured value is updated.
Measuring the tread depth
Push the slider
8
all the way to the top so that the
measuring tine
7
is visible. The prompt “mm” appears
in the LC-display
6
.
Place the measuring tine
7
into a tread groove in the
middle of the tyre imprint (the imprint is the area of the tyre
that touches the ground when driving straight ahead).
Press the tyre gauge onto the the upper surface of the tyre
and then carefully remove the appliance from the tyre.
Read off the tread depth in millimeter from the LC-display
6
.
The indicator blinks on tread depth readings less of 4 mm.
The indicator blinks and alarm sound on tread depth read-
ing of 2 mm or less.
Switching the appliance off
If the appliance is not used within a period of approx. 35 sec-
onds it switches itself off automatically.
You can also switch the device off manually by pushing
down the slider and holding it there until the LC-display
6
extinguishes.
Replacing the battery
The battery must be replaced when the symbol
1
appears in the LC-display
6
.
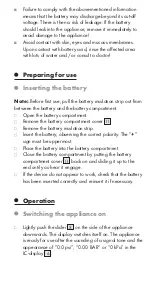
Failure to comply with the above-mentioned information
means that the battery may discharge beyond its cut-off
voltage. There is then a risk of leakage. If the battery
should leak into the appliance, remove it immediately to
avoid damage to the appliance!
Avoid contact with skin, eyes and mucous membranes.
Upon contact with battery acid, rinse the affected area
with lots of water and / or consult a doctor!
Preparing for use
Inserting the battery
Note:
Before first use, pull the battery insulation strip out from
between the battery and the battery compartment.
Open the battery compartment.
Remove the battery compartment cover
11
.
Remove the battery insulation strip.
Insert the battery, observing the correct polarity. The “
+
”
sign must be uppermost.
Place the battery into the battery compartment.
Close the battery compartment by putting the battery
compartment cover
11
back on and sliding it up to the
end until you hear it engage.
If the device do not appear to work, check that the battery
has been inserted correctly and reinsert it if necessary.
Operation
Switching the appliance on
Lightly push the slider
8
on the side of the appliance
downwards. The display switches itself on. The appliance
is ready for use after the sounding of a signal tone and the
appearance of “0.0 psi”, “0.00 BAR” or “0 kPa” in the
LC-display
6
.
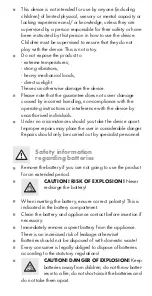
This device is not intended for use by anyone (including
children) of limited physical, sensory or mental capacity or
lacking experience and / or knowledge, unless they are
supervised by a person responsible for their safety or have
been instructed by that person in how to use the device.
Children must be supervised to ensure that they do not
play with the device. This is not a toy.
Do not expose the product to
- extreme temperatures,
- strong vibrations,
- heavy mechanical loads,
- direct sunlight.
These can otherwise damage the device.
Please note that the guarantee does not cover damage
caused by incorrect handling, non-compliance with the
operating instructions or interference with the device by
unauthorised individuals.
Under no circumstances should you take the device apart.
Improper repairs may place the user in considerable danger.
Repairs should only be carried out by specialist personnel.
Safety information
regarding batteries
Remove the battery if you are not going to use the product
for an extended period.
CAUTION! RISK OF EXPLOSION!
Never
recharge the battery!
When inserting the battery, ensure correct polarity! This is
indicated in the battery compartment.
Clean the battery and appliance contact before insertion if
necessary.
Immediately remove a spent battery from the appliance.
There is an increased risk of leakage otherwise!
Batteries should not be disposed of with domestic waste!
Every consumer is legally obliged to dispose of batteries
according to the statutory regulations!
CAUTION! DANGER OF EXPLOSION!
Keep
batteries away from children; do not throw batter-
ies into a fire; do not short-circuit the batteries and
do not take them apart.
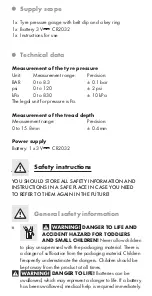
Supply scope
1 x Tyre pressure gauge with belt clip and a key ring
1 x Battery 3 V
CR2032
1 x Instructions for use
Technical data
Measurement of the tyre pressure
Unit: Measurement
range: Precision:
BAR
0 to 8.3
± 0.1 bar
psi
0 to 120
± 2 psi
kPa
0 to 830
± 10 kPa
The legal unit for pressure is Pa.
Measurement of the tread depth
Measurement range:
Precision:
0 to 15.8 mm
± 0.4 mm
Power supply
Battery: 1 x 3 V CR2032
Safety instructions
YOU SHOULD STORE ALL SAFETY INFORMATION AND
INSTRUCTIONS IN A SAFE PLACE IN CASE YOU NEED
TO REFER TO THEM AGAIN IN THE FUTURE!
General safety information
DANGER TO LIFE AND
ACCIDENT HAZARD FOR TODDLERS
AND SMALL CHILDREN!
Never allow children
to play unsupervised with the packaging material. There is
a danger of suffocation from the packaging material. Children
frequently underestimate the dangers. Children should be
kept away from the product at all times.
DANGER TO LIFE!
Batteries can be
swallowed, which may represent a danger to life. If a battery
has been swallowed, medical help is required immediately.
Introduction
Familiarise yourself with the product before using it
for the first time. In addition please refer carefully
to the operating instructions below and the safety
advices. Use the product only as described and for the indicated
purpose. Keep these instructions in a safe place. If you pass the
product on to anyone else, please ensure that you also pass on
all the documentation.
Proper use
This appliance is intended for use in checking the air pressure
and tread depth of car tyres. Any other use or modification of
the device constitute improper use and may result in injury and / or
damage to the device. The manufacturer is not liable for dam-
age caused by improper use. The device is not intended for
commercial use.
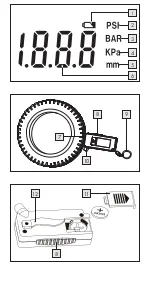
Description of parts
1
battery
2
symbol (tyre pressure)
3
symbol (tyre pressure)
4
symbol (tyre pressure)
5
symbol (tread depth)
6
LC-Display
7
Measuring tine (for the tyre profile depth)
8
Slider
9
Key ring
10
Air pressure sensor
11
Battery compartment cover
12
Belt clip
Z30013A
Z30013B
Pokyny pro obsluhu a bezpečnostní pokyny
Kezelési és biztonsági utalások
Operation and Safety Notes
Wskazówki dotyczące obsługi i bezpieczeństwa
Pokyny pre obsluhu a bezpečnostné pokyny
Navodila za upravljanje in varnostna opozorila
1
2
3
4
5
6
12
8
7
9
10
11
8


