Ultimatte-9 Operations Manual
March 1, 2000
20
Step 4: Set the Flare Controls
(if necessary)
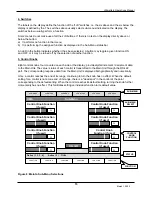
A) Press the MENUS “
FG
” hard button on the left side of the remote panel.
B) Press the “
FLARE
” soft button in the area above the display panel.
The Ultimatte algorithms will automatically suppress flare caused from the backing onto foreground
subject matter. The flare controls are used to suppress excessive spill using the following guidelines:
i)
Black Balance:
Use this control to remove excessive spill on dark foreground objects.
ii)
Gray Balance:
Use this control to remove excessive spill on midrange foreground
objects
iii)
White Balance:
Use this control to remove excessive spill on bright foreground objects.
iv)
Gate 1/3
: ("Gate one three") Use this control to reproduce blues, greens, or cyans.
a) For blue screen: At 100%, blues will be reproduced. At 50%, blues will become cyan.
At 0%, greens will be reproduced and blues/cyans will turn green.
b) For green screen: At 100%, greens will be reproduced. At 50%, greens will become
cyan. At 0%, blues will be reproduced, greens will become grayish, and cyans will
turn blue.
v)
Gate 2
: Use this control to reproduce the following colors:
a)
For blue screen: used to reproduce pinks, purples, and magentas that will turn red
when blue is subtracted.
Warning: Since skin tones are pinkish, advancing this
control too far may add blue to the skin tones.
b)
For green screen: used to reproduce yellows and oranges that will turn red when
green is subtracted.
Warning: Since skin tones are pinkish, advancing this control
too far may add green to the skin tones.
Step 5: Set the AdvantEdge Controls
(If necessary)
In order to increase the "sharpness" of an image, video cameras add artificial edge enhancements to the
original picture. These edge enhancements to the foreground image can give the subject an unrealistic
(harsh) appearance when composited with the background. AdvantEdge will smooth the “harsh” edges.
This results in a more natural appearance in the composite without the loss of sharpness/detail or
softening of the edges.
Warning: Adjusting this control too much will reduce fine detail.
A) Press the MENUS “
MATTE
” hard button on the left side of the remote panel.
B) Press the “
ADVANTEDGE
” soft button above the display panel.
C) Press the “
CORRECTION ENABLE
” soft button below the display panel.
D) Adjust the “
Overlay Width
” knob until you see the edges reduce.
Your basic composite has now been set. Toggle between the foreground and composite view by
pressing/depressing the VIEW “
FG
” hard button in the upper right hand corner of the remote panel to
check the integrity of your composite.


