background image

sales@ultra-soft.co.uk 

01622 933 853 

www.ultra-soft.co.uk 

sales@ultra-soft.co.uk 

01622 933 853 

www.ultra-soft.co.uk 


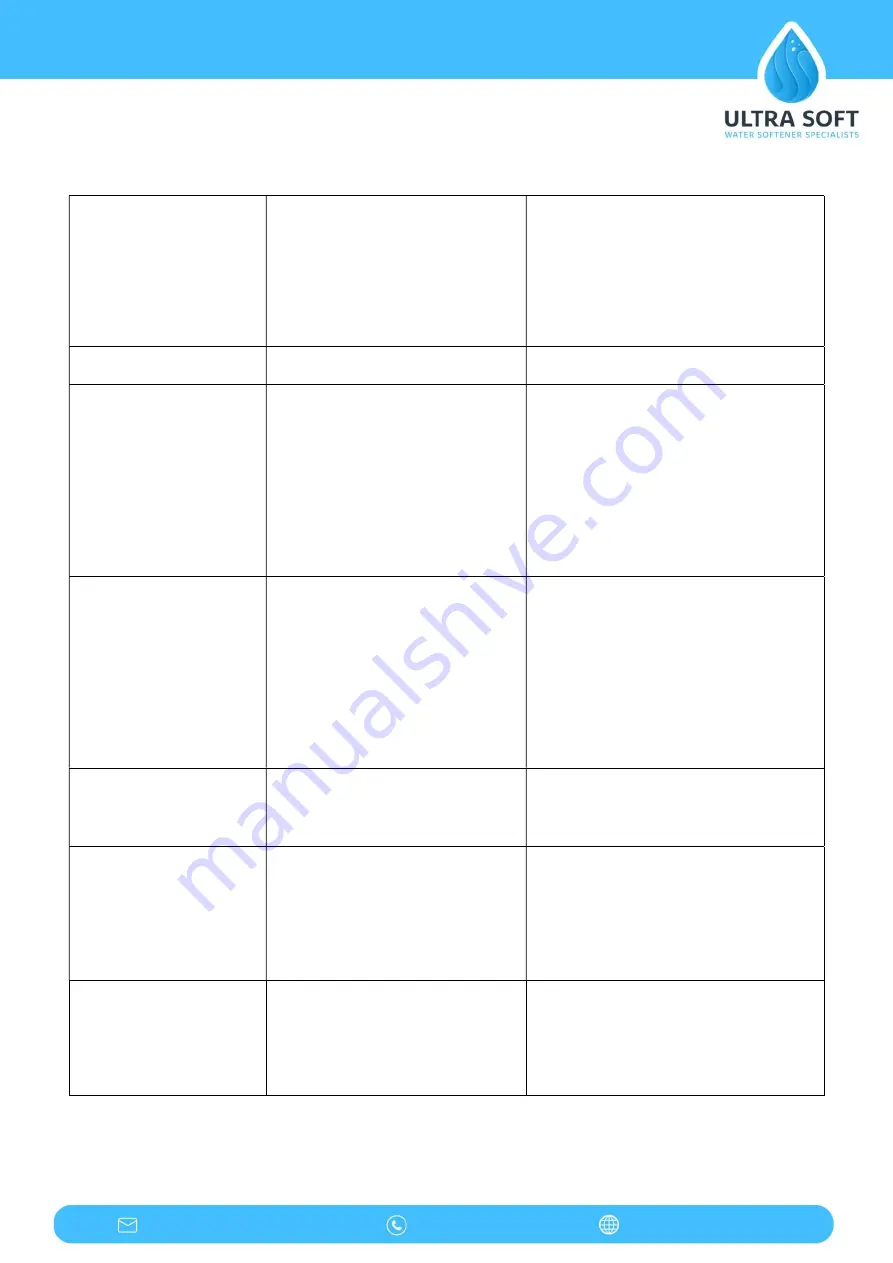
Softener fails to draw 
brine 

A.


Line pressure is too low 

B.


Brine line is plugged 

C.


Brine line is leaking 

D.


Injector is plugged 

E.


Internal control leak 

F.


Drain line is plugged 

G.


Sizes of injector and DLFC do 
not match with tank 

A.


Increase line pressure 

B.


Clean brine line 

C.


Replace brine line 

D.


Clean or replace injector 

E.


Replace valve body 

F.


Clean drain line flow control 

G.


Select correct injector and DLFC 
size 

Unit used too much salt 

A.


Improper salt setting 

B.


Excessive water in brine tank 

A.


Check salt usage and salt setting 

B.


See excessive water in brine tank 

Excessive water in brine 
tank 

A.


Overlong refilling time 

B.


Water remaining after 
brine draw 

C.


Foreign material in brine 
valve and plug drain line 
flow control 

D.


Not installed safety brine 
valve and power failure 
while salting 

E.


Safety brine valve breakdown 

A.


Reset correct refilling time 

B.


Check the injector and remove 
foreign matter from brine pipe 

C.


Clean brine valve and brine line 

D.


Stop water supply and restart 
program install with safety brine 
valve in salt tank 

E.


Repair or replace safety brine 
valve. 

Pressure loss or rust in 
pipe 

A.


Iron in water supply pipe 

B.


Iron mass in the softener 

C.


Fouled resin bed 

D.


Too much iron in raw water 

A.


Clean water supply pipe. 

B.


Clean valve and add resin 
cleaning agent 

C.


Check backwash, brine draw and 
brine tank refill. Increase 
frequency of regeneration and 
backwash time 

D.


Iron removal equipment is 
required to install before 
softening 

Loss of resin though 
drain 

A.


Air in water system 

B.


Bottom screen broken  

C.


Improperly sized DLFC 

A.


Assure that well system has 
proper air eliminator control 

B.


Replace new screen 

C.


Check for proper drain rate 

Control valve cycles 
continuously 

A.


Locating signal wiring 
breakdown 

B.


Controller is faulty 

C.


Foreign material stuck in 
driving gear 

D.


Time of regeneration steps set 
to zero 

A.


Check and connect locating 
signal wiring 

B.


Replace controller 

C.


Take out foreign material 

D.


Check program setting and 
reset 

Drain flows continuously 

A.


Internal valve leak 

B.


Power off when in 
backwash or fast rinse 

A.


Check and repair valve body or 
replace it 

B.


Adjust valve to service 
position or turn off bypass 
valve and restart when 
electricity supply 

Summary of Contents for Cyan

Page 1: ...ded some of our water softners that would be suitable for you below SOFT WATER MODERATELY SOFT WATER SLIGHTLY HARD WATER MODERATELY HARD WATER HARD WATER VERY HARD WATER Your Water Softener Recommenda...

Page 2: ...e placed close to the rising main Take care to allow hard water take off points for a drinking water facility and or an outside tap The distance between the drain and the softener should be as short a...

Page 3: ...the water softener is tested to a pressure of 6 bar 87psi we recommend the fitting of a pressure limiter should your pressure exceed 4 bar 58 psi The minimum working pressure is 1 5 bar 21 7psi Start...

Page 4: ...Waste Pipe Installation Connect the waste pipe to the waste outlet on the softener and run the hose to either an up stand or outside drain a minimum air gap of 20mm must exist at the end of the drain...

Page 5: ...is please follow these instructions Using the up and down buttons scroll to Advanced Settings and Press CONFIRM Scroll down to Set Residual Water and press CONFIRM This will show you the total amount...

Page 6: ...er has been connected the valve will display the valve model and initialise itself and then display TIME you can then start to program the valve Selections are made using the UP and DOWN buttons until...

Page 7: ...now scroll up and down to change the amount of days for the override Change Regeneration Time Default At 2 00am Press CONFIRM to show menu scroll to Advanced Settings and press CONFIRM Scroll down to...

Page 8: ...r plugged D Insufficient water flowing into brine tank E Leak at oring on riser F Internal valve leak G Regeneration cycles not correct H Shortage of resin I Bad quality of feed water or turbine block...

Page 9: ...e and brine line D Stop water supply and restart program install with safety brine valve in salt tank E Repair or replace safety brine valve Pressure loss or rust in pipe A Iron in water supply pipe B...

Page 10: ...core or C sealing ring D Reduce water pressure or use pressure relief connector function Salt water going to service A Foreign material in injector or injector fails to work B Brine valve cannot be s...

Reviews: