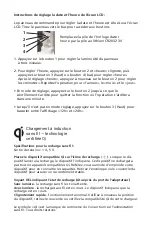
LCD Date and Time Setting Instructions:
NOTE: Control Panel to set Date and Time is located near the front
bottom area of lamp body. Pull panel down to access buttons.
1. Push button 1 to adjust three level panel brightness.
2. To set time, push button 2 and the “hour” will flicker, then push
button 3 (Up) or button 4 (Down) to adjust “hour.” After “hour” setting,
touch button 2 again to set the “minute,” “year,” “month” and “day.”
• In Setting mode, touch button 2 until flicker stops to exit function or
operation will stop in one minute.
• When not in Setting mode, touch button 3 (Up) to switch between “12h”
and “24h” display.
Wireless Charging Specifications:
Output: 1.0Amp, 5 Volt.
Place the Qi compatible device over the wireless charging icon
( ).
When the device begins charging, the device will indicate that charging is
active. This feature will not charge all Qi compatible devices. Please refer to
your device instructions for enabled capability. Device case or cover should
be removed to ensure a stable connection.
Charging Status LED Indicator (located near power adapter port)
Without light
- Wireless charging is on standby.
With light
- Wireless charging is active. Device will indicate charging is active.
Fast flashing
- Abnormal operation. Recheck device position, remove cover,
or check Qi compatibility with your device.
The ‘Qi’ symbol is a trademark of the Wireless Power Consortium.
All rights reserved.
1
2
3
4
Replace Date/Time battery with
CR2032 3V Lithium Battery
Summary of Contents for ZEN Series
Page 8: ...Elevate your lifestyle...
Page 14: ...CAN ICES 005 B NMB 005 B...
Page 16: ...levez votre style de vie...


