background image

ULTRAFLEX


-  

pag. 11

INSTALLATION  INSTRUCTIONS

ISTRUZIONI DI INSTALLAZIONE

INSTRUCTIONS DE MONTAGE

UK

F

I

AVVERTENZA

AVERTISSEMENT

WARNING

Attendere che l’olio sia arrivato al 

serbatoio inferiore e che entrambi i 

serbatoi siano riempiti.

Attendre que l’huile atteigne le réser-

voir inférieur et que les deux réservoirs 

soient remplis.

Wait until the oil reaches the lower 

tank and both tanks are filled.

8  Seguire la stessa procedura 

di spurgo indicata nel paragrafo 

“Stazione di guida singola/cilindro 

singolo“ nel manuale del cilindro 

tenendo presente che durante la 

rotazione del volante si muovono 

entrambi i cilindri.

9  Ripetere più volte l’intera proce-

dura al fine di garantire la completa 

assenza di aria all’interno del circu-

ito.

6  Svitare manualmente le due 

valvole di spurgo sui raccordi dei 

tubi idraulici del cilindro e portare i 

cilindri in battuta da un lato.

7  Posizionare la bottiglia dell’olio 

in prossimità della stazione di guida 

primaria (superiore) come indicato 

al paragrafo “Posizionamento della 

bottiglia dell’olio” nel manuale del 

cilindro.

8  Follow the same bleeding 
procedure described in paragraph 
“Single steering station/ single 
cylinder”  in the cylinder manual 
while turning the steering wheel 
be careful because both cylinders 
move.
9  Repeat the entire procedure 
several times to ensure the air 
absence in the system.

6  Manually unscrew the two 
bleed valves on the hydraulic hose 
fittings and push the cylinders to 
one side up to the end stroke.

7  Position the oil bottle near 
the main steering station (upper) 
according to what is described in 
paragraph “Positioning of the oil 
bottle” in the cylinder manual.

8  Suivre la même procédure 
de purge indiquée au paragraphe 
“Poste de gouvernement unique/ 
vérin unique” dans le manuel du 
vérin pendant la rotation du volant 
faire attention car les deux vérins 
sont en mouvement.
9  Répéter plusieurs fois toute la 
procédure afin d’assurer l’absence 
totale d’air dans le circuit.

6  Dévisser manuellement les 
deux soupapes de purge sur les 
raccords tuyaux hydrauliques du 
vérin et pousser les vérins d’un côté 
jusqu’au fin de course.

7  Positionner la bouteille de 
l’huile près du poste de gouverne-
ment principal (supérieur) selon 
ce qui est indiqué au paragraphe 

“Positionnement de la bouteille de 

l’huile” dans le manuel du vérin.

DOPPIA STAZIONE / CILINDRO 
DOPPIO

DUAL STATION / DUAL CYLINDER

P O S T E   D E   G O U V E R N E M E N T 
DOUBLE / VERIN DOUBLE
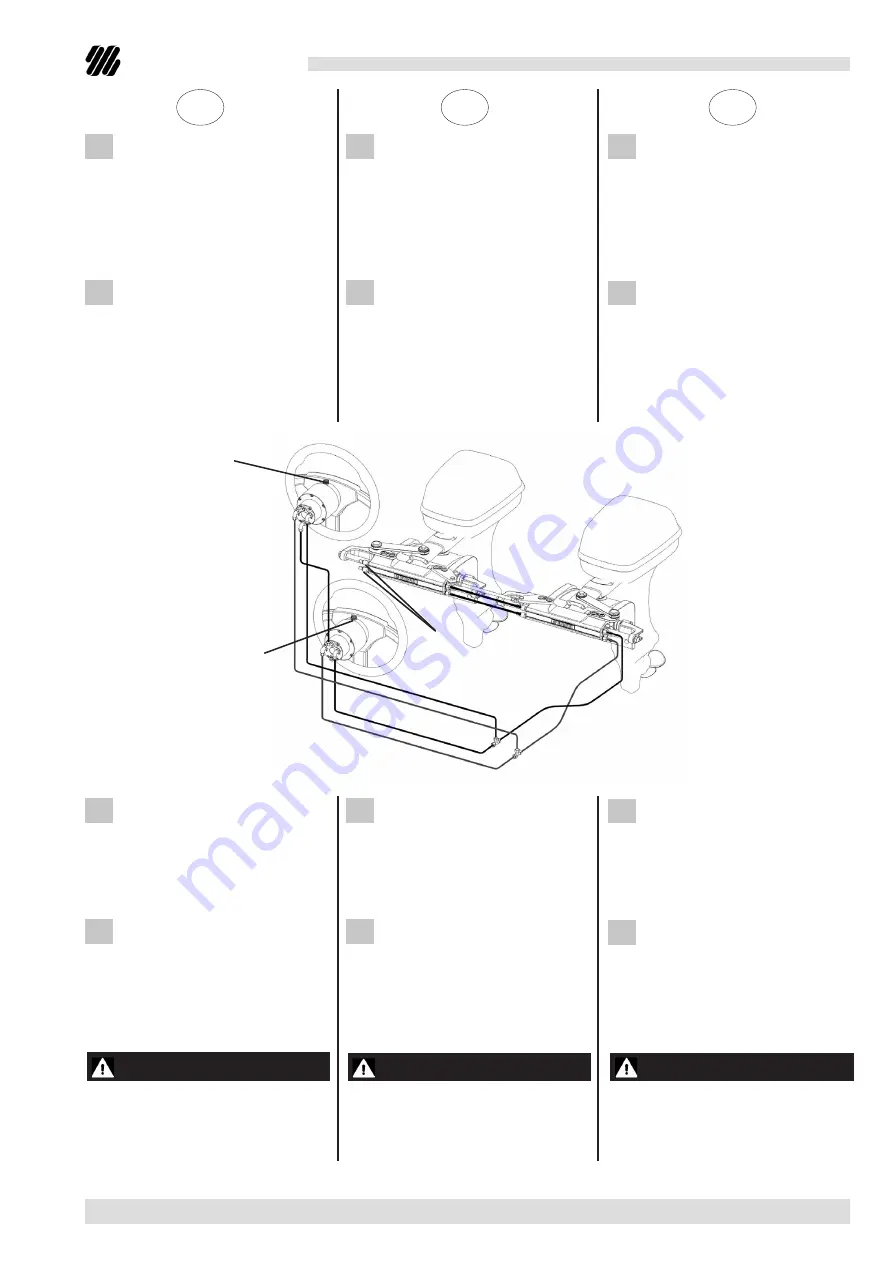
black vent plug

tappo con sfiato 

nero

bouchon avec év-

ent noir

silver non-vent plug

tappo senza sfiato argento

bouchon sans évent (ar-

gent)

bleed valves

valvole di spurgo

soupapes de purge

Summary of Contents for OB-2C130-SVS

Page 1: ...nstructions KIT OB 2C130 SVS HOSE KITS Istruzioni di installazione KIT OB 2C130 SVS TUBI FLESSIBILI RACCORDATI Instructions de montage KITOB 2C130 SVSTUYAUXFLEXIBLESRACCORDES UK F I Dr Dis Des n 35453 a 03 11 2020 PARTNER Rev 1 ...

Page 2: ...UCTIONS DE MONTAGE UK F I DOCUMENT REVISIONS INDICE DELLE REVISIONI DEL DOCUMENTO DOCUMENT DES REVISIONS Rev Rev Rév Date Data Date Revision description Descrizione della revisione Description de la révision 1 03 11 2020 Codes update Aggiornamento codici Mise à jour des codes ...

Page 3: ...or for design or sales requirements at any moment and without being obliged to update this publication ALL RIGHTS ARE RESERVED Pub lishing rights trademarks part numbers and photographs of UL TRAFLEX products contained in this manual are ULTRAFLEX property Great care has been taken in collect ing and checking the documentation contained in this manual to make it as complete and comprehensible as p...

Page 4: ...is not cov ered by this warranty In particular the company is not responsible and this warranty will not cover the dam age resulting from incorrect instal lation or use of the product except for replacement or repair of defective parts according to the conditions and terms above This warranty does not cover the products installed on race boats or boats used in competitions The descriptions and ill...

Page 5: ...nza rinforzati da una treccia in Kevlar e raccordi con dado gire vole pressati deve essere utilizzato per il collegamento doppio cilindro doppio motore per sistemi di guida Silversteer e unicamente con cilindri UC130 SVS Le KIT OB 2C130 SVS constitué par un couple de tuyaux flexibles à haute résistance renforcés par une tresse en Kevlar et des raccords pressés avec écrou pivotant doit être utilisé...

Page 6: ...UEUR TUYAU CODE CODICE CODE KIT OB 2C130 SVS 38 660 mm 26 381 mm 15 43615 H KIT OB 2C130 SVS 41 686 mm 27 407 mm 16 43616 K KIT OB 2C130 SVS 43 711 mm 28 432 mm 17 43617 M KIT OB 2C130 SVS 45 724 mm 28 5 445 mm 17 5 43618 P KIT OB 2C130 SVS 46 737 mm 29 457 mm 18 43619 S KIT OB 2C130 SVS 48 762 mm 30 483 mm 19 43620 A KIT OB 2C130 SVS 50 777 mm 30 5 496 mm 19 5 43621 C KIT OB 2C130 SVS 51 788 mm 3...

Page 7: ...t OB 2C130 SVS 7 kit OB SVS 1 helm 2 starboard cylinder 3 port cylinder 4 hydraulic hose fittings 5 tie bar 6 kit OB 2C130 SVS 7 kit OB SVS PORT LINE LINEA PORT P LIGNE BABORD GAUCHE STARBOARD LINE LINEA STARBOARD S LIGNE TRIBORD DROIT Check that the central hoses con necting the two cylinders in parallel are long enough to allow the two engines to tilt independently ATTENZIONE ATTENTION CAUTION V...

Page 8: ... OB 2S SVS 9 kit OB SVS 1 upper station helm 2 lower station helm 3 starboard cylinder 4 port cylinder 5 hydraulic hose fittings 6 tie bar 7 kit OB 2C130 SVS 8 kit OB 2S SVS 9 kit OB SVS 3 4 1 2 5 6 7 8 9 PORT LINE LINEA PORT P LIGNE BABORD GAUCHE STARBOARD LINE LINEA STARBOARD S LIGNE TRIBORD DROIT Check that the central hoses con necting the two cylinders in parallel are long enough to allow the...

Page 9: ...rboard S input of cylinder 2 2 Remove th breathers from the starboard cylinder for the configura tion shown in picture A For the con figurationshowninpictureB remove the breathers from the port cylinder and move from the other side those present in the starboard cylinder 3 Assembler les kits OB 2C130 SVS en connectant l entrée bâbord P du vérin 1 avec l entrée bâbord P du vérin 2 et l entrée tribo...

Page 10: ... shown in picture A or starboard for the configuration shown in picture B to bleed the system 6 Manually unscrew the two bleed valves on the hydraulic hose fittings and push the cylinders to one side up to the end stroke 7 Position the oil bottle as de scribed in paragraph Positioning of the oil bottle in the cylinder manual 4 Serrer les écrous 3 sur les raccords pompe et vérin à l aide d une clé ...

Page 11: ...urning the steering wheel be careful because both cylinders move 9 Repeat the entire procedure several times to ensure the air absence in the system 6 Manually unscrew the two bleed valves on the hydraulic hose fittings and push the cylinders to one side up to the end stroke 7 Position the oil bottle near the main steering station upper according to what is described in paragraph Positioning of th...

Page 12: ... utiliser exclusivement le bouchon avec le trou d évent noir For the additional steering station lower tank use only the silver non vent plug supplied with the kit OB 2S SVS For the main steering station upper tank use only the black vent plug AVVERTENZA AVVERTENZA Alterminedell installazioneazionare il sistema di guida e verificare che i tubi non interferiscano o sfreghino con parti dell imbarcaz...

Page 13: ...il tubo danneggiato Le rayon minimum de courbure des tuyaux est de 250 mm Une courbure excessive du tuyau pourrait causer la rupture intérieure en compromet tant le bon fonctionnement du sys tème Dans ce cas il faut remplacer le tuyau endommagé The minimum bend radius of the hoses is 250 mm An excessive hose bend could result in its in ternal breaking which will cause a bad operation of the system...

Page 14: ... fondamentali atte a salvaguardare l ambiente Guaine condotti flessibili compo nenti di materiale plastico o comun que non metallico dovranno essere smontati e smaltiti separatamente I componenti CONTENGONO OLI INQUINANTI che devono essere smaltiti secondo le normative in vigore When for any reason the compo nents are put out of service it is nec essary to follow some rules in order to respect the...

Page 15: ...ULTRAFLEX pag 15 INSTALLATION INSTRUCTIONS ISTRUZIONI DI INSTALLAZIONE INSTRUCTIONS DE MONTAGE UK F I NOTES ...

Page 16: ...ULTRAFLEX S p A 16015 Casella Genova Italia Via Crose 2 ...

Reviews: