8.4.6
Replacing the Front Block
Tools Required:
#2 Philips screw driver
1. Attach the new Front Block via the hinge with the four (4) hinge screws.
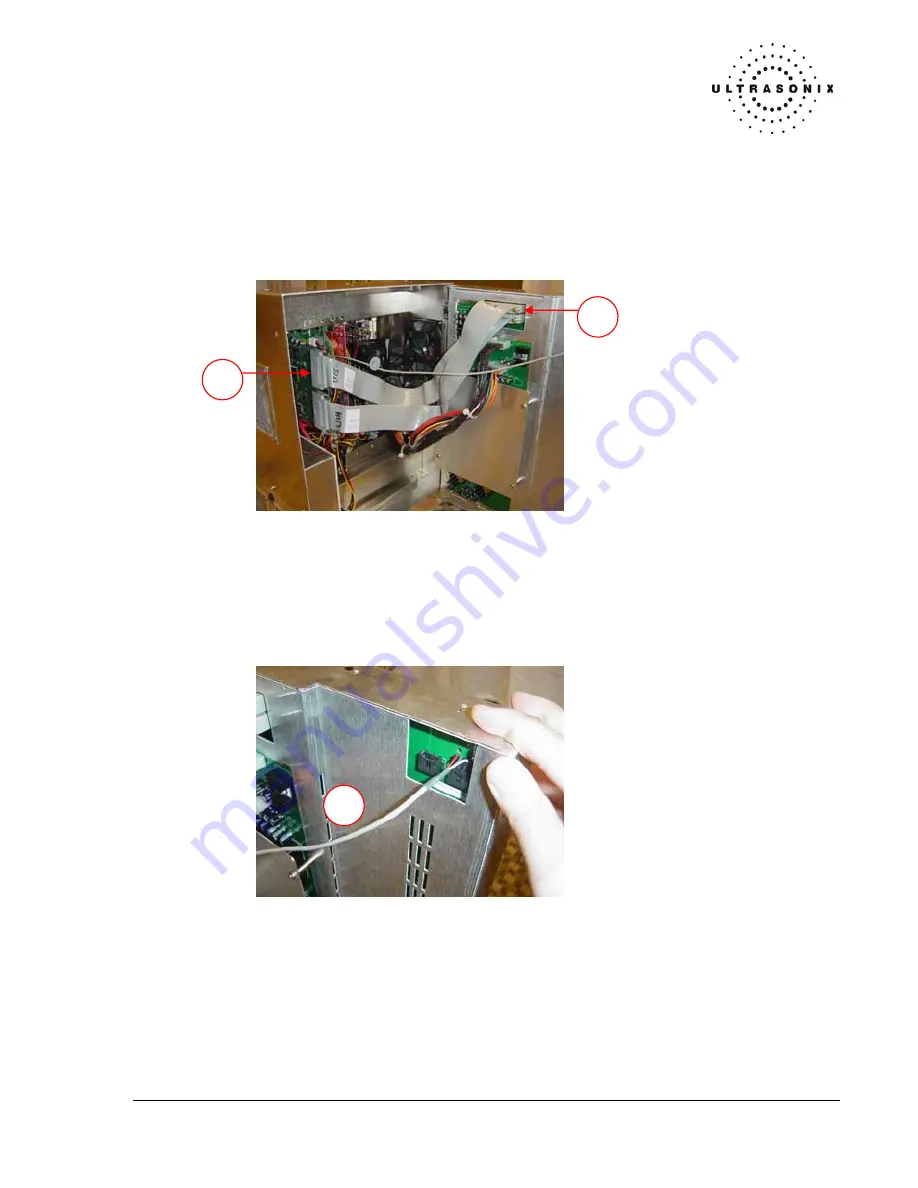
2. Connect the cables as below.
3. The 3M cables coming from the PCI card are connected in reverse. The top plug of the
PCI card (
7
) is connected to the bottom plug on the ultrasound modulo (
8
).
Consequently, the bottom of the PCI card is connected to the top plug on the
ultrasound modulo.
4. The black and multi-colored plugs can be connected in any order.
5. Connect the power cable coming from the PCI card (
9
) to the plug on the right-hand
side of the door.
9
6. While closing the Front Block, tuck the cables in, particularly the power cable (
9
) so that
they do not hit the fans on the left and right side of the SONIX.
7. Secure the door with the two (2) service access screws.
SONIX Service Manual
SSM – 001, Revision F
Chapter 8: Field Service Components
75
Summary of Contents for SONIX Series
Page 1: ...SONIX SERIES ULTRASOUND SYSTEM SERVICE MANUAL...
Page 2: ......
Page 4: ......
Page 12: ...Chapter 1 General Information SSM 001 Revision F SONIX Service Manual 4...
Page 20: ...Chapter 2 System Specifications SSM 001 Revision F SONIX Service Manual 12...
Page 38: ...Chapter 3 System Installation SSM 001 Revision F SONIX Service Manual 30...
Page 46: ...Chapter 5 Software Features SSM 001 Revision F SONIX Service Manual 38...
Page 50: ...Chapter 7 Components and Assembly SSM 001 Revision F SONIX Service Manual 42...
Page 52: ...Chapter 7 Components and Assembly SSM 001 Revision F SONIX Service Manual 44...
Page 53: ...SONIX Service Manual SSM 001 Revision F Chapter 7 Components and Assembly 45...
Page 55: ...SONIX Service Manual SSM 001 Revision F Chapter 7 Components and Assembly 47...
Page 56: ...Chapter 7 Components and Assembly SSM 001 Revision F SONIX Service Manual 48...
Page 57: ...SONIX Service Manual SSM 001 Revision F Chapter 7 Components and Assembly 49...
Page 58: ...Chapter 7 Components and Assembly SSM 001 Revision F SONIX Service Manual 50...
Page 63: ...SONIX Service Manual SSM 001 Revision F Chapter 7 Components and Assembly 55...
Page 66: ...Chapter 7 Components and Assembly SSM 001 Revision F SONIX Service Manual 58...
Page 96: ...Chapter 8 Field Service Components SSM 001 Revision F SONIX Service Manual 88...
Page 122: ...Chapter 12 Complete Plastics Replacement SSM 001 Revision F SONIX Service Manual 114...
Page 126: ...Chapter 13 Maintenance SSM 001 Revision F SONIX Service Manual 118...
Page 135: ...Notes SONIX Service Manual SSM 001 Revision F Notes 127...
Page 136: ...Notes SSM 001 Revision F SONIX Service Manual 128...


