Chapter 4: Performance Testing
00.053.206, Revision A
SonixOne Service Manual
4-2
4.2
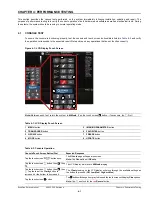
IMAGE TEST
To Conduct an Image Test:
1.
Connect each of the different transducers available and tap the touch screen button, then .
2.
Verify that the image scanned has all elements present. Note any black static line(s) that are visible on the
image.
3.
If found, test with the other transducers to verify the non-visible element(s) is in the same location.
4.
Try different transducer connectors to eliminate the possibility of a malfunctioning transducer.
4.3
REMOVABLE (PERIPHERAL) HARDWARE (IF APPLICABLE)
The system supports many different types of removable hardware other than what comes with the system as a default
package. The following comprises a list of the supported removable hardware:
• medical grade USB printer
• medical grade footswitch (dual or triple)
• barcode reader
• USB media (memory stick, external hard drive, etc.).
• external LCD display.
4.4
BATTERY MODULE TEST (IF APPLICABLE)
To Test the Battery Module:
1.
Ensure the battery is properly connected (
2.
Ensure the system is plugged in and powered on.
3.
Unplug the system's power cord from the wall.
4.
Ensure the system is still running (i.e., the system is running on battery power).
5.
Plug the system back in.
6.
Power off the system.
4.5
PULSED DOPPLER SOUND TEST
To Conduct a Pulsed Doppler Sound Test:
1.
Ensure the system is powered on and has completed the initialization sequence.
2.
Ensure the system has an exam screen showing.
3.
Tap the touch screen button.
4.
Tap .
5.
Tap .
6.
Tap .
7.
Tap the top of the
Audio
button to increase the volume or the bottom to decrease it.
8.
The sound of static should be audible.
Note:
Most transducers can be inserted in either of the two transducer connection ports. However, to ensure
proper function, insert the SA4-2/24 transducer into transducer connection port
2
.
Note:
To ensure the battery is completely charged at the time of installation, leave the system plugged in for at
least 6.5 uninterrupted hours.
Note:
If
Audio
is not visible on the touch screen, use the page selector buttons (
>>
or
<<
) to move through
imaging parameter options to locate it.
Note:
If static is not audible, tap and drag the gate away from the top of the LCD display.
B
PW
Summary of Contents for SonixOne Q+
Page 1: ...Analogic Ultrasound Service Manual SonixOne Q Ultrasound System...
Page 2: ......
Page 4: ......
Page 8: ...Table of Contents 00 053 206 Revision A SonixOne Service Manual iv...
Page 14: ...Chapter 1 General Information 00 053 206 Revision A SonixOne Service Manual 1 6...
Page 16: ...Chapter 2 System Specifications 00 053 206 Revision A SonixOne Service Manual 2 2...
Page 42: ...Chapter 4 Performance Testing 00 053 206 Revision A SonixOne Service Manual 4 4...
Page 46: ...Chapter 5 Software 00 053 206 Revision A SonixOne Service Manual 5 4...
Page 54: ...Chapter 6 Peripherals and Accessories 00 053 206 Revision A SonixOne Service Manual 6 8...
Page 119: ......

