background image

CBF 125 AIR COOLING ENGINE SERVICE MANUAL 

RENEGADE SPORT & SCRAMBLER X 125 EFI


10

8


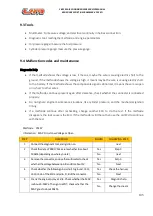
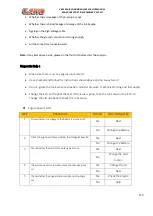
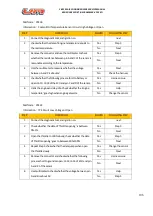
Malfcode

P0201 

Information

Injector 1 Circuit Malfunction 

STEP 

OPERATION 

SOLVED 

FOLLOWING STEP 

Connect the diagnostic tool, and ignition on. 

next 

Remove the conneter of injecor 1, use multimeter to check 

whether the voltage of Pin A is about 12V. 

Yes 

Step 4 

No 

Next 

Check whether the connection between pin A and the main 

power relay is short to gound or open. 

Yes 

Harness issue 

No 

Next 

Use multimeter to measure whether the resistance 

between pin A and B of the injecotr is about 10-14 Ω @ 

20


No 

Change the injector 

Yes 

next 

Use the multimeter to check whether the voltage of Pin B is 

about 12V. 

Yes 

Help 

No 

Next 

Check whether the connection between pin B of the 

injector and J2-05 of the ECU is open or short to 

battery/ground. 

Yes 

Harness issue 

No 

Help 

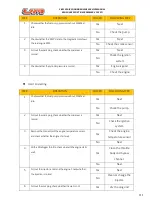
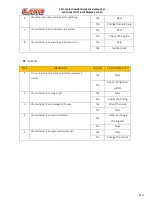
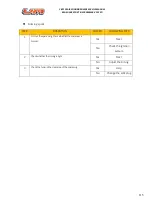
Malfcode

P0230/P0232 

Information

FPR Coil Circuit Low/High Voltage or Open 

STEP 

OPERATION 

SOLVED 

FOLLOWING STEP 

Connect the diagnostic tool, and ignition off 

next 

Wait about 30s. Remove the fuel pump realy, ignition on. 

Check whether voltage of the relay feeder ear is about 12V 

Yes 

Change the pump 

No 

Next 

Check whether the feeder ear is short to ground or open. 

Yes 

Harness issue 

No 

Help 

Summary of Contents for CBF 125

Page 1: ...CBF 125 ENGINE AIR COOLING SERVICE MANUAL AND DELPHI EFI DIAGNOSTIC...

Page 2: ...1 MAIN TECHNICAL PARAMETERS 2 GENERAL MAINTENANCE 3 LUBRICATION SYSTEM 4 CYLINDER HEAD PARTS MAINTENANCE 5 CYLINDER BLOCK AND PISTON 6 RIGHT COVER CLUTCH BALNACE GEAR GEARSHIFT 7 LEFT COVER STARTING M...

Page 3: ...6 C C Compression ratio 9 2 1 Valve Timing In Open 5 BTDC Close 37 ABDC Out Open 50 BBDC Close 3 ATDC Max power 7 2 1 5 kW 7500 1 5 rpm Max torque 9 2 1 5 N m 6000 1 5 rpm Idle speed 1400 100 r min Tr...

Page 4: ...100rpm 1 5 Cylinder Head and Valves unit mm Item Standard Service Limit Valve Clearance Inlet 0 04 0 06 Exhaust 0 04 0 06 Valve Stem Diameter Inlet 4 975 4 990 4 92 Exhaust 4 955 4 970 4 90 Valve Guid...

Page 5: ...38 52 39 52 3 Inner diameter of piston pin hole 14 002 14 008 14 04 Closure clearance of piston ring Top 0 1 0 25 0 35 Second 0 15 0 30 0 4 Oil 0 2 0 7 0 85 Piston Ring Groove Clearance Top 0 02 0 06...

Page 6: ...nnecting Rod Big End Radial Clearance 0 0 008 0 03 Side Clearance 0 1 0 35 0 5 Crankshaft Run out 0 03 0 08 Fork Outer diameter of fork shaft 9 966 9 984 9 93 Inner diameter of fork 10 000 10 018 10 0...

Page 7: ...ADE SPORT SCRAMBLER X 125 EFI 7 GENERAL MAINTENANCE 2 1 ENGINE MAINTENANCE CYCLE 8 2 2 ENGINE MAINTENANCE STANDARDS 8 2 3 TORQUE STANDARS 8 2 4 SPARK PLUG MAINTENANCE 9 2 5 VALVE CLEARANCE ADJUSTMEN 1...

Page 8: ...ion system the fuel filter must be changed every 3000 Km as is specified in the table and the fuel pump filter changed every 10000 km 2 2 Engine Maintenance Standards Item Standard Service Limit Engin...

Page 9: ...age the engine If the lateral and center electrode have erosion or covered with accumulation of carbon the spark plug shall be cleaned or replaced The clearance of spark plugs shall be 0 8 1 0 mm Asse...

Page 10: ...on Mark line T on rotor of magneto is aligned with center of view hole Remove upper cover of cylinder head refer to 4 2 section Check Valve Clearance Note The inspection and adjustment of the valve cl...

Page 11: ...125 AIR COOLING ENGINE SERVICE MANUAL RENEGADE SPORT SCRAMBLER X 125 EFI 11 Tighten caps of large and small view holes respectively Install upper cover of cylinder head and check the engine for leaka...

Page 12: ...or 3 5minutes 2 6 4 2 3minutes after stopping the engine support the vehicle using the main stand on firm level ground remove oil level gauge wipe it up and reinsert it Then put it out again to check...

Page 13: ...r hands with soap and water as soon as possible after handling used oil Changing the oil filter requires a torque wrench If you do not have it or the necessary skill to do the task we recommend you vi...

Page 14: ...o inspection The oil screen shall not be cleaned with gasoline or other solvents that may damage rubber Reinstall the right cover refer to 6 5 section 2 7 11 Check if bolt and sealing washer are in go...

Page 15: ...VICE MANUAL RENEGADE SPORT SCRAMBLER X 125 EFI 15 LUBRICATION SYSTEM 3 1 Lubrication system schematic diagram 16 3 2 Lubrication system technical specifications 17 3 3 Troubleshooting 17 3 4 Oil pump...

Page 16: ...CBF 125 AIR COOLING ENGINE SERVICE MANUAL RENEGADE SPORT SCRAMBLER X 125 EFI 16 3 1 Lubrication system schematic diagram...

Page 17: ...tween rotor and pump body 0 15 Requirements of tightening torque Fastening bolt of oil pump 10N m Screw on cover plate of oil pump 3N m 3 3 Troubleshooting Name of component Type of damage Symptom of...

Page 18: ...ion 3 4 1 Oil pump dismantle 3 4 1 1 Dismantle right cover refer to 6 5 section then remove circlip and take out gears of oil pump 3 4 1 2 Take out the pin and remove fastening bolt of oil pump Take o...

Page 19: ...embled thoroughly 3 4 3 Check of oil pump Note When checking oil pump turn the rotor to measure it at multiple points so as judge it if its wear is beyond service limit If wear measured at any point i...

Page 20: ...ck fit clearance between outer and inner rotors of oil pump Service limit 0 20mm 3 4 3 3 Take out the shaft and pin from the oil pump Use knife straight edge and feeler gauge to measure axial clearanc...

Page 21: ...umference of outer rotor and install the rotor into oil pump casing 3 4 4 2 Apply lube oil on the circumference of inner rotor pin shaft and pin and install them into oil pump casing 3 4 4 3 Install c...

Page 22: ...125 EFI 22 3 4 4 5 Assemble oil pump and tighten the bolt Assemble the pin 3 4 4 6 Install oil pump gears onto pin shaft and install circlip Apply an appropriate amount of lube oil on the gears 3 4 4...

Page 23: ...RAMBLER X 125 EFI 23 CYLINDER HEAD PARTS MAINTENANCE 4 1 CYLINDER HEAD EXPLODED VIEW 24 4 2 UPPER COVER OF CYLINDER HEAD MAINTENANCE 25 4 3 ROCKER ARM SET MAINTENANCE 27 4 4 CYLINDER HEAD SET MAINTENA...

Page 24: ...CBF 125 AIR COOLING ENGINE SERVICE MANUAL RENEGADE SPORT SCRAMBLER X 125 EFI 24 4 1 Cylinder Head exploded view...

Page 25: ...pper cover of cylinder head maintenance 4 2 1 Remove two bolts form upper cover of cylinder head 4 2 2 Take out upper cover and corresponding seal gasket 4 2 3 Positioning pin and O ring for removing...

Page 26: ...e and clean it using air gun 4 2 6 Assemble bolts and washers after the head cover is checked Need to be replaced old washer by a new one 4 2 7 Assembly location pin and a new O ring 4 2 8 Clean the s...

Page 27: ...ed at right place install rubber gasket of bolt of cylinder head with mark UP upwards 4 2 10 Assembling head cap upper cover bolts and tighten Tightening torque 10N m 4 3 Rocker arm set maintenance 4...

Page 28: ...AL RENEGADE SPORT SCRAMBLER X 125 EFI 28 4 3 1 3 Remove the fastening bolts from timing sprocket chain 4 3 1 4 Remove the timing sprocket chain Care shall be taken when using a tool to fix the chain t...

Page 29: ...MBLER X 125 EFI 29 4 3 1 5 Remove AB Nut to take out the ROCKER ARM set 4 3 1 6 Loosen fastening bolt on stop plate and remove the stop plate Then remove camshaft 4 3 1 7 Remove fastening bolt of rock...

Page 30: ...t both ends of camshaft for free rotation 4 3 1 10 Inspect the cam for abrasion Service limit Inlet 31 8 mm Exhaust 31 5mm 4 3 1 11 And check rocker arm shaft for wear Service limit 9 91mm 4 3 1 12 Ch...

Page 31: ...Assemble rocker arm and rocker shaft in accordance with sequence shown in the illustration 4 3 2 3 Use flat screwdriver to turn rocker arm shaft so verify that screw hole on rocker arm shaft is aligne...

Page 32: ...riate amount of SO2 grease into cams 4 3 2 6 Mounting the camshaft into the rocker bracket take special attention to the projected point on flange shall be upward as shown in the figure 4 3 2 7 Mounti...

Page 33: ...h sides of gasket and external surface of nut then install them into rocker arm bracket 4 3 2 10 Tighten AB bolt nut in turns Fastening torque 35N m 4 3 2 11 Follow the preceding steps to adjust the e...

Page 34: ...olts Fastening torque 9N m 4 3 2 14 Loosen tensioner device to check if chain is tensioned 4 3 2 15 Replace O ring with a new one and assemble the tensioning screw 4 4 Cylinder head set maintenance 4...

Page 35: ...35 4 4 1 2 move the cylinder head assembly 4 4 1 3 Remove the cylinder head seal gasket and the two position pins 4 4 1 4 Use special tooling to dismantle valve collet seat ring valve valve steam sea...

Page 36: ...eck of cylinder head assembly 4 4 2 1 Check the cylinder Head combustion chamber clean the carbon deposit 4 4 2 2 ck valve spring for free length In 37 8 mm Outer 40 8 mm 4 4 2 3 Inspection flatness o...

Page 37: ...CBF 125 AIR COOLING ENGINE SERVICE MANUAL RENEGADE SPORT SCRAMBLER X 125 EFI 37...

Page 38: ...X 125 EFI 38 4 4 3 Assembly of Cylinder head set Cylinder head exploded view 4 4 3 1 Assemble the components according to the order of exploded view 4 4 3 2 When installing valve spring care shall be...

Page 39: ...r head assembly shall be subject to air tightness test Next operation shall not be done unless the cylinder head assembly is confirmed air tight 4 4 3 4 Assembly positioning pins and a new cylinder he...

Page 40: ...ERVICE MANUAL RENEGADE SPORT SCRAMBLER X 125 EFI 40 4 5 Tensioner device extraction and installation 4 5 1 Remove the screw of the tensioning device 4 5 2 Use the right tools to adjust the tensioning...

Page 41: ...CBF 125 AIR COOLING ENGINE SERVICE MANUAL RENEGADE SPORT SCRAMBLER X 125 EFI 41 4 5 3 Assembly of Tensioner device 4 5 4 Replace O ring with a new one 4 5 5 Tighten the screw...

Page 42: ...SERVICE MANUAL RENEGADE SPORT SCRAMBLER X 125 EFI 42 CYLINDER BLOCK AND PISTON 5 1 CYLINDER BLOCK PISTON EXPLODED VIEW 43 5 2 LIMITS FOR SERVICE 44 5 3 TROUBLESHOOTING 44 5 4 CYLINDER BLOCK PISTON DIS...

Page 43: ...CBF 125 AIR COOLING ENGINE SERVICE MANUAL RENEGADE SPORT SCRAMBLER X 125 EFI 43 5 1 Cylinder block piston exploded view...

Page 44: ...4 14 13 96 Clearance between piston pin and piston pin hole 0 002 0 014 0 04 Small End of Connecting Rod Inner diameter 14 015 14 028 14 06 Clearance between small end of connecting rod and piston pin...

Page 45: ...plate 5 4 1 2 Knock cylinder block slightly with rubber hammer to separate cylinder block from crankcase Take out cylinder block upwards Care shall be taken to not damage piston when dismantling cyli...

Page 46: ...all be taken at two directions mutually perpendicular at every layer Limit value 52 5mm 5 4 2 2 Calculate cylindricity of cylinder bore in accordance with the maximum value measured at the positions L...

Page 47: ...Use long nose pliers to remove circlip of piston pin 5 4 3 3 Remove Piston pin 5 4 3 4 Turn piston rings manually to check if the piston rings can rotate freely on the piston without seizure Use thum...

Page 48: ...er bore and piston skirt calculate their fit clearance Limit value 0 09mm 5 4 4 3 Diameter inspection of piston pin hole Limit value 14 04mm 5 4 4 4 Detection of piston pin diameter Limit value 13 96m...

Page 49: ...into cylinder block and press them down with piston Check gap of each piston ring with feeler gauge Limit value Top ring 0 40mm Second ring 0 40mm Oil ring 0 85mm 5 4 4 9 heck for clearance between p...

Page 50: ...CBF 125 AIR COOLING ENGINE SERVICE MANUAL RENEGADE SPORT SCRAMBLER X 125 EFI 50...

Page 51: ...ston rings must be placed away from each to other by 120 Incorrect assembly of piston rings will directly cause oil burning abnormal wear and tear of piston 5 4 5 piston cylinder block installation Wh...

Page 52: ...n to reuse circlip otherwise the engine may be damaged Piston pin circlip must be installed to its place Split of circlip shall be alternated away from the installing position on the piston Split of c...

Page 53: ...PORT SCRAMBLER X 125 EFI 53 Install guide plate of chain into cylinder block Note Guide plate shall be installed to its place as shown in the figure otherwise the plate may be damaged abnormally Assem...

Page 54: ...RIGHT COVER CLUTCH BALANCED GEAR GEARSHIFT 55 6 2 CLUTCH TECHNICAL SPECIFICATIONS 56 6 3 TIGHTENING TORQUE REQUIREMENTS 56 6 4 TROUBLESHOOTING 56 6 5 RIGHT COVER EXTRACTION AND INSTALLATION 57 6 6 CLU...

Page 55: ...CBF 125 AIR COOLING ENGINE SERVICE MANUAL RENEGADE SPORT SCRAMBLER X 125 EFI 55 6 1 Exploded view of right cover clutch balancing gear gearshift...

Page 56: ...ear locking nut 45N m Five star plate fastening bolts 12N M Positioning plate fastening Bolts 12N M Clutch lid fastening Bolts 12N m 6 4 Troubleshooting 6 4 1 Clutch does not release or not fully rele...

Page 57: ...extraction and installation First drain off oil from engine remove bolts from right cover Remove the paper gasket and positioning pin Check the crankshaft oil seal is intact Removal of right cover Tak...

Page 58: ...for deformation check iif pushing rod and spring are damaged if they are replace them with new ones Partial assembly of right cover Replace oil seal of control arm with new one Apply appropriate amoun...

Page 59: ...in figure Then install pushing rod of clutch Assembly location pins and new paper gasket Removal clutch gasket and engine oil from crankcase before assembling Assemble right cover bracket bolts First...

Page 60: ...stallation 6 6 1 Clutch extraction Dismantle 4 bolts from end cover of clutch then take out end cover of clutch bearing declutch spring Dismantle locknut and washer of clutch Take out upper and lower...

Page 61: ...R X 125 EFI 61 Take out declutch shaft sleeve 6 6 2 Checking of clutch Check bearing of clutch for free rotation Check declutch spring of clutch for damage Measure free length of spring Service limit...

Page 62: ...mit 2 6mm Check driven friction plates flatness Service limit 0 20mm Check outer case of clutch and shaft sleeve for abnormal geometry Measure inner hole diameter of driven gear on outer case Service...

Page 63: ...ve onto main shaft Apply appropriate amount of lube oil onto gears Assemble outer case and declutch washer New friction plates shall be immersed in engine oil before assembly When assemble central sle...

Page 64: ...tools to fix pressure plate and tighten locknut of clutch Tightening torque shall meet specified requirement Tightening torque 45N m Assemble spring and clutch end cover and tighten bolts on the end...

Page 65: ...arts in order 6 6 3 1 Pin 6 6 3 2 Locating plate 6 6 3 3 Locating plate bolt 6 6 3 4 Locating plate spring 6 6 3 5 Washer 6 6 4 Check of gearshift arm Check if lever of arm bends deforms or wears abno...

Page 66: ...e pin and star shaped plate Pin holes on the star shaped plate shall be aligned with two cylindrical pins 6 6 7 Tighten bolt on star shaped plate Tightening torque 12 N m 6 6 8 Apply lube oil to gears...

Page 67: ...alancing gear Note Do not damage woodruff and circumference of crankshaft when removing drive gear and balancing gear 6 6 2 Drive gear and balancing drive gear Assembly 6 6 2 1 Check woodruff key for...

Page 68: ...ve gear with woodruff key on crankshaft and assemble them Apply appropriate amount of engine oil on gears 6 6 2 5 Assemble oil filter washer locknut 6 6 2 6 Tighten nut to specified torque Tightening...

Page 69: ...shaft sleeve and woodruff key 6 6 3 3 Balancing driven Gear Disassembly and assembly Dismantle circlip washer disc washer flat washer in turn Take out balancing driven gear two springs two buffer rub...

Page 70: ...g face between gear and hub Install buffer rubber bushing on right position on the hub Install driven gear onto the rub Install buffer spring into gear Install washer disc washer washer circlip in tur...

Page 71: ...alancing shaft and keyway 6 8 1 2 Align keyway of balancing driven gear with woodruff key on balancing shaft Meanwhile rotate balanced driven gear to align the keyway with timing mark on balancing dri...

Page 72: ...5 EFI 72 7 LEFT COVER STARTING MOTOR SYSTEM MAGNETO 7 1 EXPLODED VIEW OF LEFT COVER STARTING MOTOR SYSTEM MAGNETO 73 7 2 LEFT COVER EXTRACTION AND INSTALLATION 74 7 3 STARTING MOTOR SYSTEM EXTRACTION...

Page 73: ...CBF 125 AIR COOLING ENGINE SERVICE MANUAL RENEGADE SPORT SCRAMBLER X 125 EFI 73 7 1 Exploded view of left cover starting motor system magneto...

Page 74: ...stallation 7 2 1 Take out gearshift switch harness from harness groove 7 2 2 Loosen fastening bolt on left cover and remove left cover 7 2 3 Take out locating pin and paper gasket Assemble locating pi...

Page 75: ...5 7 2 5 Insert gearshift switch harness into harness groove on left cover 7 3 Starting motor system extraction and installation 7 3 1 Dismantle left cover and take out shaft sleeve dual gear shaft and...

Page 76: ...n magneto Use special tools to dismantle magneto rotor 7 3 5 Check needle bearing woodruff key on crankshaft for damage 7 3 6 Clean off engine oil from tapered face of crankshaft Install magneto rotor...

Page 77: ...que Tightening torque 65 N m 7 3 9 Replace O ring with a new one Apply appropriate amount of lube oil onto O ring before assembling 7 3 10 Assemble starting motor 7 3 11 Apply appropriate amount of lu...

Page 78: ...k Assemble large starting gear onto magneto rotor then check if the gear can rotate normally making it rotate counterclockwise 7 3 13 Magneto rotor disassembly 7 3 13 1 Use special tools to fix rotor...

Page 79: ...ENGINE SERVICE MANUAL RENEGADE SPORT SCRAMBLER X 125 EFI 79 7 3 13 4 Check teeth of large starting gear for damage Measure outer diameter of large starting gear Service limit 45 60mm 7 3 13 5 Magneto...

Page 80: ...with threaded hole 7 3 13 8 Apply appropriate amount of fastening adhesive onto threads of bolts then use tools to locate and tighten the bolt Tightening torque 16 N m 7 3 13 9 Install large starting...

Page 81: ...ake out magneto 7 4 3 Install a magneto onto left cover then tighten bolts 7 4 4 Install sensor and tighten bolts Press cable clip of magneto into corresponding position on left cover and tighten bolt...

Page 82: ...RACTION AND INSTALLATION 8 1 CRANKSHAFT EXPLODED VIEW 83 8 2 TECHNICAL SPECIFICATIONS 84 8 3 CRANKSHAFT EXTRACTION 85 8 4 DRIVE TRAIN EXTRACTION AND CHECK 87 8 5 BEARINGS EXTRACTION 90 8 6 BEARINGS IN...

Page 83: ...CBF 125 AIR COOLING ENGINE SERVICE MANUAL RENEGADE SPORT SCRAMBLER X 125 EFI 83 8 1 Crankcase exploded view...

Page 84: ...iameter 10 000 10 018 10 05 Shift Fork Ear Thickness 4 93 5 00 4 5 Drive train Gear tooth inner hole diameter M4 20 000 20 021 20 04 M5 20 000 20 021 20 04 C1 20 500 20 521 20 55 C2 23 000 23 021 23 0...

Page 85: ...block right cover left cover in accordance with steps described above 8 3 2 Loosen and dismantle fastening bolt on chain guard then take out chain guard tension plate guide plate and chain 8 3 3 Disma...

Page 86: ...n right crankshaft 8 3 7 Dismantle fastening bolts on crankshaft 8 3 8 Place crankcase properly with right half downwards Knock counter shaft and crankshaft with rubber hammer to loosen adhesive on ha...

Page 87: ...heck chain tension plate for severe wear or damage If there is replace the tension plate with a new one 8 4 Drive train extraction and check 8 4 1 Take out fork shaft of main and counter shafts 8 4 2...

Page 88: ...er diameter of the gears Service limit M4 20 04mm M5 20 04mm C1 20 55mm C2 23 07mm C3 23 07mm 8 4 4 3 Check shaft sleeve for severe wear and damage Measure inner and outer diameters of shaft sleeve Bu...

Page 89: ...r of main and counter shafts M4 16 93mm C1 16 93mm C2 19 94mm C3 19 95mm Calculate fit clearance between gears and shaft sleeve Service limit 0 10mm 8 4 5 Check of gearshift drum 8 4 5 1 Check both en...

Page 90: ...al wear and damage 8 4 6 Replacement of bearings 8 4 6 1 Turn inner race of bearing to check if it can rotate freely 8 4 6 2 Check bearing cage and balls looking for severe wear and damage 8 5 Bearing...

Page 91: ...OOLING ENGINE SERVICE MANUAL RENEGADE SPORT SCRAMBLER X 125 EFI 91 8 5 3 Dismantle counter shaft and gearshift arm oil seals located on left half 8 5 4 Dismantle bearings from left half using a bearin...

Page 92: ...sponding holes with special tools Note 1 Bearing shall be installed using special tools 2 When pressing bearing force shall be applied on outer race of bearing otherwise the bearing may be damaged 8 6...

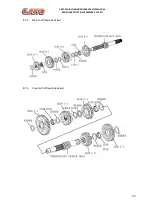
Page 93: ...rease onto inner and outer races of bushing to guarantee initial lubrication 8 7 4 Install the components and parts onto their original positions Note All gears assembled shall be able to rotate and m...

Page 94: ...CBF 125 AIR COOLING ENGINE SERVICE MANUAL RENEGADE SPORT SCRAMBLER X 125 EFI 94 8 7 5 Main shaft Exploded view 8 7 6 Counter shaft exploded view...

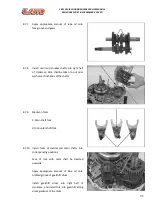
Page 95: ...aken to not miss washers at both ends of the shafts 8 7 9 Marks on forks C Main shaft fork R L Counter shaft fork 8 7 10 Install forks of counter and main shafts into corresponding positions Face of f...

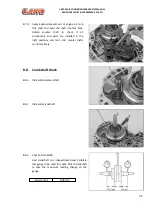
Page 96: ...ft to check if all components and parts are installed in the right positions and main and counter shafts can rotate freely 8 8 Crankshaft check 8 8 1 Dismantle balanced shaft 8 8 2 Dismantle crankshaf...

Page 97: ...Check timing drive sprocket on crankshaft for abnormal wear and damage If there is check correspondingly timing driven sprocket chain tensioner etc for abnormal condition When it is necessary to repl...

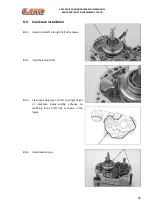
Page 98: ...8 9 Crankcase installation 8 9 1 Install crankshaft into right half of crankcase 8 9 2 Install balanced shaft 8 9 3 Clean matching faces on left and right halves of crankcase Apply sealing adhesive o...

Page 99: ...nstalled onto their positions and if there are foreign elements in the crankcase 8 9 6 Install and approximate the bolts then tighten them with torque spanner to specified torque Tightening torque 12N...

Page 100: ...Apply adhesive to thread on 2 3 of length then install pressing pin body guard and bolts onto crankshaft case Tighten the bolts to specified value Tightening torque 10N m 8 9 11 Install chain tension...

Page 101: ...DE SPORT SCRAMBLER X 125 EFI 101 9 EFI DIAGNOSTIC SYSTEM RENEGADE SPORT SCRAMBLER X 125 EFI 9 1 GENERAL INFORMATION 102 9 2 PRECAUTIONS 102 9 3 TOOLS 103 9 4 MALFUNCTION CODES AND MAINTENANCE 103 9 3...

Page 102: ...ion off before connect or disconnect the connectors Make sure the ECU temperature is below 80 Please do not disassemble the fuel pipe arbitrariliy If have to please first release the pressure and make...

Page 103: ...ly Do not ignore engine maintenance situations like cylinder pressure and the mechanical ignition timing If a malfcode continue after rechecking change another ECU to do the test If the malfcode disap...

Page 104: ...are short battery J2 8 J2 10 of theECU and pin C D of the connector Yes Change the harness No Next 6 Crank the engine and stay idle Check whether the intake air temperature goes up whenthe engine tem...

Page 105: ...the engine to stay idle Check whether the intake air temperature goes up when the engine temperature goes up Yes Help No Change the sensor Malfcode P0117 Information Coolant Oil Temperature Sensor Ci...

Page 106: ...14 of the ECU and pin C and D of the sensor Yes Harness issue No Next 6 crank the engine and stay idle Check whether the engine temperture goes high whenengine get warm Yes Help No Change the sensor...

Page 107: ...and C of the sensor Yes Harness issue No Next 6 Use multimeter to check whether the voltage between pin A and B is about 5V Yes Help No Step 5 Malfcode P0131 P0132 Information O2S 1 Circuit Low High...

Page 108: ...tance between pin A andB of the injecotr is about 10 14 20 No Change the injector Yes next 5 Use the multimeter to check whether the voltage of Pin B is about 12V Yes Help No Next 6 Check whether the...

Page 109: ...check whether the voltage of pin B is about 12V Yes Help No Next 6 Check whether the connection of pin 2 of the coil and J2 01 of ECU is open or shor to battery ground Yes Harness issue No Help Malfco...
Page 110: ...the maintenance situation cylinder pressure mechanical timing and fuel quality Change the ECU and repeat the test if the issue is gone then the root cause is the ECU Or change the old one back to che...

Page 111: ...rd to starting STEP OPERATION SOLVED FOLLOWING STEP 1 Check wether the fuel pump pressure is about 250kPa at idle Yes Next No Check the pump 2 Pull out the spark plug check whether the sparkover is no...

Page 112: ...e body and bypass channel Yes Clean the TB No Next 3 Check whether the IACV works well Yes Next No Check the IACV 4 Check whethe the fuel pressure is about 250kPa Yes Next No Check the pump 5 Check wh...

Page 113: ...emperature sensor and check whether the engine works well Yes Help No Change the sensor Acceleration gets worse STEP OPERATION SOLVED FOLLOWING STEP 1 Check whether the air filter is blocked and wheth...

Page 114: ...cked or not No help Yes maintenance Backfire STEP OPERATION SOLVED FOLLOWING STEP 1 Pull out the spark plug check whether the sparkover is normal Yes Next No Check the ignition system 2 Check whether...

Page 115: ...rk STEP OPERATION SOLVED FOLLOWING STEP 1 Pull out the spark plug check whether the sparkover is normal Yes Next No Check the ignition system 2 Check whether the timing is right Yes Next No Adjust the...

Reviews: