background image

24

General Information

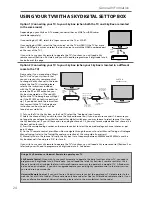
USING YOUR TV WITH A SKY DIGITAL SET TOP BOX

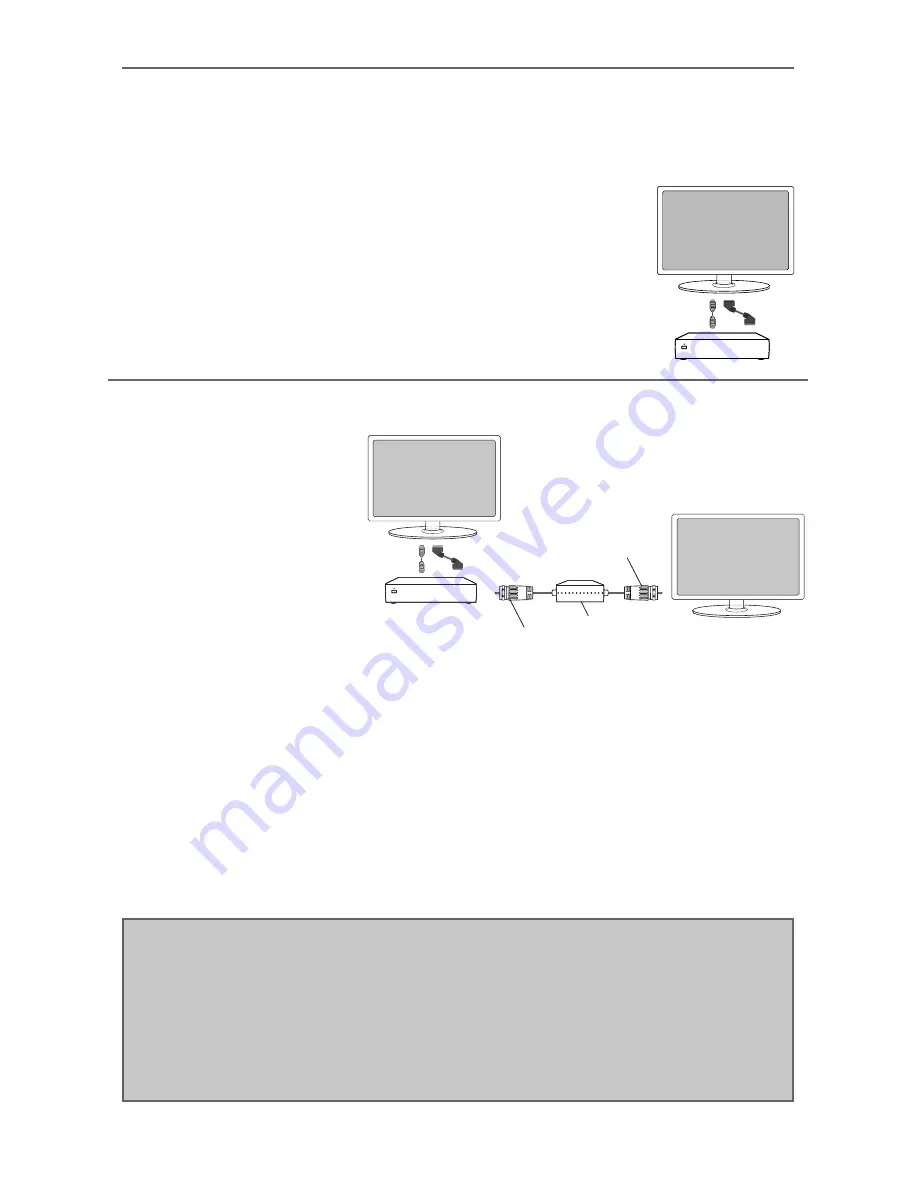
Option 1) Connecting your TV to your Sky box (when both the TV and Sky Box are located 
in the same room) 

Depending on your Sky Box & TV model, connect either by SCART or HDMI cables 
(available separately) 

If connecting by SCART, select the ‘Input source’ on the TV as SCART. 

If connecting by HDMI, select the ‘Input source’ on the TV as HDMI (if the TV has more 
than 1 HDMI port, ensure you select the input source to match the HDMI numbered port 
on the rear of the TV)

If you wish to use your Sky remote to operate the TV’s functions, you will need a Sky 
remote control (Revision 9 or later) and you will need to programme a 4 digit code into it.  
See bottom of this page. 

Option 2) Connecting your TV to your Sky box (when your Sky box is located in a different 
room to the TV) 

Please note, if you are adding a ‘Magic 
Eye/TV Link’ to your system so that 
you can use your Sky remote control 
to change the Sky channel in the room 
where the 2nd TV is located, please 
refer to the instructions included 
with the TV link/magic eye in order to 
ensure the RF or RF2 output on your 
Sky box is powered on. (The red LED 
light on the TV link/magic eye will light 
up if the RF / RF2 output is correctly set 
up)  If you do not have the instructions 
that came with the TV link/magic eye, 
instructions on how to do it can be 
found on our web site. 

1) To tune the TV to the Sky box, on the 2nd TV, select the ‘Analogue’ input source. 
2) Select the channel that you wish to store the Sky box/channel on. (If you do not use channels 1-5 because you 
no longer have analogue terrestrial channels after digital switchover, you may choose to select channel 1 to store 
the Sky box/channel, if you still have and use analogue channels 1-5, you may for example decide that channel 6 is 
the best option for you)  
3) Press the corresponding number on the remote control to select the desired analogue channel chosen as per 
point 2 above. 
4) On the TV remote control, press Menu. Now navigate through the menus to select Manual Tuning or Analogue 
Manual tuning (refer to the Tuning/Channel menu section of this user guide if necessary) 
5) Manually tune in the channel (usually, the Sky box is at a frequency between 800Mhz and 850Mhz) once the 
Sky box/channel is found, press ‘OK’ to store it. 

If you wish to use your Sky remote to operate the TV’s functions, you will need a Sky remote control (Revision 9 or 
later) and you will need to programme a 4 digit code into it.  See below. 

Sky Box

SCART 
or HDMI 
cable

RF/COAX cable from 
Sky Box to 2nd TV

Connect to RF 
or RF2 output 
on the Sky box

Connect to the 
Aerial/RF input 
on the 2nd TV

TV Link/Magic Eye 
(optional)

2nd TV in 
another room

Sky Box

SCART 
or HDMI 
cable

Using a Sky Remote or a Universal Remote to operate your TV

Sky Remote Control, 

If you wish to use your Sky remote to operate the basic functions of your TV, you need to 

programme a 4 digit code into it. Please note. you will need the latest Sky Revision 9 remote control as this is 
the only version that includes the latest software/fi rmware necessary to operate this model of TV.  All codes can 
be found on our website. If you wish to upgrade/replace your existing Sky remote control to the latest version, 
you can do so on our web site. 


Universal Remote Control,

 If you wish to use a Universal remote control to operate your TV, please refer to the 

web site for a full list of codes.  (Please note we only have codes for One for All branded remote controls, if you 
have an alternative brand of Universal remote, please refer to the manufacturer for the code.)

Summary of Contents for W185-189G-GB-2B-TCU-UK

Page 1: ...Model No W215 189G GB 2B FTCU UK W236 186G GB 4B FTCU UK W185 189G GB 2B TCU UK User Guide...

Page 2: ...Started Initial Set Up 11 TV Buttons and Input Source Menu 12 Remote Control 13 Connections 14 15 TV Menu Operation 16 21 Channel Menu 16 Picture Menu 17 Sound Menu 18 Time Menu 19 Feature Menu 20 Se...

Page 3: ...ant Once shadow image screen burn occurs it will never disappear and is not repairable under warranty How do I dispose of this product UK Waste electrical products should not be disposed of with house...

Page 4: ...rted Initial Set Up 11 TV Buttons and Input Source Menu 12 Remote Control 13 Connections 14 15 TV Menu Operation 16 21 Channel Menu 16 Picture Menu 17 Sound Menu 18 Time Menu 19 Feature Menu 20 Setup...

Page 5: ......

Page 6: ......

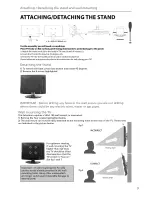
Page 7: ...and press the Standby button to power on the TV As part of our ongoing development to reduce power consumption we have added an extra function to this Television called Ecohome you will see this durin...

Page 8: ......

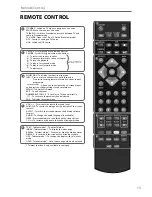
Page 9: ...s to your preference MENU To display OSD menu EXIT To exit all menus NUMBER BUTTONS 0 9 to select a TV channel directly To return to the previous channel viewed FAV To display favourites menu VOL To i...

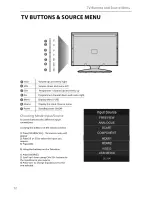
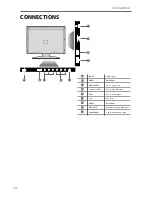
Page 10: ...input VIDEO AUDIO Video and Audio input Component HD Component HD Input RF IN RF TV Aerial Input USB USB port HDMI 2 HDMI input CI CARD IN Common Interface Card Input HEADPHONES 3 5mm Headphone outpu...

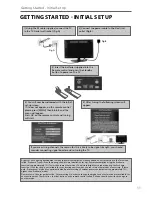
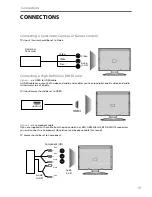
Page 11: ...a Camcorder Camera or Games Console TVs Input Source should be set to Video Connecting a High De nition HD Device Option 1 via HDMI to HDMI cable A HDMI cable can output both video and audio and enabl...

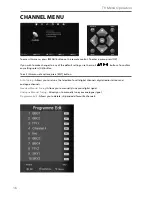
Page 12: ...igital signal Analogue Manual Tuning Allows you to manually tune your analogue signal Programme Edit Allows you to delete skip and add favourite channels To access this menu press MENU button on the r...

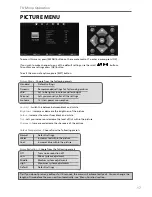
Page 13: ...lack and white Brightness Increase or decrease the brightness of the picture Colour Increases the colour from black and white Tint Lets you increase or decrease the level of tint within the picture Sh...

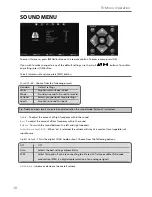
Page 14: ...movies Personal Selects your personal sound settings Sports Emphasises sound for sports Digital Output This is the digital COAX Audio output Choose from the following options Off Off Auto Selects the...

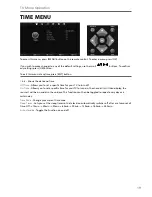
Page 15: ...ime Allows you to set a speci c time for your TV to turn off On Time Allows you to set a speci c time for your TV to turn on the channel it will then display the source it will be on and also the volu...

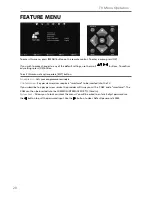
Page 16: ...ed into the COMMON INTERFACE PORT CI Card In System Lock Allows you to lock or unlock the menu You will be asked to enter a 4 digit password use the button to quit the password input Use the button to...

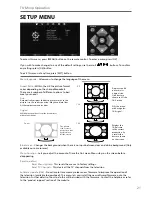
Page 17: ...d This menu lets you install the new software rmware onto the television Further details of how to do this will be issued with the rmware Contact the helpline or refer to the product support section o...

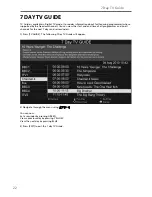
Page 18: ...l You can view the start and end time of all programmes and on all channels for the next 7 days and set reminders 1 Press TV GUIDE The following 7 Day TV Guide will appear 2 Navigate through the menu...

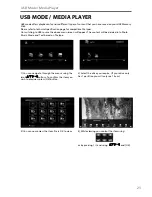
Page 19: ...see 1 item 3 You can now access the item Press OK to view 4 While viewing you control the item using or by pressing i and using and OK USB mode offers playback of various different types of content th...

Page 20: ...ore the Sky box channel if you still have and use analogue channels 1 5 you may for example decide that channel 6 is the best option for you 3 Press the corresponding number on the remote control to s...

Page 21: ...ation please refer to the set up menu section of the manual of how to do this General Can I stop my TV turning off after 4hrs Yes 1 In the picture settings menu de select Eco home 2 In the time settin...

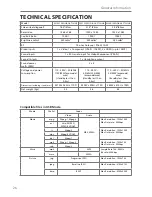
Page 22: ...TCU UK Screen size diagonal 18 5 47cm 21 5 55cm 23 6 60cm Resolution 1366 x 768 1920 x 1080 1920 x 1080 Contrast Ratio 1000 1 1000 1 1000 1 Brightness cd m2 250 cd m2 250 cd m2 280 cd m2 RF 75 ohm Ant...

Page 23: ...tion 11 Frequently Asked Questions 27 Getting Started 11 Language 21 Manual Search 16 Noise Reduction 17 Operating the TV with a universal or Sky BSKYB remote control 26 Picture Mode 17 Remote control...

Page 24: ...07 3...
Reviews: