6
Note:
Always turn off your guitar amplifier before connec ng
your guitar cables or changing the ba ery in the pedal to avoid
damaging your amplifier.
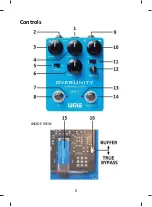
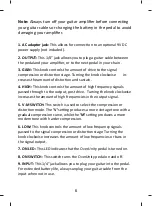
1. AC adaptor jack:
This allows for connec on to an op onal 9V DC
power supply (not included).
2. OUTPUT:
This 1/4” jack allows you to plug a guitar cable between
the pedal and your amplifier, or to the next pedal in your chain .
3. GAIN:
This knob controls the amount of drive to the signal
compression or distor on stage. Turning the knob clockwise in-
creases the amount of distor on and sustain.
4. HIGH:
This knob controls the amount of high frequency signals
passed through to the output, post drive. Turning the knob clockwise
increases the amount of high frequencies in the output signal.
5. V-M SWITCH:
This switch is used to select the compression or
distor on mode. The
’V’
se ng produces a more vintage tone with a
gradual compression curve, while the
‘M’
se ng produces a more
modern tone with harder compression.
6. LOW:
This knob controls the amount of low frequency signals
passed to the signal compression or distor on stage. Turning the
knob clockwise increases the amount of low frequencies or bass in
the signal output.
7. ON LED:
This LED indicates that the OverUnity pedal is turned on.
8. ON SWITCH:
This switch turns the OverUnity pedal on and off.
9. INPUT:
This 1/4” jack allows you to plug your guitar into the pedal.
For extended ba ery life, always unplug your guitar cable from the
input when not in use.


