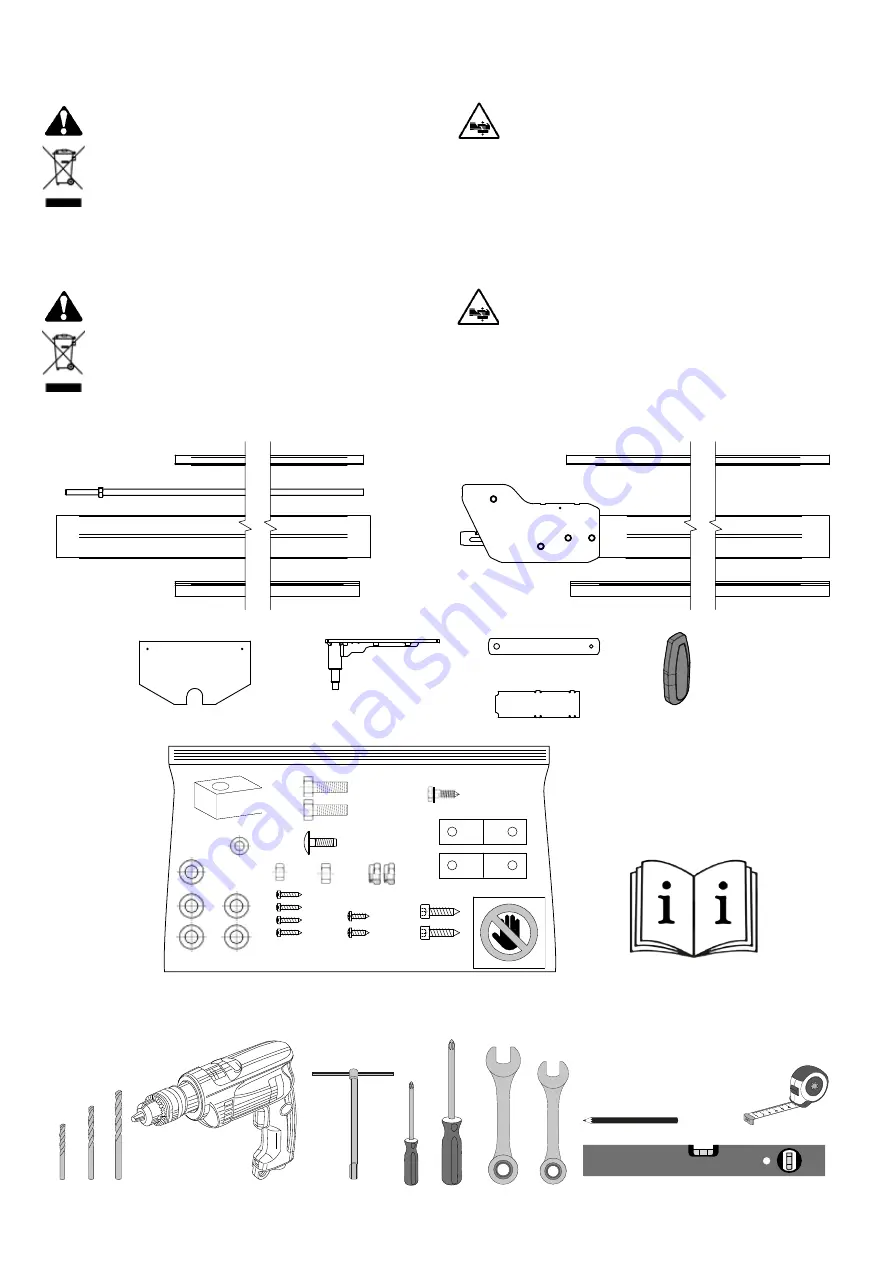
background image

M10x25

Ø10

Ø10

Ø6

M10

M6

M10

4,2x16

ø3,5x13

ø2,9x16

ø4,8x22

M6x20

GENERALITÀ

Il kit ART90 BAR PS / BOOM PS consente di installare la barriera in aree con spazio in altezza limitato. 

ART90 BAR PS / BOOM PS

 3m - Larghezza passaggio: da 2m a 3m - Altezza passaggio: 2.0m ÷ 2.7m 

ART90 BAR PS / BOOM PS

 5m - Larghezza passaggio: da 3m a 5m - Altezza passaggio: 2.2m ÷ 3.3m 

DEMOLIZIONE 

L’eliminazione dei materiali va fatta rispettando le norme vigenti. Non gettate il vostro apparecchio scartato, le pile o 

le batterie usate nei rifiuti domestici. Avete la responsabilità di restituire tutti i vostri rifiuti da apparecchiature elettriche o elettroniche 

lasciandoli in un punto di raccolta dedicato al loro riciclo.

GENERAL INFO

The ART90 BAR PS / BOOM PS kit allows the barrier to be installed in areas with limited height space.

ART90 BAR PS / BOOM PS

 3m – Opening width: from 2m to 3m - Overhead clearance: 2.0m ÷ 2.7m 

ART90 BAR PS / BOOM PS

 5m – Opening width: from 3m to 5m - Overhead clearance: 2.2m ÷ 3.3m 

SCRAPPING

 Materials must be disposed of in accordance with the regulations in force. Do not throw away your discarded equipment 

or used batteries with household waste. You are responsible for taking all your waste electrical and electronic equipment to a suitable 

recycling centre.

COMPOSIZIONE DEL KIT - KIT COMPOSITION

ATTREZZATURE - EQUIPMENT

Ø 2.25 - 6.5 - 10.5

Ø 2.25 - 6.5 - 10.5

5 mm

5 mm

17 mm

17 mm

PH1

PH1 PH2

PH2

10 mm

10 mm

Prima di effettuare qualsiasi intervento sull’impianto 

togliere l’alimentazione elettrica.

Il simbolo indica operazioni che, se effettuate in modo non 

corretto, possono presentare rischi di SCHIACCIAMENTO.

Disconnect the power supply before carrying out any 

interventions on the system.

The symbol indicates operations which, if performed 

incorrectly, may pose CRUSHING risks.

2 - 

ART90

D814294 23A97_02

Summary of Contents for ART90 BAR PS

Page 1: ...M PS D814294 23A97_02 ISTRUZIONI D USO E DI INSTALLAZIONE INSTALLATION AND USER MANUAL BARRA SNODATA ARTICULATED BOOM Attenzione Leggere attentamente le Avvertenze all interno Caution Read Warnings inside carefully 19 05 21 ...

Page 2: ...d height space ART90 BAR PS BOOM PS 3m Opening width from 2m to 3m Overhead clearance 2 0m 2 7m ART90 BAR PS BOOM PS 5m Opening width from 3m to 5m Overhead clearance 2 2m 3 3m SCRAPPING Materials must be disposed of in accordance with the regulations in force Do not throw away your discarded equipment or used batteries with household waste You are responsible for taking all your waste electrical ...

Page 3: ... MONTAGGIO GOMMA E CLIP RUBBER AND CLIP MOUNTING MONTAGGIO CERNIERA HINGE MOUNTING MONTAGGIO TIRANTE TIE ROD MOUNTING Ø2 9x16 5mm Ø2 9x16 Non serrare Do not tighten 1 2 Ø2 25 6mm 6mm ART90 3 D814294 23A97_02 ...

Page 4: ...ssone per BARRA SINISTRA LEFT SIDE barrier box drilling Ø10 5 Ø6 5 Ø6 5 Ø10 5 Ø10 Ø6 Ø10 Grower M10x25 M6x20 M6 DIMA DI FORATURA DRILLING TEMPLATE Foratura cassone per BARRA DESTRA RIGHT SIDE barrier box drilling Esempio di montaggio su barriera destra Assembly example for right side boom 4 ART90 D814294 23A97_02 ...

Page 5: ...r bloccare la posizione Tighten the lock nut to fix the position Tenere bloccato il tirante con la chiave a T Keep the tie rod lo cked wit the T type hex key wrench Avvitare il dado per portare la barra snodata in posizione orizzon tale Tighten the nut till the articulated boom ends on a straight position ART90 5 D814294 23A97_02 ...

Page 6: ...e led strip under the hinge pin Posizionare il segno all inizio della barra Place the sign on the led strip on the border of the arm Fissare la strip led con la clip Fix the led strip with the clip Posizionare la strip led a 225 mm Position the led strip Stendere la strip led e segnare con pennarello a 165 mm Unfold the led strip and mark with a pen at 165 mm Bloccare la strip led con le clip Lock...

Page 7: ...2465 2365 2265 2165 2065 1965 1865 1765 1665 1565 C 1160 1260 1360 1460 1560 1660 1760 1860 1960 2060 2160 2260 A 1260 1360 1460 1560 1660 1760 1860 1960 2060 2160 2260 2360 B 2915 2815 2715 2615 2515 2415 2315 2215 2115 2015 1915 1815 C 1160 1260 1360 1460 1560 1660 1760 1860 1960 2060 2160 2260 A 1260 1360 1460 1560 1660 1760 1860 1960 2060 2160 2260 2360 B 3165 3065 2965 2865 2765 2665 2565 246...

Page 8: ...M ETICHETTA PERICOLO DANGER LABEL Etichetta pericolo Danger label 25x25mm Posizionare l etichetta adesiva sul carter Place the adhesive label on the carter 8 ART90 D814294 23A97_02 ...

Reviews: