background image

MANUAL - SPRAY GUN CLEANERS - UG5000W SERIES       

Revision 2019-3 

2

CONTENTS

INTRODUCTION . . . . . . . . . . . . . . . . . . . . . . . . . . . . . . . . . . . . . . . . . . . . . . . . . . . . . . . . . . . . . . . . . . . . . . 3

FEATURES . . . . . . . . . . . . . . . . . . . . . . . . . . . . . . . . . . . . . . . . . . . . . . . . . . . . . . . . . . . . . . . . . . . . . . . . . . . 3

SETUP
INSPECTION  . . . . . . . . . . . . . . . . . . . . . . . . . . . . . . . . . . . . . . . . . . . . . . . . . . . . . . . . . . . . . . . . . . . . . . . . . 3
INCLUDED PARTS  . . . . . . . . . . . . . . . . . . . . . . . . . . . . . . . . . . . . . . . . . . . . . . . . . . . . . . . . . . . . . . . . . . . . 3
STRUCTURE  . . . . . . . . . . . . . . . . . . . . . . . . . . . . . . . . . . . . . . . . . . . . . . . . . . . . . . . . . . . . . . . . . . . . . . . . . 4
LOCATION  . . . . . . . . . . . . . . . . . . . . . . . . . . . . . . . . . . . . . . . . . . . . . . . . . . . . . . . . . . . . . . . . . . . . . . . . . . . 6
LEVELING, VENT AND AIR SUPPLY  . . . . . . . . . . . . . . . . . . . . . . . . . . . . . . . . . . . . . . . . . . . . . . . . . . . . 6
SOLVENT SELECTION   . . . . . . . . . . . . . . . . . . . . . . . . . . . . . . . . . . . . . . . . . . . . . . . . . . . . . . . . . . . . . . . . 6
PAIL SETUP - SOLVENT SIDE. . . . . . . . . . . . . . . . . . . . . . . . . . . . . . . . . . . . . . . . . . . . . . . . . . . . . . . . . . . 7
INSTALL WASH GUN AND WHIP LINE COUPLER . . . . . . . . . . . . . . . . . . . . . . . . . . . . . . . . . . . . . . . . . 7
PAIL SETUP - WATER SIDE . . . . . . . . . . . . . . . . . . . . . . . . . . . . . . . . . . . . . . . . . . . . . . . . . . . . . . . . . . . . . 7

CLEANING OPERATION
RIGHT TANK WATER
 

PRE-CLEAN  . . . . . . . . . . . . . . . . . . . . . . . . . . . . . . . . . . . . . . . . . . . . . . . . . . . . . . . . . . . . . . . . . . 8 


CLEAN SPRAY GUNS    . . . . . . . . . . . . . . . . . . . . . . . . . . . . . . . . . . . . . . . . . . . . . . . . . . . . . . . . . 8 


WATER RECLAIM  . . . . . . . . . . . . . . . . . . . . . . . . . . . . . . . . . . . . . . . . . . . . . . . . . . . . . . . . . . . . 10

LEFT TANK, SOLVENT  . . . . . . . . . . . . . . . . . . . . . . . . . . . . . . . . . . . . . . . . . . . . . . . . . . . . . . . . . . . . . . . 11 
     PRE-CLEAN  . . . . . . . . . . . . . . . . . . . . . . . . . . . . . . . . . . . . . . . . . . . . . . . . . . . . . . . . . . . . . . . . . . . . . . 11 
     PLACING SPRAY GUNS AND CUPS IN WASH TANK        . . . . . . . . . . . . . . . . . . . . . . . . . . . . . . . 12        
CLEANING CYCLE. . . . . . . . . . . . . . . . . . . . . . . . . . . . . . . . . . . . . . . . . . . . . . . . . . . . . . . . . . . . . . . . . . . 14 
                 USING THE FLOW-THROUGH BRUSH  . . . . . . . . . . . . . . . . . . . . . . . . . . . . . . . . . . . . . . . . 14
 

     MAINTENANCE . . . . . . . . . . . . . . . . . . . . . . . . . . . . . . . . . . . . . . . . . . . . . . . . . . . . . . . . . . . 15

TROUBLESHOOTING CHART  . . . . . . . . . . . . . . . . . . . . . . . . . . . . . . . . . . . . . . . . . . . . . . . . . . . . . . . . . 17
TROUBLESHOOTING PROCEDURES  . . . . . . . . . . . . . . . . . . . . . . . . . . . . . . . . . . . . . . . . . . . . . . . . . .  . 19
FLOW DIAGRAM  . . . . . . . . . . . . . . . . . . . . . . . . . . . . . . . . . . . . . . . . . . . . . . . . . . . . . . . . . . . . . . . . . . . . 20
REPLACEMENT PARTS   . . . . . . . . . . . . . . . . . . . . . . . . . . . . . . . . . . . . . . . . . . . . . . . . . . . . . . . . . . . . . . 26
WARRANTY   . . . . . . . . . . . . . . . . . . . . . . . . . . . . . . . . . . . . . . . . . . . . . . . . . . . . . . . . . . . . . . . . . . . . . . . . 28

Summary of Contents for UG5000W

Page 1: ...CAUTION RIGHT TANK FOR WATER BORNE PAINTS ONLY NOT DESIGNED FOR USE WITH SOLVENT BASED PAINT Conforms to Article 13 1 b ii Council Directive 2014 34 EU EX9A 18 02 78342 002 WWW UNIRAM COM CORPORATION...

Page 2: ...P SOLVENT SIDE 7 INSTALL WASH GUN AND WHIP LINE COUPLER 7 PAIL SETUP WATER SIDE 7 CLEANING OPERATION RIGHT TANK WATER PRE CLEAN 8 CLEAN SPRAY GUNS 8 WATER RECLAIM 10 LEFT TANK SOLVENT 11 PRE CLEAN 11...

Page 3: ...e other right side The left solvent side has automatic wash air flush solvent rinse fume venting with on off control manual wash with Flow through Brush manual rinse with a spigot and a stainless stee...

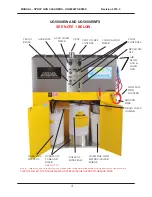
Page 4: ...IMER WASH PAIL WITH FILTERS WATER BORNE WASH PAIL SOLVENT VENT ON OFF CONTROL AIR BLOW GUN WASH GUN GROUND WIRE SOLVENT RINSE PAIL BRUSH ON OFF OVERFLOW TUBE AND RISER SEE NOTE 1 FLOW CONTROLS DRAIN V...

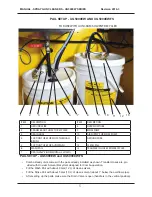
Page 5: ...ALVE HORIZONTAL CLOSED PAIL SETUP UG5000EW AND UG5000EWFS FOR USE WITH A UNI RAM SOLVENT RECYCLER 1 2 3 4 5 6 7 8 9 10 11 12 13 PAIL SETUP UG5000EW and UG5000EWFS Combo Ready units come with the pails...

Page 6: ...diameter The air supply pressure must be at least 85 PSI The supply air must be free from contaminants such as water dust rust tar and grease If the air supply is not clean and dry install a moisture...

Page 7: ...Open drain valve vertical position and pour 16 L of solvent into the wash tank to drain to the wash pail through the drain hose INSTALL BLOW GUN WASH GUN AND WHIP LINE COUPLER Remove the Blow Gun Wash...

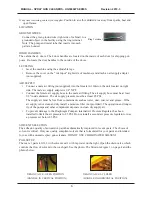
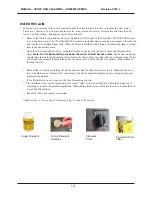
Page 8: ...inse NOTE WATERBORNE PAINT DRIES QUICKLY TO MINIMIZE HARDENING OF THE PAINT BEGIN CLEANING AS SOON AS POSSIBLE AFTER COMPLETION OF THE PAINT JOB PRE CLEAN Disconnect the spray gun from the air hose Po...

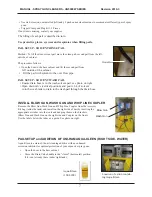
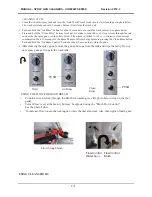
Page 9: ...nel TO ADJUST THE FLOW CONTROL Use the Flow Control to adjust the flow of water on the Water Gun and the Brush To increase the flow loosen the locking nut and rotate the dial anti clock wise and then...

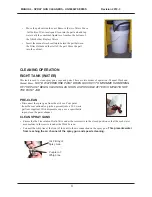
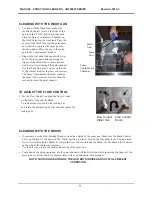
Page 10: ...ion proceeds the water should become clear The debris consisting of paint absorbed into the flocculant will collect in the filters Clean the tank with the wash gun wipe off the screen and rails reinse...

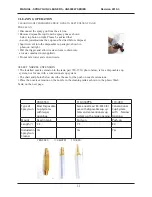
Page 11: ...aste SELECT NOZZLE EXTENSION The installed nozzle extension in the tank part 780 3530 photo below is for a disposable cup system not for use with a conventional cup system The chart and photos below d...

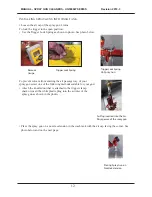
Page 12: ...n select one of the following methods suitable for your gun Attach the knurled nut that is attached to the trigger clamp chain or insert the white plastic plug into the air inlet of the spray gun as s...

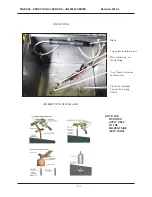
Page 13: ...19 3 Place Nozzle extension on this nozzle Place Conventional Cup on the 3 prong fixture Place white plug on the air fitting WASH TANK NOTE THE PICTURES APPLY ONLY TO THE SOLVENT SIDE LEFT TANK Brush...

Page 14: ...sumption Wait 30 seconds for the Rinse Pump to fully recharge before re pressing the Clean Rinse button Push and hold the Air Rinse Control button for about 2 second to air rinse the guns After cleani...

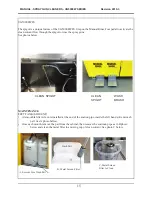
Page 15: ...spigot to rinse the spray guns See photos below MAINTENANCE LEFT TANK SOLVENT A removable filter screen is installed at the end of the suction pipe inside the left hand solvent wash pail See A photo...

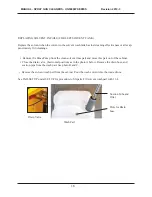
Page 16: ...r after ap proximately 100 cleanings Remove the Rinse Pump from the clean solvent rinse pail and move this pail out of the cabinet Close the drain valve horizontal position as in the photo A below Rem...

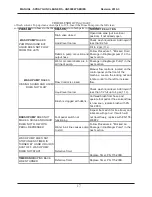
Page 17: ...h not functioning Inspect foot switch for free travel and lubricate with gun oil If switch will not travel freely replace with PN 155 400BF2 Water in air line causes pump to stall Follow Procedure 2 B...

Page 18: ...adapter Incompatible solvent p p solvent formulated for type of paint Low pressure in air supply p of 85 PSI Plugged jets y g through the jets If not successful SOLVENT APPEARS RED or ORANGE Water in...

Page 19: ...ycling the spool valve has stalled due to a blocked air passage Follow the procedure below to clear the blockage Connect a blow gun to an 85 PSI source Locate the blue hose that extends from the air e...

Page 20: ...1 1 X 8 3 H B R 6 1 1 1 X 8 3 H B R R T 2 1 X 4 1 H B R 8 1 X 2 3 3 T Y N 6 X 4 T Y N 6 X 4 T Y N 6 X 4 T Y N 6 X 4 T Y N 6 X 4 T Y N 6 X 4 T Y N 6 X 4 T Y N 6 X 4 T Y N 6 X 4 T Y N 8 X 6 T Y N 6 X 4...

Page 21: ...21 MANUAL SPRAY GUN CLEANERS UG5000W SERIES Revision 2019 3 FLOW DIAGRAM FOR UG5000EWFS Shows the flow of solvent and compressed air...

Page 22: ...MANUAL SPRAY GUN CLEANERS UG5000W SERIES Revision 2019 3 22...

Page 23: ...23 MANUAL SPRAY GUN CLEANERS UG5000W SERIES Revision 2019 3...

Page 24: ...MANUAL SPRAY GUN CLEANERS UG5000W SERIES Revision 2019 3 24...

Page 25: ...25 MANUAL SPRAY GUN CLEANERS UG5000W SERIES Revision 2019 3...

Page 26: ...S ONLY 110 430 NOZZLE EXTENSION ALL MODELS PUSH ON 110 430PPS NOZZLE EXTENSION DISPOSABLE CUP SYSTEMS ONLY 780 3530 TRIGGER CLAMP PLUG KIT 140 2340 AIR PASSAGE PLUG 140 230 LID SWITCH 115 350F WASH PA...

Page 27: ...VALVE 110 356 TAPER NOZZLE 100 350 SPRAY JETS 140 361F DELIVERY TUBE ASSY WITHOUT JETS 120 318 HANDLE 144 390 FLOW THROUGH BRUSH ASSY INSIDE SOLVENT LEFT TANK 140 450 DELIVERY TUBE CONNECTOR ASSY 110...

Page 28: ...for the return of your original pump Conditions of Warranty As Uni ram Corporation has no control over the working conditions or circumstances under which the purchaser stores handles or uses the prod...

Reviews: