3.2 Function Selection
3.3 Compliances:
IEC 61010-1 CATIII 300V , Pollution Degree 2
IEC 61557-1, 5
IEC 61010-2-31
Caution:
1. Frequency Range for AC Voltage: 50~60Hz;
2. For AC voltage
<
60V, the reading is for reference only.
3.4 Working Voltage:
230VAC (Range: 195~253V)
3.5 Working Conditions:
Temperature: 0 ~40
Relative Humidity: 80%RH
Altitude: 2000m
3.6 Storage Conditions:
Temperature: -20 ~60
Relative Humidity: 75%RH
3.7 Dimensions:
210mm x 175mm x 90mm
3.8 Weight:
About 1,000g
3.9 Accessories
Test Lead (1.5m)---------------------1
Manual-----------------------------------1
Gallus/Tool Case----------------------1
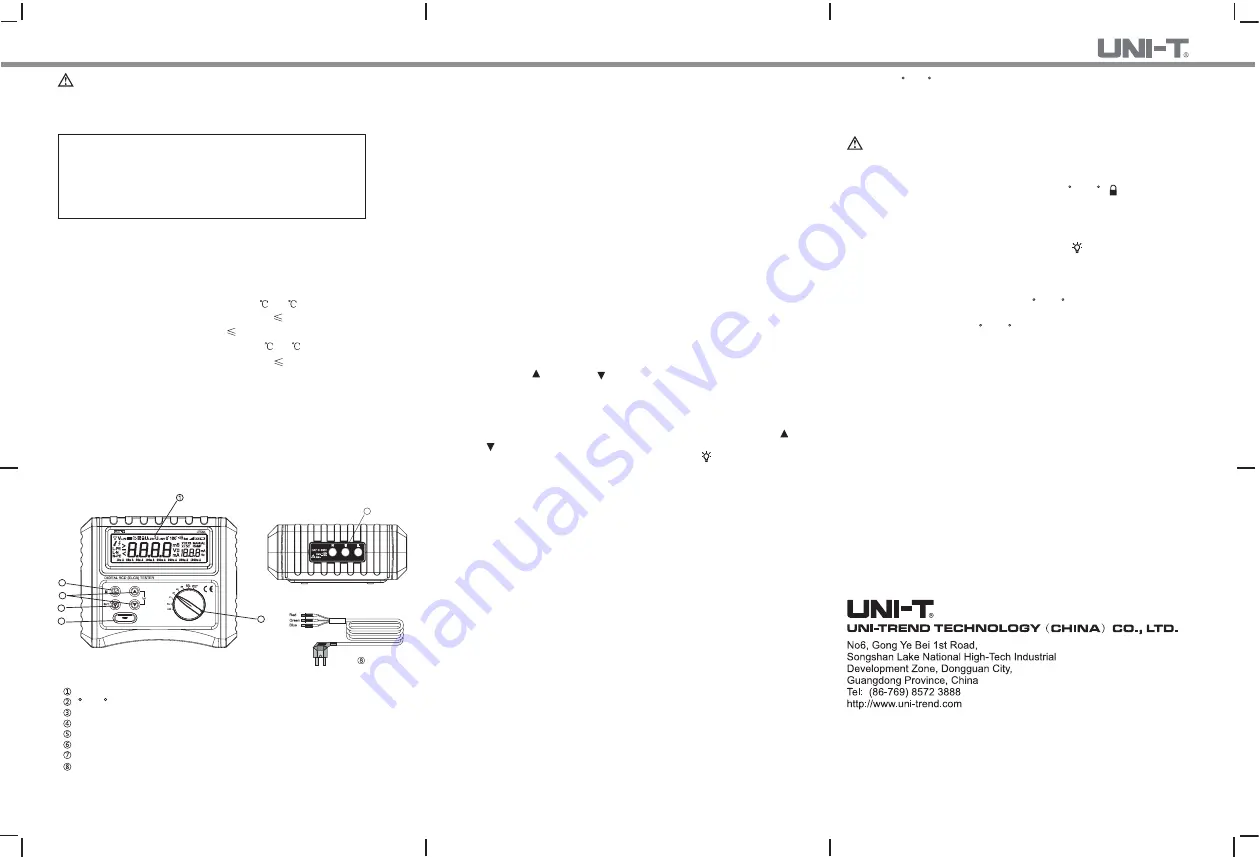
IV. Tester Description and Main Accessory
(See Figure1,2,3)
2
3
4
5
6
/
10m A 20m A 30m A 100m A 200m A 300m A 500m A 1000m A
Figure 1
Figure 2
Figure 3
7
V. RCD Test
Danger:
Do not touch any exposed earthing metal or conductor during the operation
.
(7)Test locked:
When the test lead is disconnected, long press 0 / 180 ( )button to enable
the test locked function, then connect the test lead to tested terminals, the
tests can be automatically performed.
6.3 Press 0 /180 button to set the phase angle and repeat 6.1 to determine
the fastest trip time.
6.4 Press to change the phase angle and repeat 6.1
6.5 When the tests finish, disconnect the test lead from the tested circuit
immediately.
VI. Maintenance and Repair
6.2 Maintenance
Please contact UNI-T after-sale service center or agents if the following anomaly
happens:
A.Instrument case or parts are damaged.
B.LCD displays wrongly.
C.Unexpected data shows even under normal use.
D.Buttons do not work or produce confusing display.
E.Noises arise in testing.
This manual is allowed to be alternated without prior notice.
**ENG**
X1/2------------------Non-trip test, check RCD sensitivity
X1--------------------Measure trip time
X2--------------------Measure fast trip time at I
△
n×2 trip current
X5--------------------Measure fast trip time at I
△
n×5 trip current
AUTO RAMP Test----Measure trip current
MANUAL RAMP Test--measure trip time (at setting current)
0 / 180 /Lock Button
UP/DOWN Button: Set /Adjust the Current (under MANUAL RAMP)
LIGHT/SET Button(under MANUAL RAMP)
TEST Button
Rotary Switch
Input Terminals
Test Lead
LCD
(1)Test Lead Connections
Connect three connectors of the test lead respectively to three input terminals
of the Tester: Red—L, Green—E, Blue—N, then connect another terminal of
the test lead to tested circuit (230V/50Hz power socket).
(2)Voltage Test
Set the rotary switch to V position, The tester now can measure the voltage
between L and N terminals, which should fall within 195V-253V, if not, please
check if the wiring is correct before proceeding into next step
(3)Wiring Check
Turn the rotary switch to RCD ranges and check the wiring status indicated
on LCD.
LCD Indication
Connection Status
L-N&L-PE flash Abnormal power supply or no supply to
tested circuits
L-PE&N-PE flash, L-N doesn’t The tested terminals are badly or not earthed.
L-N&N-PE flash, L-PE doesn’t Neutral terminal is disconnected
L-N,L-PE and N-PE flash Wrong wiring to tested terminals,
The tester will prohibit the tests regarding the above status, please check the
wiring and correct the connection before restart the tests.
(4) Press I
△
n UP( ) or DOWN( ) button to adjust the trip current(I
△
n) the
same as the rated trip current marked on RCD.
Default value: I
△
n 30mA 00(except MANUAL RAMP)
(5) When MANUAL RAMP is selected, the setup value“30mA” shows on lower
part of LCD, 40% of 30mA: “12mA” displays on right side, then use UP( ) or
DOWN( ) button to adjust the current within 40%~100% of the setup value at
a step of 5%; To change the setup value, long press “
” button to access
current setup, “Set” icon shows on LCD, short press to set to 10mA,20mA,
30mA, 100mA, 200mA, 300mA, 500mA or 1000mA; long press the button
to exit the setup.
(6) Taking RCD Tests
6.1 Set the rotary switch to test parameters
● Non-Tripping ×1/2: Max. trip time up to 2000ms
● Tripping ×1: 10/20/30/100/200/300mA,: Max. trip time up to 2000ms
500/1000mA: Max. trip time up to 200ms
● Fast Tripping ×2 : Max. trip time up to 200ms
● Fast Tripping ×5 : Max. trip time up to 200ms
● AUTO RAMP Test: 40%~110% of rated trip current(I
△
n), Max. trip time up
to 300ms.
● MANUAL RAMP Test: Max. trip time up to 300ms.
6.2 Press TEST button
● Non-Tripping ×1/2-----The RCD should not trip.
● Tripping ×1: ---------The RCD should trip.
● Fast Tripping ×2 : -------- The RCD should trip.
● Fast Tripping ×5: ---------- The RCD should trip.
● AUTO Ramp Test: --------The RCD should trip, and trip time and trip current
are displayed simultaneously.
● MANUAL RAMP Test-------The RCD should trip.
(8) Backlight:
when testing on dimly lighted sites, press LIGHT(
) to turn on /off the
backlight. Under MANUAL RAMP mode, press the button momentarily to turn
on/off the backlight, or long press to access I
△
n setup.
(9) Auto Power Off:
To disable the function, press and hold 0 / 180 button while turning on the
instrument, LCD will show “APO OFF” icon; the Tester usually defaults at
APO ON status(no pressing 0 / 180 button).
6.1 Cleaning the Casing:
Do not clean the instrument casing with any corrosive agents such alcohol or
solvent that may damage the display. Clean it with dry soft cloth and protect
the instrument from any moisture.
P/N:110401104490X DATE:2018.06.26 REV.2


