


13
All operations should be performed in well-ventilated rooms or outdoors. The
fertiliser distributor should be washed in the area which has access to sewage
disposal.
6. Maintenance
Daily service
Before entering the field:
- check all screw connections;
- check hydraulic system tightness;
- check tension of the springs that close the dosing holes;
- grease the mixer shaft bearings;
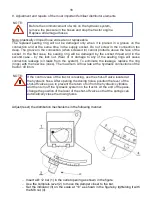
- once the fertiliser distribution has been adjusted,
secure the positioning of the lever
tightly with the knob
;
-
check tension of the mixer’s drive chain.
After season service and maintenance
- Wash and clean the fertiliser distributor thoroughly after the service period. Avoid
washing the fertiliser distributor with high pressure water jets at close range.
- Examine the paint and clean any damaged spots by removing rust and dirt, degrease and
apply a primer and subsequently a topcoat paint.
- Spray oil-based protective mixture on the fertiliser distributor, particularly on the metal
parts.
- Check the condition of the springs closing the dosing holes.
-
Clean threads of the adjusting and setting screws and grease with ŁT-42.
- Check the condition of the rubber locking cover plates.
- Check the chain of the chain transmission and lubricate.
- Refill grease in all greasing points.
- Check the pivot connections and grease.
Lubrication
All greasing points should be filled with grease. Lubricate until fresh grease becomes
visible on the outside of the mating parts. Grease the slide bearings of the mixer shaft
every 8 hours with ŁT-42. The bevel gears should be filled with oil up to the level of the
lower edge of the level indicator plugs. The first gear oil replacement should take place
after 100 hours of operation. PL motor vehicle gear oil should be used in bevel gears.
Grease the jointed-
telescopic shaft with ŁT42. The side gears were filled at the factory with
semi-fluid grease. Filling with lubricant is usually unnecessary. External signs, such as
fresh oil stains under the standing machine or on the machine, or increased noise emitted
by the gear, are clear signs of the gear leakage. Identify the causes, remove them and fill
the oil or semi-fluid grease.
Oil replacement in the bevel gear is performed in the following manner:
- Turn on the drive for a couple of minutes in order to heat up the oil.
- After turning off the drive, unscrew the drain plugs and wait until the oil flows out.
- Screw in the drain plug, pour 0.4 litre of PL oil until it appears in the control hole.
- Screw in the filler and control plugs.
NOTE:
Summary of Contents for MX
Page 3: ......
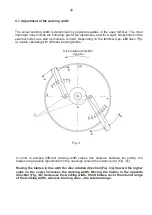
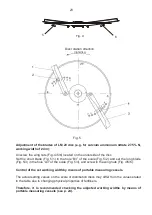
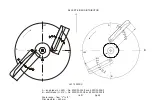
Page 43: ...40 5 4 2 3 1 Fig 6 Fig 7...


