background image

11


USE & PROGRAMMING


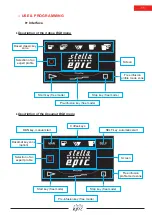
Interface


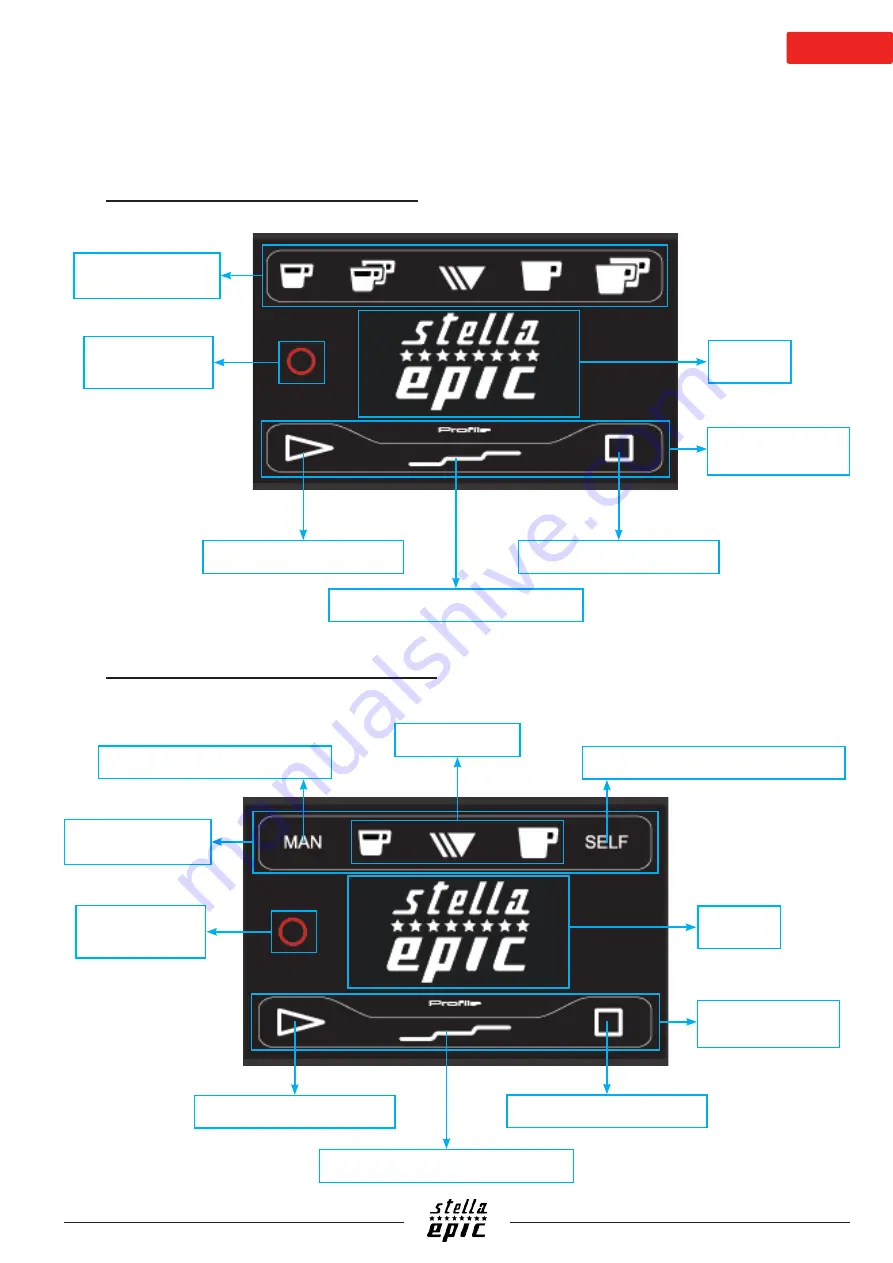
Description of the 4 dose BGX menu


Description of the Dosamat BGX menu

Start key (free mode)

Pre-infusion key (free mode)

Stop key (free mode)

Free infusion 

profile mode zone

Screen

Selection of an 

expert profile

Dosed classic key 

zone

Start key (free mode)

Pre-infusion key (free mode)

Stop key (free mode)

Free infusion 

profile mode zone

MAN key, manual start

Coffee keys

SELF key, automatic start

Screen

Selection of an 

expert profile

Dosamat key zone 

(option)

Summary of Contents for Stella Epic

Page 1: ... manufacturer of professional espresso machines since 1919 The manufacturer reserves the right to modify the appliance presented in this publication without notice in order to improve its performance Read the safety instructions carefully before use SE9011 07 2019 ...

Page 2: ......

Page 3: ... 9 Adjusting the expansion valve 9 Adjusting the pump pressure 10 Adjusting the water inlet solenoid valve 10 Adjusting the coffee grinding 10 Adjusting the mixer tap for hot water 10 Adjusting the basin 10 USE PROGRAMMING 11 Interface 11 Description of the 4 dose BGX menu 11 Description of the Dosamat BGX menu 11 Description of the BTA menu 12 Various icons 13 Main menu 14 Day night programming 1...

Page 4: ...rk 27 Details of the coffee cleaning Procedure menu 28 Coffee rinsing 28 Coffee cleaning 28 Reference of cleaning products 28 option SteamAir 29 Components 29 key SteamAir 29 Programming 29 Details of the Maintenance menu 30 Components test 30 Softener 30 Descaling 30 Machine cooling 31 Error log 31 Repairs 32 Troubleshooting 32 Technical features 32 CPU connectors fuses 33 Cable lists 34 Plate as...

Page 5: ...rature below 5 C 41 F the water circuit boiler piping must be drained if the appliance freezes wait 24 hours at a minimum temperature of 10 C 50 F before restarting it Before connecting the power and water supplies check that the electrical and water mains comply with the technical information plate of the appliance The power supply must be provided with the following safety features power switch ...

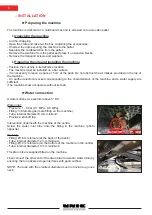
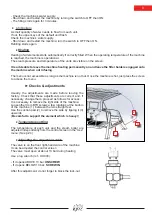
Page 6: ...to the characteristics of the machine and a water supply are sufficient The machine must not operate without its feet Water connection A water softener is essential above 5 KH Water inlet Pressure 1 8 bar 0 1 MPa 0 8 MPa Fitting 3 8 female gas male fitting on the machine Tube internal diameter 8 mm minimum Provide a shut off tap Intervention underneath the machine at the centre Screw the water inl...

Page 7: ... numbered wires Set the general cut off to 0 before the intervention Check that the wiring of the machine matches the available mains voltage in accordance with the connection diagrams below If necessary modify by working on the jumpers on the terminal block located on the left hand side of the machine IMPORTANT Connection to 230 V with 5 strand cable it is necessary to couple the wires at the end...

Page 8: ... is provided if the filling is not done within 3 minutes In this specific case the solenoid valve for filling and the pump cut off Start up screen Control screen Verification of the toroidal transformer with respect to the mains voltage The machine has a multi voltage transformer to guarantee the right mains voltage for the electronics The machine is factory fitted according to the destination cou...

Page 9: ...03 If it opens ABOVE 13 bar UNSCREW If it opens BELOW 13 bar SCREW IN After this adjustment do not forget to block the lock nut Check the machine s water supply Shut down and restart the machine by turning the switch to OFF then ON The filling starts again for 3 minutes Unit boilers A small quantity of water needs to flow from each unit If not the upper keys of the default unit flash Check the mac...

Page 10: ...he two cup filter with two doses of coffee Average time to make 2 cups 6 to 7 cl per cup 30 to 35 seconds If this time is shorter reduce the grinding coarseness If this time is too long increase the grinding coarseness To obtain a good result use at least 6 g of good ground coffee per cup Adjusting the mixer tap for hot water The mixer tap is located on the top on the right hand front of the machi...

Page 11: ...free mode Stop key free mode Free infusion profile mode zone Screen Selection of an expert profile Dosed classic key zone Start key free mode Pre infusion key free mode Stop key free mode Free infusion profile mode zone MAN key manual start Coffee keys SELF key automatic start Screen Selection of an expert profile Dosamat key zone option ...

Page 12: ...hine s water network pressure Coffee heater temperature Steam boiler level Real time information relating to the whole machine Rapid access to the Cleaning menu Back to the main screen Access to levels 1 2 with password Key to put the machine into standby mode Description of the BTA menu ...

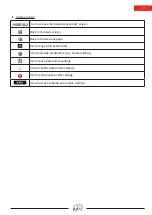
Page 13: ... the main screen Back to the previous page Icon to copy a file and or data Icon to indicate parameters e g steam settings Icon to save data and or settings Icon to confirm data and or settings Icon to cancel data and or settings Icon to access enabled error codes alarms ...

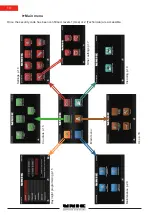
Page 14: ...nce p 20 Day night programming p 15 Counters p 15 Main menu Use p 18 Cleaning p 19 Other settings p 17 Settings p 16 Main menu Once the security code has been confirmed levels 1 Use or 2 Technician are accessible ...

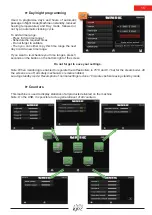
Page 15: ...ange If you want to re schedule your time ranges press 3 seconds on the button on the bottom right of the screen Do not forget to save your settings Note When monitoring is enabled to regulate the coffee boilers to 70 C and 0 1 bar for the steam boiler All the screens are off all safety mechanisms remain enabled Leaving standby mode Resumption of normal settings is done 10 minutes before leaving s...

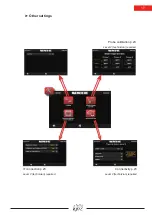
Page 16: ... and time using the required language the Machine Identity Card CIM the screensaver or temperature units Note Some parameters are only accessible or modifiable on the USB USB level required Access levels p 22 CIM p 21 USB level required Saving p 22 Language p 21 Customisation p 21 ...

Page 17: ...17 Other settings IT connection p 23 Connectivity p 23 Probe calibration p 23 Level 2 technician required Level 2 technician required Level 2 technician required ...

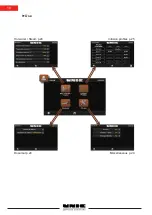
Page 18: ...18 Use Hot water Steam p 24 Infusion profiles p 25 Dosamat p 24 Miscellaneous p 24 ...

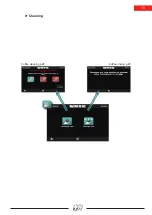
Page 19: ...19 Cleaning Coffee cleaning p 28 Coffee rinsing p 28 ...

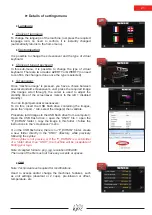
Page 20: ...20 Components test p 30 Machine cooling p 31 Error log p 31 Softener p 30 Maintenance Note accessible or modifiable at the USB level ...

Page 21: ...abled standby You can import personal screensavers To do this insert the USB flash drive containing the images press the import tab select the image s then validate Procedure add images to the USB flash drive from a computer Open the USB flash drive open the UNIC file open the F_ECRAN folder copy the image in this folder follow the instructions in the screensaver menu If on the USB flash drive the...

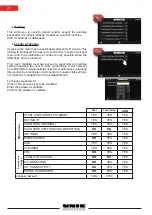
Page 22: ...er be restricted for certain settings linked to maintenance requiring intervention by a technician and counters monetary link settings IoT linked to management of the establishment To change a password Click on the access level to be modified Enter the password validate Confirm the password validate User Technician USB Main menu START AND FINISH OF STANDBY YES YES YES DAY NIGHT YES YES YES COUNTER...

Page 23: ...f connection GSM no settings needed Wifi Security choose the security with respect to your wifi network WEP WPA WPA2 SSID name of the wifi connection name of point of access router box Password the wifi access point word Very important perfectly comply with the syntax lower case upper case characters Diagnostic 1 Switch the machine off then on again 2 Wait a few minutes The LED turns green if the ...

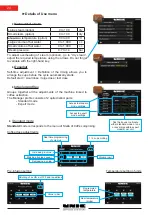
Page 24: ...l dose large dose last dose Infusion profiles Groups together all the adjustments of the machine linked to coffee extraction The Manager profile consists of 2 quite distinct parts Standard mode Expert mode Pre infusion setting Temperature setting of units Access to standard mode settings Access to expert mode settings Tick the boxes to allocate either standard mode or one or several possible exper...

Page 25: ... Post infusion Setting of unit in seconds Saving Pressure bar in real time Cycle time s Set temperature S Real temperature R The curve is displayed in real time during the cycle 0 12 bars BGX 1st stage choice of profiles required per unit 2nd stage programming of different profiles 3rd stage Setting and recording of the profile Press 3 seconds on the key to programme the unit required Selected dos...

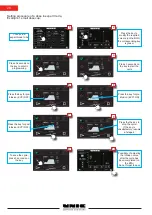
Page 26: ...key for pre infusion EVP OFF Press the key for pre infusion EVP ON Press the key for post infusion EVP OFF Press the the key to stop the cycle If the key is unsatisfactory resume at stage 4 To save the cycle press 3 seconds on the key Possibility of adjusting the infusion curve after the cycle has been completed on the BTA Do not forget to save Setting procedure of a dose in expert mode Example 1 ...

Page 27: ...e BEFORE PREPARING A DRINK After the service Take the 2 cup filter holder cup Place the rubber plug Ref DO 197 inside the filter Rinse the decompression circuit Engage the cup onto the unit by tightening it Press a coffee key to pressurise the cup and then stop the unit Repeat the operation several times by emptying the water contained in the cup each time Rinsing of the cup seal Engage the cup on...

Page 28: ...ence plug DO 197 Note for more information on cleaning products refer to the manufacturer s safety data sheet By pressing the coffee cleaning icon you access the procedure Follow it step by step on the machine screen as indicated below 1 One or several units can be selected The keys of the units turn blue Cleaning starts when you press a blue key of each unit 2 3 4 5 6 Cleaning details 15 cycles 8...

Page 29: ...e foam ooo Level 3 Medium foam oo Level 2 Fine foam Level 0 Steam only key SteamAir Automatic mode to reach the programmed T One press on the key makes the SteamAir flow until the liquid reaches the pre set temperature see programming Stop the operation manually by pushing the key again Manual mode over the programmed T If once stopped in automatic mode temperature reached you wish to continue to ...

Page 30: ...be descaled only by a qualified technician EVK1 Unit 1 coffee EV EVK2 Unit 2 coffee EV EVK3 Unit 3 coffee EV EVP1 Unit 1 pre infusion EV EVP2 Unit 2 pre infusion EV EVP3 Unit 3 pre infusion EV RS1 Static relay 1 RS2 Static relay 2 RS3 Static relay 3 DO1 Unit 1 volume dosing DO2 Unit 2 volume dosing DO3 Unit 3 volume dosing MPO Pump EVR Filling EVR RSV1 Steam static relay 1 RSV2 Steam static relay ...

Page 31: ... the BTA Error code number Detailed name of the error code Date of appearance of the error code Error log This menu has no action on the electronics of the elements affected by the machine s error codes It is a simple log of events in which the technician can record the interventions performed The help can be consulted for information purposes ...

Page 32: ...achine before any work on the electrical circuits B Cool the machine and lower the pressure before any work on the hydraulic circuit DIMENSIONS EPIC 2 EPIC 3 SETTINGS Width 79 cm 31 98 cm 38 5 Temperature 118 to 120 C 244 to 248 F Height 51 3 cm 20 2 51 3 cm 20 2 Steam pressure 0 9 to 1 bar 0 09 to 0 1 MPa Depth 68 2 cm 26 8 68 2 cm 26 8 Pump pressure 9 to 10 bar 0 9 MPa to 1 MPa WEIGHT 90 kg 198 ...

Page 33: ...IGHT DIP 5 08mm CN9 WAFER STRAIGHT DIP 5 08mm CN7 WAFER STRAIGHT DIP 5 08mm EV RISERVA CN3 MODU1 VENTOLA 12V CN4 MORSETTO DA C S MCV 1 5 2 G 3 81 W TECA conn RSV1 2 3 CN4 MODU2 CN6 MINI FIT JR 5A 250V T 2A 250V T 1A 250V T 1A 250V T 10A 250V F JP1 JP2 JP7 JP8 JP25 JP24 JP23 FUSIBILI REF VALORE PROTEZIONE F1 1A 250V RITARDATO EV AUX1 EV AUX2 EV CARICAMENTO CALDAIA F2 10A 250V VELOCE VALVOLE DEI GRU...

Page 34: ... 2 UNITS EV FEEDING CABLE CN1 1 2 EVR NZ8023 CABLE EV REMPLISSAGE 3GR 3 UNITS EV FEEDING CABLE NZ8038 CABLE CN9 CPU CN9 CPU CABLE CN9 1 TRANSFO 2 6 BORNIER 3 5 CONTACTEUR 7 8 TS2 9 10 TS1 11 12 TSV NZ8039 CABLE CN8 CPU 3GR 3 UNITS CN8 CPU CABLE CN8 3 4 TS3 NZ8042 CABLE ALIM MONO 240V 50HZ 240V 50HZ MACHINE POWER WIRE NZ8053 CABLE POUR LED GROUPE EV UNIT EV CABLE FOR LED NZ8054 CABLE LED GROUPE LED...

Page 35: ...07 SE8007 SE8000 SE8006 NZ8006 TG8012 Cable ventilateur SE8008 BTA BGX BGX BST 04 19 521 CABLES CONNECTEURS CALANDRE CONNECTORS WIRES FRONT PANEL Towards dosamat sensor Towards dosamat sensor Towards CPU CN2 Earthing Towards CPU CN12 Towards CPU Towards CPU ...

Page 36: ...50 AE51 FR2013 41422 NZ2011 42003 AE51 V17 NZ2010 PE 12 44215 CN 661 NZ2008 S 11 51053 45390 CN651 PG 15B CN 325 NZ2010 CN 661 34201 DO 195 NZ2005 44410 PG 14 CN 124 03 19 510 TABLEAU DE RACCORDEMENT ELECTRIQUE ELECTRIC CONNECTION PANEL Plate assembly ...

Page 37: ...37 Wiring diagrams ...

Page 38: ...0V TRI 09 07 2018 Neutre 200V 230V 240V 230V Tri N 200V 230V 240V 24V 24V RG1 RS1 TS1 Diruptor TSV RSV1 RSV2 RSV3 RG2 TSX RS2 RG3 RS3 TS3 RG4 RS4 TS4 TSE BGX BTA MPO EVR RS232 RS485 x 4 Contacteur sécurité R N T S K 200 J 230 240 F E D C A B chassis ...

Page 39: ...00V 230V 240V 400V Tri N Diruptor TSV RSV1 RSV2 RSV3 RG2 TSX RS2 RG3 RS3 TS3 RG4 RS4 TS4 TSE BGX BTA STELLA EPIC SCHEMA DE CABLAGE DE PRINCIPE 400V TRI 09 07 2018 MPO EVR RS232 RS485 x 4 Contacteur sécurité R N T S K 200 J 230 240 F E D C A B chassis ...

Page 40: ...ousing throughout the update procedure Insert the USB flash drive you have several possibilities update of the CPU BTA or BGX update STAGE 1 introduce the updated USB flash drive BTA update 1 2 3 4 5 6 STAGE 2 CPU update The procedure starts automatically with validation 1 2 3 4 ...

Page 41: ...1 STAGE 3 BGX update Before updating check in the CIM that the number of units matches what actually exists The procedure starts automatically with validation 1 2 3 4 STAGE 4 Export import products 2 1 3 ...

Page 42: ...ithout forgetting to tighten the fastening screws BTA BGX BST box replacement Dismantling Switch the machine off Loosen the two screws located under the lateral grids of the cup warmer about 1 cm then release the grille from the hooks by pushing the screws back Tip the grille forward to access the wiring Unplug the connectors linking the grille to the machine to remove it Place the grille flat on ...

Page 43: ... photos no 3 and no 4 Prepare the tamper NZ4007 piston NZ4008 and spring 28828 assembly without seals and then position and screw the assembly photo no 6 Install the O ring 27800 photo No 7 Install the cup seal PC 17 photo 8 Refit the ID 103 filter and the diffuser 31910 pay attention to the direction of the diffuser photo no 9 Attach the NZ4011 cup holder Make 2 espressos and check the mobility o...

Page 44: ... due to overheating Check the STV regulation circuit and TSV thermostat manual reset Steam Boiler heating stopped Defect removed and manual reset of TSV and machine reset 7 STV Thermostatic pressostatic probe STEAM BOILER Unplugged no signal Check the probe and wiring Steam Boiler heating stopped Defect removed and Machine reset 8 STV Thermostatic pressostatic probe STEAM BOILER Short circuited Ch...

Page 45: ...tic if defect removed 24 DO2 UNIT 2 dosing Unplugged no signal Check the component and wiring Manual dosing alarm Automatic if defect removed 25 DO2 UNIT 2 dosing short circuited Check the component and wiring Manual dosing alarm Automatic if defect removed 26 DO2 UNIT 2 dosing Interruption of counting for more than 5 seconds Check free rotation of the dispenser turbine and cabling defective conta...

Page 46: ...OT WATER dosing Interruption of counting for more than 5 seconds Check free rotation of the dispenser turbine and cabling defective contact Dosing alarm or Manual stop Automatic if defect removed 53 DOE HOT WATER dosing Cycle time longer than 110 seconds flow too weak Check the cleanliness of the water circuit Cycle stop EVE Automatic if defect removed 54 STS StreamAir probe Unplugged no signal Ch...

Page 47: ...TSE WATER BOILER overheating safety mechanism Started due to overheating Check the STE regulation circuit and TSE thermostat manual reset Heating stopped Defect removed and manual reset of TSE and machine reset 73 STE WATER BOILER Thermostatic probe Unplugged no signal Check the probe and wiring Heating stopped Defect removed and Machine reset 74 STE WATER BOILER Thermostatic probe Short circuited...

Page 48: ...st filling impulse pressure remains at zero when you press for more than 3 seconds or has not fallen below 30 impulses per second in under 3 minutes Coffee boiler filling cycle stopped MPOs stopped Closing of EV1 and EP1 Defect removed and Machine reset 93 DO3 UNIT 3 dosing Defect on 1st filling impulse pressure remains at zero when you press for more than 3 seconds or has not fallen below 30 impu...

Reviews: