background image

E N G

5 . ) # ! 4 % 2 -

3 7


     5.0  

DATE / TIME / CLOCK SETTINGS 

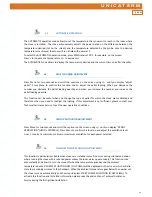
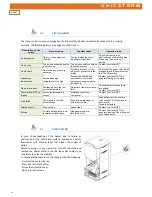
Press Menu for 2 “ to access Menu/Clock. This function allows to set the parameters to run the clock inside 
the card. Press Menu again, the following data will be displayed one after the other, so that it is possible to 
set them: day, month, year, hours, minutes, day of the week. 
When 

Save??

 (

Salvataggio??

) is displayed, press Menu to make sure the settings are correct before 

confirming them (

Save OK

 (

Salvataggio OK

) will appear on the screen). 


     5.1  WEEKLY PROGRAMMER SETTINGS 

Press Menu for two seconds to access the Clock settings. Press + to access the weekly time settings, 
displayed as “Programs ON/OFF” (

Programmi ON/OFF

) on the screen. This function allows to set a 

maximum of three ignitions and three shutdowns per day for each day of the week. 
When “Programs ON/OFF” is displayed, press “Menu” to confirm and select one of the following options: 
NO PROGRAMS (

NO PROGRAMMI

) (no programs set) 

DAILY PROGRAM (PROGRAMMA GIORN.) (single program for all days) 
WEEKLY PROGRAM (PROGRAMMA SETTIM.) (program for each single day) 
Use + and – to scroll the programs. 
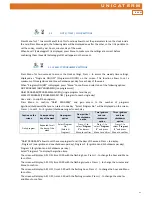
Press Menu to confirm “DAILY PROGRAM” and gain access to the number of programs 
(ignitions/shutdowns) that you can select in one day. “Select Program No.” will be displayed on the screen. 
Press +/

-

 to set 1, 2 or 3 ignition/shutdown ranges for each day. 

Caption on the 

screen 

Corresponding 

day of the week 

No program 

option 

One ignition / 

One shutdown 

option 

Two ignitions 

and two 

shutdowns 

option 

Three ignitions 

and three 

shutdowns 

option 

Daily program 

Repeated for all 

the days of the 

week 

Select Program

No. 

(

Select N 

Program

Press +/

-

to 

select “

Program  

1

” and press 

Menu to confirm 

Press +/

-

 to 

select “

Program 

2

” and press 

Menu to confirm 

Press +/

-

to 

select “

Program  

3

” and press 

Menu to confirm 


“DAILY PROGRAM” allows to set the same program for all the days of the week. Press + to display: 

-

 Program 1 (one ignition and one shutdown per day), Program 2  (2 ignitions and 2 shutdowns per day), 

Program 3 (3 ignitions and 3 shutdowns per day) 
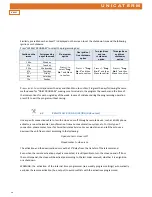
Select “Program 1” to display the ignition time. 
The screen will display: All 1 ON, time 10:30 with the flashing hour. Press +/ 

-

 to change the hour and Menu 

to confirm. 
The screen will display: All 1 ON, time 10:30 with the flashing minutes. Press +/ 

-

 to change the minutes and 

Menu to confirm. 
The screen will display: All 1 OFF, time 12:30 with the flashing hour. Press +/ 

-

 to change the hour and Menu 

to confirm. 
The screen will display: All 1 OFF, time 12:30 with the flashing minutes. Press +/ 

-

 to change the minutes 

and Menu to confirm. 

Summary of Contents for PLUS 12

Page 1: ... e n z i o n e p e r s t u f a a p e l l e t PLUS LINE U s e r a n d m a i n t e n a n c e g u i d e f o r p e l l e t s t o v e I T A E N G PLUS 9 PLUS 12 B e t r i e b s u n d W a r t u n g s h a n d b u c h f ü r P e l l e t ö f e n D E U ...

Page 2: ...I T A 5 4 2 2 ...

Page 3: ...Sicurezza 04 05 Norma ve e dichiarazioni di conformità 05 06 Responsabilità 05 07 Garanzia 05 08 Pellet 05 09 Installazione 06 10 Cara eris che tecniche 08 11 Prima accensione 10 12 Centralina Ele ronica 11 13 Pulizia giornaliera 19 14 Pulizia mensile 20 15 Pulizia stagionale 22 ...

Page 4: ...sa Non lavare le par interne ed esterne della stufa con acqua Installare la stufa in luoghi ideali alla prevenzione d incendi e già predispos per la sicurezza Evitare di appoggiare la stufa su pavimen realizza in materiali com bus bili In caso di pavimen in legno o infiammabili usare sempre un materiale isolante tra stufa e pavimento La stufa a pellet non è un apparecchio per la co ura o il riscal...

Page 5: ...lazione da parte di personale non qualificato ed istruito installazione non conforme alle norma ve vigen nel Paese u lizzo di ricambi NON originali even eccezionali condizioni clima che sbalzi di tensione Nei casi sopra cita decade la garanzia 7 GARANZIA La società UNICA TERM GmbH garan sce il prodo o per 24 mesi dalla data di acquisto che viene comprovato dal tagliando di garan zia il quale deve ...

Page 6: ...iali infiammabili nel caso fossero in prossimità distanza minima 200mm usare protezioni e materiali termicamente isolan sul tubo con adeguata conducibilità termica Importante che la curvatura a 90 preveda un raccordo a T con ispe zione E vietato usare re o filtri all estremità della canna fumaria o qualsiasi finale che potrebbe diventare un nido per uccelli usare solo terminali secondo norma va CO...

Page 7: ...la stanza in cui è installata la stufa ci sia un are azione sufficiente e se necessario installare un condo o di addu zione d aria dall esterno di diametro minimo di 50 mm consigliato La presa d aria esterna deve comunicare con la stufa e posizionata in modo da evitare che possa essere ostruita Deve essere prote a con una griglia permanente non richiudibile e con idonea protezione Canna fumaria inte...

Page 8: ...ONE giornaliera se manale week end nr 21 21 TELECOMANDO SI SI GESTIONE PASSIVA GSM ON OFF SI SI GESTIONE ATTIVA GSM SI SI POTENZA MASSIMA ASSORBITA Wa 350 350 POTENZA ASSORBITA A REGIME MASSIMO Wa 170 170 TENSIONE V 230 230 FREQUENZA Hz 50 50 RIVESTIMENTO acciaio acciaio CAMERA DI COMBUSTIONE acciaio acciaio BRACIERE inox inox CASSETTO CENERE SI SI WELLNESS UMIDIFICATORE SI SI VETRO CERAMICO RESIS...

Page 9: ...I T A 5 4 2 9 PLUS 9 PLUS 12 ...

Page 10: ...i a rezzi gli accessori che sono sta inseri al momento dell imballaggio ed assicurarsi che il serbatoio sia libero da eventuali corpi estranei Assicurarsi di aver ben collegato il cavo ele rico alla rete Riempire il serbatoio con il pellet consigliato diametro 6 mm e cer ficato DIN51731 Verificare che il braciere sia ben inserito e posizionato nella sua sede Chiudere la porta si raccomanda di non ...

Page 11: ...aricamento pellet ed attesa accensione fiamma AVVIO 480 000 Stufa in seconda fase accensione avvio combustione a regime Warm UP Stufa in fase di riscaldamento scambiatore aria P1 P2 P3 P4 P5 Livello di potenza impostato 05 35 C Livello temperatura desiderato nell ambiente di installazione della stufa PULIZIA Pulizia automatica del crogiolo in atto STOP FIAMMA Stop Fiamma blocco funzionamento per p...

Page 12: ...caldarsi dello scambiatore della stufa I tempi indicati sono quelli massimi in funzione di quanto rilevato dalla sensoristica l elettronica può decidere di accorciare tali tempi 3 1 SPEGNIMENTO Premendo il tasto 0 1 con stufa accesa si avvia la fase di spegnimento che prevede a Interruzione della caduta del pellet b Esaurimento del pellet presente nel crogiolo mantenendo attivo il ventilatore fumi...

Page 13: ...nzione può essere utile nel caso in cui sia cambiato il tipo di pellet per il quale è stata tarata la stufa e sia quindi necessaria una correzione del caricamento Se tale correzione non fosse sufficiente contattare il centro assistenza tecnica per stabilire il nuovo assetto di funzionamento 3 5 REGOLAZIONE VENTILAZIONE Premendo per due secondi il tasto menù e scorrendo con i tasti le indicazioni d...

Page 14: ...temperatura fumi troppo bassa Mancanza pellet Fiamma troppo bassa al minimo Verificare se all interno del serbatoio ci sono i pellet Rivolgersi al CAT di zona Guasto TC Termocoppia fumi guasta Usura del componente Rivolgersi al CAT di zona Avvio fallito La stufa non si è accesa in automatico Partenza con coclea vuota oppure con crogiolo sporco Caricare il pellet nella coclea vedi paragrafo 2 0 del...

Page 15: ...ETTIM impostazione per ogni singolo giorno Si passa dall una all altra coi tasti e Confermando col tasto Menù l opzione PROGRAMMA GIORN si accede alla scelta del numero di programmi accensioni spegnimenti eseguibili in un giorno avremo a display Select N Program con il tasti potremmo selezionare se vogliamo impostare 1 2 oppure 3 fasce di accensione spegnimento per ogni giorno Sigla a display Gior...

Page 16: ...i e e confermando col tasto Menù si proseguirà con la programmazione con la stessa modalità con la quale si esegue un PROGRAMMA GIORN scegliendo per ogni giorno della settimana se attivare una programmazione stabilendone numero di interventi ed a quali orari In caso di errore in qualunque momento della programmazione si può uscire dal programma senza salvare premendo tasto 0 1 6 0 FUNZIONE ATTIVAZ...

Page 17: ...CENSIONE C2 RPM FAN SMOKE TEST MOTORE ESTRATTORE FUMI RPS C3 LOAD PELLET TEST MOTORE COCLEA A C4 AIR FAN TEST MOTORE VENTILAZIONE V 100 C5 TERMOCOPPIA TEST TERMOCOPPIA C C6 AIR FLOW FLOW TEST SENSORE DI FLUSSO Volt C7 SENSOR TEMPERATURA C TEST SONDA ARIA AMBIENTE C C8 TEST SONDA IR TEST SONDA TELECOMANDO C C9 PORTA AUX TEST CAVO SERIALE PORTA AUX ON OFF 8 0 PARAMETRI TECNICI Premendo per due secon...

Page 18: ...I T A 5 4 2 1 8 9 0 SCHEMA ELETTRICO ...

Page 19: ...r pulire l interno della stufa Si può usare l aspirapol vere purchè la cenere sia perfe amente fredda Fare molta a enzione quando si inserisce il casse o esso deve arrivare fino in fondo e non ci devono essere residui di cenere davan o so o ad esso se presen dei residui potrebbe esserci interferenza con la chiusura della porta e di conseguenza una per dita d aria nella camera di combus one c PULIZ...

Page 20: ...n la rimo zione delle pare interne Togliere il crogiolo dall alloggio in cui è inserito Nella parte superiore della camera di combus one c è il ba fiamma afferrarlo sul bordo e rare verso l esterno Sulla parte inferiore della camera di combus one so o il casse o della cenere ci sono due piastre rimuo verle entrambe con l aiuto di un cac ciavite Nella parte sinistra della camera di combus one afferra...

Page 21: ...cenere tu o l interno della camera di combus one e pulire tu i singoli pezzi smonta con spazzola o panno asciu o Controllare tu o l interno e procedere con il rimontaggio di tu i compo nen facendo a enzione al corre o riposizionamento Si raccomanda di non montare com ponen ro o danneggia rivolgersi al proprio installatore di fiducia ...

Page 22: ... di non montare com ponen ro o danneggia rivolgersi al proprio installatore di fiducia GIORNALIERA OGNI 2 3 GIORNI MENSILE STAGIONALE ADDETTO INCARICATO BRACIERE X X X UTENTE CASSETTO CENERE X X X X UTENTE VETRO X X X UTENTE SERBATOIO X X UTENTE CAMERA COMBUSTIONE X X UTENTE GUARNIZIONE PORTA X X TECNICO CONDOTTO ASPIRAZIONE X TECNICO CANNA FUMARIA X TECNICO CONDOTTO FUMI X TECNICO PULIZIA GENERAL...

Page 23: ...vengano dire amente sia nel caso in cui vengano effe ua tramite un sistema di raccolta colle vo Qualsiasi chiarimento così come qualsiasi altra informazione potrà in ogni caso essere fornito dal distributore installatore presso cui è stato acquistato questo prodo o o dall ente locale responsabile dei rifiu INFORMAZIONE PER LO SMALTIMENTO O RICICLAGGIO AL TERMINE DEL CICLO DI VITA DEL PRODOTTO per p...

Page 24: ...E N G 5 4 2 2 4 ...

Page 25: ... 04 Safety 26 05 Legisla on and declara on of compliance 27 06 Disclaimer 27 07 Warranty 27 08 Pellets 27 09 Installa on 28 10 Technical specifica ons 30 11 First use 32 12 Control unit 33 13 Daily rou ne cleaning 41 14 Monthly rou ne cleaning 42 15 Seasonal maintenance 44 ...

Page 26: ...empty Every ac on which is not stated on this manual can be hazar dous Do not use water to clean the internal or external parts of the stove Install the stove only in safe places with minimum risk of fire Do not place the stove on floors made of combus ble materials In case of wooden or flammable flooring always place an insula ng material between the stove and the floor The pellet stove should no...

Page 27: ...which does not comply with the local country legisla on Usage of non genuine replacement parts Excep onal circumstances weather condi ons sudden changes in voltage In the above men oned instances the warranty will be voided 7 WARRANTY UNICA TERM GmbH guarantees the quality of the product for 24 months from the date of purchase as stated on the cer ficate of warranty on which must be specified the ...

Page 28: ... on the pipe Do not use nets or filters on the vent termina on as they could be used by birds to build their nests only use termina on caps compliant to local regula ons CHIMNEY The chimney must have the following characteris cs Cross sec on and internal shape equivalent to those of the vent pipe The exit cross sec on should be at least double of that of the vent pipe It should be built to prevent...

Page 29: ...ula on to perform the combu s on process correctly Ensure that proper air circula on takes place inside the room where the stove is installed If necessary install an air duct of at least 50 mm diameter to flow air from the outside The external air inlet should be connected directly to the stove and Internal chimney flue External chimney flue placed so as to it cannot be obstructed It should be cov...

Page 30: ...RAMS daily weekly week end nr 21 21 REMOTE CONTROL YES YES PASSIVE MANAGEMENT GSM ON OFF YES YES ACTIVE MANAGEMENT GSM YES YES MAXIMUM POWER CONSUMPTION Wa 350 350 MINIMUM POWER CONSUMPTION Wa 170 170 VOLTAGE V 220 240 220 240 FREQUENCY Hz 50 50 CLADDING steel steel COMBUSTION CHAMBER steel steel BRAZIER stainless stainless REMOVABLE ASH DRAWER YES YES WELLNESS HUMIDIFIER YES YES CERAMIC GLASS RES...

Page 31: ...E N G 5 4 2 3 1 PLUS 9 PLUS 12 ...

Page 32: ...uring packaging out of the hopper and ensure that the hopper does not contain any external items Ensure that the power supply cable is correctly plugged into the electrical system Fill the hopper with recommended pellets 6 mm diameter and in compliance with DIN51731 cer fica on Ensure that the burn grate is inserted correctly Close the glass door never open the glass door while the stove is in ope...

Page 33: ... phase pellet loading waiting for the flame to ignite ON 480 000 Stove is in second ignition phase start of full combustion Warm UP Stove is warming up P1 P2 P3 P4 P5 Power level set 05 35 C Temperature desired in the room where the stove is installed CLEANING Automatic cleaning of the crucible is running FLAME STOP Flame stop the stove is not operating because it probably run out of pellets START...

Page 34: ...terminate the ignition procedure and the stove exchanger to warm up The maximum timing is indicated on the screen but the electronic system may shorten it according to the data detected by the sensors 3 1 SHUTDOWN If you press 0 1 when the stove is on you start the shutdown phase which includes a stopping the pellet loading b running out of pellets in the crucible while the smoke fan stays on usua...

Page 35: ...e was calibrated and therefore when you need to readjust the loading If this adjustment is not sufficient please contact your Technical Assistance Service to set the new operation conditions 3 5 FRONT VENTILATION ADJUSTMENT Press Menu for two seconds and scroll the captions on the screen using until you display FRONT VENTILATION VENTIL FRONTALE Press Menu to confirm this function and adjust the ve...

Page 36: ... interruption Shutdown due to too low smoke temperature No pellets flame is too low at idle Check whether the tank there are pellets Contact your local CAT Thermocouple TC is broken Smoke thermocouple is broken Wear and tear of the component Contact your local CAT Start failed The stove did not start automatically Start with empty auger or with dirty crucible Load pellets into the cochlea see sect...

Page 37: ...ms ignitions shutdowns that you can select in one day Select Program No will be displayed on the screen Press to set 1 2 or 3 ignition shutdown ranges for each day Caption on the screen Corresponding day of the week No program option One ignition One shutdown option Two ignitions and two shutdowns option Three ignitions and three shutdowns option Daily program Repeated for all the days of the week...

Page 38: ...e week In case of mistakes during the programming operation press 0 1 to exit the program without saving 6 0 REMOTE ACTIVATION FUNCTION AUX output Use a specific connection cable to turn the stove on or off through a remote device such as a GSM phone activator a room thermostat a confirmation from a home automation system etc For this type of connection please contact your Technical Assistance Ser...

Page 39: ...NG THE SMOKE EXTRACTION ENGINE RPS C3 PELLET LOAD TESTING THE AUGER ENGINE A C4 AIR FAN TESTING THE VENTILATION ENGINE V 100 C5 THERMOCOUPLE TESTING THE THERMOCOUPLE C C6 AIR FLOW TESTING THE FLOW SENSOR Volt C7 C TEMPERATURE SENSOR TESTING THE ROOM AIR PROBE C C8 IR PROBE TESTING TESTING THE REMOTE CONTROLLER PROBE C C9 AUX OUTPUT TESTING THE SERIAL CABLE OF AUX OUTPUT ON OFF 8 0 TECHNICAL PARAME...

Page 40: ...E N G 5 4 2 4 0 9 0 ELECTRICAL DIAGRAM ...

Page 41: ...down or clean the stove s internal surfa ces An ash aspirator may be used as long as the ash is completely cold Pay extra a en on when the ash pan is re inserted it should be properly fi ed in its original posi on and there should be no com bus on products anywhere around it If any ash is le on the ash pan a er re inser ng it this could prevent the correct door closure and result in an air leakage...

Page 42: ...tray off before removing the internal walls Take the crucible off its housing The flame protec on is located in the upper part of the combus on cham ber grab it from the edge and pull it outward There are two plates in the lower part of the combus on chamber under the ash tray use a screw driver to take them off Grab the firewall on the le hand side of the combus on chamber and pull it outward ...

Page 43: ... a vacuum cleaner to clean the inside of the combus on chamber Use a brush or a dry cloth to clean all the pieces disassembled Check the inside and assemble again all the components making sure to reposi on them correctly Do not reposi on broken or damaged pieces please contact your installa on specialist ...

Page 44: ...R IN THE TERRITORY DAILY EVERY 2 3 DAYS MONTHLY SEASONAL PERSON RESPONSIBLE BURN GRATE X X X USER ASH PAN X X X X USER GLASS DOOR X X X USER HOPPER X X USER COMBUSTION CHAMBER X X USER DOOR GASKET X X TECHNICIAN EXHAUST PIPE X TECHNICIAN CHIMNEY FLUE X TECHNICIAN EXHAUST SYSTEM X TECHNICIAN GENERAL CLEANING X TECHNICIAN Use a vacuum cleaner to clean the inside of the combus on chamber Use a brush ...

Page 45: ... unit either when it is done directly or through a collec ve collec on system Any clarifica on or further informa on needed may be provided by the distributor installer through whom this appliance has been purchased or by the local authority responsible for waste management INFORMATION ON DISPOSAL OR RECYCLING AT THE END OF THE UNIT S LIFE CYCLE For EU member na ons only UNICA TERM GmbH Arnbach 88...

Page 46: ...D E U 5 4 2 4 6 ...

Page 47: ...eise 48 04 Sicherheit 48 05 Richtlinien und Konformitätserklärungen 49 06 Ha ung 49 07 Garan e 49 08 Pellets 49 09 Installa on 50 10 Technische Eigenscha en 52 11 Ers nbetriebnahme 54 12 Elektronische Steuereinheit 55 13 Tägliche Reinigung 63 14 Monatliche Reinigung 64 15 Saisonale Reinigung 66 ...

Page 48: ...em Einschalten ist sicherzustellen dass der Brenn egel leer ist Jede Maßnahme oder Arbeit die nicht in diesem Handbuch vor gegeben ist ist als gefährlich anzusehen Die Innen und Außenteile des Ofens nicht mit Wasser waschen Den Ofen an geeigneten feuersicheren und sicherheitsmäßig vor bereiten Orten installieren Vermeiden den Ofen direct auf dem Boden aufzustellen Bei Holz oder en lammbaren Böden ...

Page 49: ... on durch nicht ausgebildetes und nicht eingewiesenes Perso nal Installa on die nicht mit den geltenden Vorschri en im zu installie renden Land im Einklang ist Gebrauch von NICHT originalen Ersatzteilen außergewöhnlichen Ereignissen Wi erungsbedingungen Spannun gsschwankungen 7 GARANTIE Die Firma UNICA TERM GmbH gewährt auf das Produkt eine Garan e von 24 Monaten ab Kaufdatum das durch den Garan e...

Page 50: ...ber eine T Verbindung mit Inspek onsluke ausgeführt wird Es ist verboten an den Enden des Rauchabzugs Netze oder Filter oder sons ge Endstücke einzusetzen die zu einem Nest für Vögel werden könnten Nur normgerechte Endstücke benutzen SCHORNSTEIN Der Schornstein muss folgenden Anforderungen genügen Innenquerschni und form gleich dem des Rauchabzugs Ausgangsnutzquerschni nicht kleiner als der doppel...

Page 51: ...m Raum in dem der Ofen aufgestellt wird eine ausreichende Lu zufuhr vorhanden ist Nö genfalls eine Leitung mit Lu zufuhr von außen mit einem Mindestdurchmesser von 50 mm empfohlen installieren Die Aufnahme von Außenlu muss den Ofen erreichen und so ange bracht werden dass sie nicht verstop werden kann Sie muss mit Interner Rauchabzug Externer Rauchabzug einem dauerha en Gi er versehen sein das nic...

Page 52: ...h Wochenende nr 21 21 FERNSTEUERUNG JA JA PASSIVE STEUERUNG GSM ON OFF JA JA AKTIVE STEUERUNG GSM JA JA MAXIMAL AUFGENOMMENE LEISTUNG Wa 350 350 MAXIMALE LEISTUNGSAUFNAHME BEI HÖCHSTAUSLASTUNG Wa 170 170 SPANNUNG V 220 240 220 240 FREQUENZ Hz 50 50 VERKLEIDUNG Stahl Stahl BRENNKAMMER Stahl Stahl BRENNTIEGEL Edelstahl Edelstahl ASCHENKASTEN JA JA WELLNESS BEFEUCHTER JA JA KERAMIKGLAS HITZBESTÄNDIG ...

Page 53: ...D E U 5 4 2 5 3 PLUS 9 PLUS 12 ...

Page 54: ... Aus dem Pelletbehälter alle Werkzeuge Zubehörteile die der Ver packung beigelegt wurden en ernen und sicherstellen dass der Behälter frei von eventuellen Fremdkörpern ist Sicherstellen dass das Stromkabel gut mit dem Stromnetz ver bunden ist Den Behälter mit den empfohlenen Pellets füllen Durchmesser 6 mm und DIN51731 Zer fizierung Überprüfen dass der Brenn egel gut eingesetzt und gut in seinem S...

Page 55: ...Pellets warten auf das zünden der Flamme START 480 000 Ofen in zweiter Einschaltphase Start Verbrennungsbetrieb Warm UP Ofen in Erwärmungsphase Luft Wärmetauscher P1 P2 P3 P4 P5 Eingestellte Leistungsstufe 05 35 C Gewünschte Umgebungstemperatur REINIGUNG Automatische Reinigung des Brenntiegels in Gang STOPP DER FLAMME Stopp der Flamme Betriebsunterbrechung wegen möglichem Pelletsmangel ZÜNDUNG MIS...

Page 56: ...ung und der Erwärmung des Wärmetauschers des Ofens Die angezeigten Zeiten sind die Maximalzeiten die je nach Erfassung der elektronischen Sensoren auch kürzer sein können 3 1 ABSCHALTUNG Durch Drücken der Taste 0 1 bei eingeschaltetem Ofen wird die Abschaltphase eingeleitet a Das Herunterfallen der Pellets wird unterbrochen b Aufbrauchen der im Brenntiegel vorhandenen Pellets wobei das Rauchabzugs...

Page 57: ...rringert sich die Ladung bei Erhöhung des Werts erhöht sich die Pellet Ladung Diese Funktion kann nützlich sein wenn sich die Art der Pellets geändert hat für die der Ofen kalibriert ist wodurch eine Korrektur der Ladung notwendig wird Wenn diese Korrektur nicht ausreichend sein sollte wenden Sie sich an das Kundendienstzentrum um die neuen Eingabewerte für den Betrieb festzulegen 3 5 EINSTELLUNG ...

Page 58: ...n Den korrekten Sitz des Stromsteckers überprüfen Der Schalter an der Rückseite muss auf ON sein Temp des Rauchs ist hoch Die Rauchabzugstemperatur ist zu hoch Pellet Ladung zu hoch Gebläse funktioniert nicht Wärmetauscher zu reinigen Wenden Sie sich an den Kundendienst für eine professionelle Ofenreinigung Flammen Stopp Abschaltung wegen zu niedriger Temperatur der Verbrennungsluft Pellets fehlen...

Page 59: ...enü drücken wodurch nacheinander folgende Daten erscheinen die eingestellt werden können Tag Monat Jahr Stunde Minuten Wochentag Durch Bestätigung von Speichern mit der Taste Menü kann die Richtigkeit der Eingaben geprüft werden bevor sie übernommen werden danach wird auf dem Display Speicherung OK angezeigt 5 1 EINSTELLUNG DES WOCHEN PROGRAMMSCHALTERS Für 2 Sekunden die Taste Menü gedrückt halten...

Page 60: ...nt All 1 ON Zeit 10 30 mit blinkender Stundenanzeige mit den Tasten können die Stunden geändert werden und mit der Taste Menü wird gespeichert Auf dem Display erscheint All 1 ON Zeit 10 30 mit blinkender Minutenanzeige mit den Tasten können die Minuten geändert werden und mit der Taste Menü wird gespeichert Auf dem Display erscheint All 1 OFF Zeit 12 30 mit blinkender Stundenanzeige mit den Tasten...

Page 61: ...dung des Ports der Fernaktivierung ist es gleichwohl möglich den Ofen vom Bedienfeld aus ein bzw auszuschalten Der Ofen wird stets gemäß dem zuletzt erhaltenen Befehl aktiviert sei es Ein oder Abschaltung ACHTUNG Die Aktivierung des internen Programmschalters für die Uhrzeit siehe Einstellung des Wochen Programmschalters schließt automatisch die Fernaktivierung aus Aux Port um einen Konflikt der p...

Page 62: ...igen durchlaufen bis auf dem Display ein Menü mit der Beschreibung EINSTELLUNGEN erscheint Dieses Menü ermöglicht es die wichtigsten Parameter einzustellen die den Ofenbetrieb regeln Sie ist nur durch autorisiertes Personal des Kundendienstzentrums aufrufbar und erfordert die Eingabe eines Passworts 9 0 ELEKTRISCHER SCHALTPLAN ...

Page 63: ...ser zum Abkühlen der Asche oder zur Reinigung des Ofeninnenraums ist verboten Es kann ein Staubsau ger benutzt werden vorausgesetzt dass die Asche wirklich erkaltet ist Beim Einsetzen des Aschekastens achtgeben Er muss vollständig bis ans hintere Ende eingeschoben werden und es dürfen keine Brennrückstände vorhanden sein die den Verschluss der Ofentür beeinträch gen könnten wodurch es zu einem Lu ...

Page 64: ...ent nehmen um die Innenwände reini gen zu können Den Brenn egel aus seinem Sitz nehmen Im oberen Bereich der Brennkammer befindet sich der Flammenschutz Diesen am Rand angreifen und nach außen ziehen Im unteren Bereich der Brennkammer befinden sich unter dem Aschekasten zwei Pla en Beide mit Hilfe eines Schraubenziehers en ernen Im linken Bereich der Brennkammer das Seitenelement lösen und nach au...

Page 65: ...amten Innenraum der Brennkammer absau gen und jedes ausgebaute Teil einzeln mit Bürste und trockenem Tuch reini gen Den gesamten Innenraum prüfen und alle Bauteile wieder mon eren Dabei auf den jeweiligen korrekten Sitz achten Gebrochene oder beschädigte Teile dürfen nicht wieder mon ert werden Wenden Sie sich an ihren Monteur ...

Page 66: ...ene oder beschädigte Teile dürfen nicht wieder mon ert werden Wenden Sie sich an ihren Monteur TÄGLICH ALLE 2 3 TAGE MONATLICH SAISONAL BEAUFTRAGTES PERSONAL BRENNTIEGEL X X X ANWENDER ASCHEKASTEN X X X X ANWENDER GLAS X X X ANWENDER BEHÄLTER X X ANWENDER BRENNKAMMER X X ANWENDER TÜRDICHTUNG X X TECHNIKER ABZUGSLEITUNG X TECHNIKER RAUCHABZUG X TECHNIKER RAUCHABZUGSLEITUNG X TECHNIKER ALLGEMEINE RE...

Page 67: ...h sowohl wenn dies direkt oder über ein System kollek ver Sammlung geschieht Diesbezügliche Erläuterungen und weitere Informa onen können jederzeit beim Händler Monteur bei dem dieses Produkt erworben wurde oder bei der zuständigen Stelle für Abfallbe sei gung eingeholt werden INFORMATIONEN ZUR ENTSORGUNG ODER WIEDERVERWERTUNG AM ENDE DER LEBENSDAUER DES PRODUKTS für Länder der Europäischen Union ...

Page 68: ...UNICA TERM GmbH A 9920 SILLIAN Arnbach 88 Phone 43 0 4842 66 61 90 Fax 43 0 4842 66 61 24 E mail info unicaterm com www unicaterm com 5 4 2 7E HEAT UP YOUR LIFE ...

Reviews: