background image

5

ANSA Relax Instruction & Safety Manual

T

 08 9351 7500              

E

 info@unicarehealth.com.au              

W

 www.unicarehealth.com.au

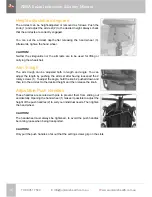
Before changing any of the adjustments of this wheelchair, it is important to read the corresponding 

section of the user’s instructions.

It is possible that potholes or uneven ground could cause this wheelchair to tip over, especially when 

riding uphill or downhill. When riding over a step or up an incline frontally, the body should be leaning 

forward.

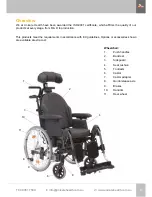
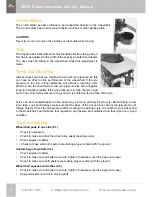
Defi nition of purpose:

The manual wheelchair is designed for all users, who require a high degree of support to sit upright for 

any length of time. This is made possible by the ergonomic, shaped backrests/back padding as well as 

the adjustability of the seating unit (seat angle, backrest angle, seat depth).

The wheelchair can be used indoors as well as outdoors on dry, relatively smooth surfaces. It should not 

be used in heavy rain, or on snow-covered, slippy surfaces.

Safety notes

Attention: Wheelchair surfaces, frame parts as well as padding can reach a temperature of > 41°, if they 

are left in the sun for a long period of time.

Transportability

Transportability of wheelchairs and users in vehicles A wheelchair secured in a vehicle will not provide 

the equivalent level of safety and security of a vehicle seating system. It is always recommended that 

the user transfers to the vehicle seating. It is recognised that this is not always practical for the user to 

be transferred and in these circumstances where the user must be transported whilst in the wheelchair 

the following advice should be followed.

1.   Confi rm that the vehicle is suitably equipped to transport a passenger in a wheelchair and has 

access that is suitable for your wheelchair type.

2.   Recommendations:
a)   That the wheelchair be secured by a 4-part (webbing) Tie Down Restraint system, conforming to ISO 

10542. These restraints generally comprise of 4 individual straps that are attached to each corner of 

the wheelchair

b)   That the occupant should be restrained independently of the wheelchair by a lap and diagonal safety 

belt, conforming to ISO 10542. This is similar to a car seat belt that comes across the user’s shoulder 

and around the waist.

c)   Any part of the wheelchair accessories such as kerb climbers) that can easily be detached should 

be removed and stored in the vehicle luggage compartment during transportation.

d)   The wheelchair should always be transported in the forward facing direction.

e)   Suffi  cient space should be available around the wheelchair to enable clear access to attach, tighten 

and release the wheelchair and occupant tie down restraints and safety belts.

f)   The wheelchair should have the headrest fi tted and adjusted to suit the user.

Summary of Contents for ANSA Relax

Page 1: ...ANSA Relax Instruction Safety Manual Please read this manual before operation for maintenance instructions and safe usage The enabling power of applied knowledge...

Page 2: ...1 ANSA Relax Instruction Safety Manual T 08 9351 7500 E info unicarehealth com au W www unicarehealth com au...

Page 3: ...verview 8 Handling 9 Tipping Tubes 9 Brakes 10 Footrests 11 Angle Adjustable Footplate 12 Headrest 12 Seat Height Adjustment 12 Wheelbase Extension 13 Backrest Height 14 Height Adjustable Side Guard 1...

Page 4: ...be satis ed with our products and service Unicare Health has thus been consistently working at continuously develop its products For this reason changes can occur in our palette of products with rega...

Page 5: ...ing your wheelchair on level ground as well as going uphill and downhill CAUTION The wheel locks are not intended to brake your wheelchair They are only there to ensure that your wheelchair does not b...

Page 6: ...d security of a vehicle seating system It is always recommended that the user transfers to the vehicle seating It is recognised that this is not always practical for the user to be transferred and in...

Page 7: ...n their use The wheelchair should be restrained with 4 point tie down webbing straps with non adjustable front straps and adjustable rear straps which typically use Karabiner clips S hooks and tongue...

Page 8: ...ir secured with front and rear wheelchair tie down restraints Positioning of the restraint straps is shown in more detail below Position of the front wheelchair tie down restraint and the tie down lab...

Page 9: ...ty of our products at every stage from R D to production This products meet the requirements in accordance with EC guidelines Options or accessories shown are available at extra cost Wheelchair 1 Push...

Page 10: ...CAUTION Risk of injury you must make sure that the backrest is correctly clicked into the bracket Quick release axles on rear wheel The rear wheels are tted with a quick release axle The wheels can b...

Page 11: ...ocks Always use the handrims for braking Make sure that the gap between the wheel locks and the tyres complies with the given speci cations Fig 10 2 To readjust loosen screw 1 and set the appropriate...

Page 12: ...st To ip up Take the load o the footrest and release the hand wheel 1 Pull the footrest upwards and set the desire height Secure at the desired height by tightening the hand wheel To lower Take the lo...

Page 13: ...adjustment all screws must be correctly tightened By pushing the calf pad on the footrest tube you can set the height Headrest The headrest can be raised moved sideward and moved horizontally both fo...

Page 14: ...depth wise or removed Wheelbase Extension The larger the wheelbase the less likely the wheelchair is to tip over The rear wheel is tted in the most rear position to extend the wheelbase Make sure tha...

Page 15: ...Angle adjustment Push the pad upwards put the pad at the desired angle and then let go of it again It will automatically click into place This is how you swing the pad away Height adjustment Loosen t...

Page 16: ...The arm trough can be adjusted both in length and angle You can adjust the length by pushing the armrest after having loosened the 2 rotary screws 1 To adjust the angle hold the knob 2 pushed down an...

Page 17: ...over can be washed see the instructions on the cushion Seat depth After loosening the screws 1 you can set the seat depth to the desired position Then tighten the screws again see the page on torque C...

Page 18: ...high the tyre could burst The correct tyre pressure for a given tyre is printed on the surface of the tyre Tyres can be mounted repaired in the same way as for an ordinary bicycle tyre Before tting a...

Page 19: ...18 T 08 9351 7500 E info unicarehealth com au W www unicarehealth com au...

Page 20: ...PO Box 82 Bentley WA 6982 T 08 9351 7500 F 08 9350 5299 info unicarehealth com au www unicarehealth com au Authorised Distributor...

Reviews: