Page 29.
Mounting the HotPort
Using the Universal Mounting Bracket
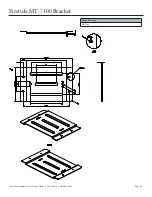
Firetide’s HotPort can be mounted to a wall or onto a vertical
or horizontal pole. The HotPort’s universal mounting bracket
provides holes and slots for use with the provided mounting
kit or for straps (not included) or other mounting methods.
Before mounting, keep in mind that adequate space is needed
around the mounting bracket to allow the HotPort unit to
slide onto it and to enable cable connections.
Remove the Universal Mounting Bracket from the
HotPort
The universal mounting bracket is shipped
attached to the HotPort node. To remove the universal
bracket, first loosen the four thumb screws, two on each
side, then slide the universal bracket toward the connector
side of the HotPort node and lift off.
Wall Mounting
Mount the universal mounting bracket to a wall using two
holes near the top and two holes near the bottom of the
universal bracket. Use appropriate screws (not provided) and
anchors as required by wall construction and materials to
safely and securely support the HotPort. Once the universal
bracket has been mounted, attach the HotPort by reversing
the bracket removal procedure.
Pole Mounting
POLE 37–50 MM DIAMETER
Use Firetide’s SP-7200-03 u-bolt mounting kit, provided with
each HotPort, to mount the universal mounting bracket onto
a 37–50 mm diameter pole.
1. Using claw-tooth gripper saddles, washers, split washers
then nuts, install the two u-bolts onto the mounting pole.
Temporarily allow enough play to snuggly slide or spin
the u-bolts on the pole.
2. Use the position of screw slots in the universal mounting
bracket as a guide to correctly position the two u-bolts on
the pole. For mounting stability, target screw slots that will
allow the u-bolts to be positioned far from each other.
3. Once properly positioned, securely tighten the two u-bolts
to the pole.
4. There should be about 12–15 mm (1/2–5/8”) of u-bolt
threaded end sticking out beyond each nut. This is the
bolt length needed to mount the universal bracket. If the
lengths are longer, then on each u-bolt end, install a
second nut until there is 12-15 mm of thread between the
second nut and u-bolt end (see photos at right).
5. Slip a flat washer onto each of four u-bolt ends.
6. Attach the universal bracket by positioning the u-bolt
ends into the bracket’s screw slots. Use washers, then lock
washers and nuts to secure the universal bracket to the u-
bolts.
7. Recheck all nuts for adequate tightness. Confirm that the
universal bracket does not slip or turn on the pole.
8. Attach the HotPort to the universal mounting bracket by
reversing the bracket removal procedure.
POLE GREATER THAN 50 MM DIAMETER
Use appropriate mounting straps (not included) or other
secure means to mount a HotPort universal mounting
bracket onto a 50 mm (2.0”) or larger diameter pole,
irregularly shaped pole, or light pole.
1. Position the universal mounting bracket against the pole.
2. Wrap a mounting strap around the pole and through
the vertical slots located near the top of the universal
mounting bracket.
3. Do the same with a second strap but this time use the
vertical slots near the bottom of the universal bracket.
4. Secure the mounting straps so that the bracket will not
slip or turn on the pole.
5. Attach the HotPort to the universal mounting bracket by
reversing the bracket removal procedure.
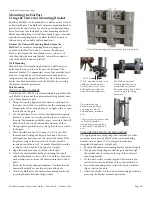
Universal mounting bracket attached to pole using u-bolts
U-bolt* mounted on pole—note
addition of secondary nuts
(circled) to meet 12–15 mm
bolt length required by the
universal mounting bracket.
The HotPort universal
mounting bracket can be
mounted on vertical and
horizontal poles using u-bolts*
or other proper fastening
hardware.
continued from previous page
Universal mounting
bracket mounted onto a
pole using two u-bolts*
with additional secondary
nuts.
* photos for quick reference only
—all u-bolts should be
secured using proper washers
& lock washers in addition to
nuts.
12–15 mm
Firetide Antenna & Accessories Guide | Version 4.0 | October 2014

