background image

-  18  -

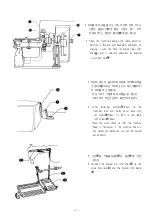
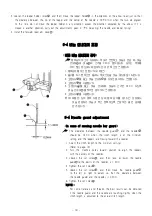
3. Loosen the looper holder screw④, and them move the looper holder⑤ in the direction of the arrow to adjust so that  

   the clearance between the tip of the looper and the center of the needle is 0.05-0.1mm when the two are aligned.  

   At this time, do not move the looper holder in any direction  except the direction indicated by the arrow. If it is     

   moved in another direction, carry out the adjustments given in "9-2. Adjusting the needle and looper timing" .

4. Install the forward feed arm cover①.  
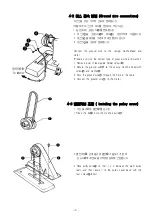
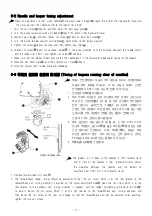
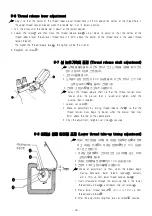
                                      

  9-4 바늘 안내대의 조정 


[이동 바늘 안내대의 경우]


☞ 

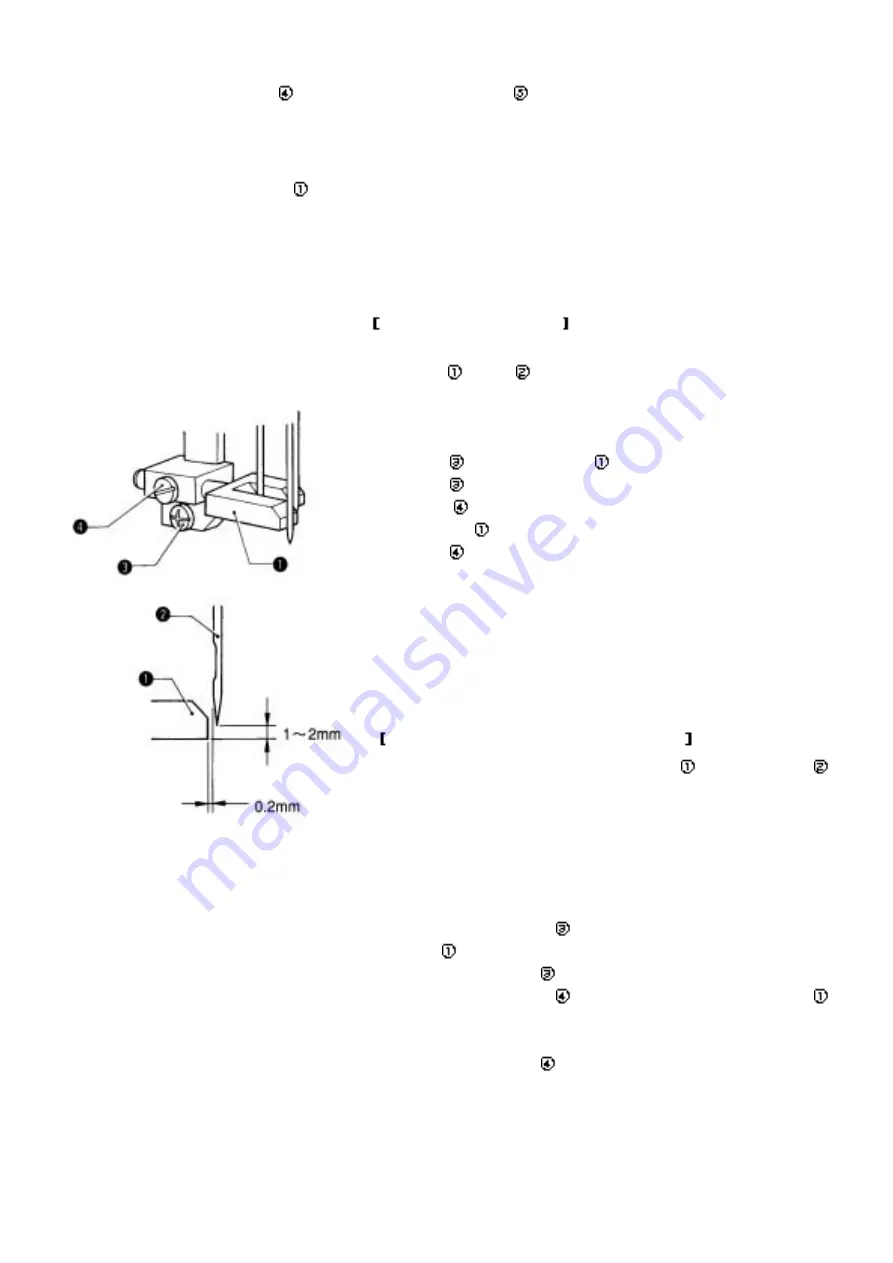
봉목길이 최소의 상태에서, 루퍼가 전진하고 바늘과 만날 때, 바늘   

                                              안내대①와  바늘②의  간격을  0.2mm  열어둡니다.  높이는  루퍼를    
                                              막지 않는 정도에서 제한하지만, 낮은 쪽으로 조정합니다.
                                          1. 봉목길이를 최소로 합니다.(p12참조)
                                          2. 풀리를 자기 앞쪽으로 돌려서, 루퍼선단을 바늘 중심에 일치시킵니다.
                                          3. 고정나사③를 풀고, 바늘 안내대①를 상하로 움직여서 조정합니다.
             .     ..                       4. 고정나사③를 체결합니다.
                                          5.  고정나사④를  풀고,  바늘  안내대와  바늘의  간격은  0.2mm  되도록     
                                             바늘 안내대①를 좌우로 움직여서 조정합니다.
               ...                          6. 고정나사④를 체결합니다. 
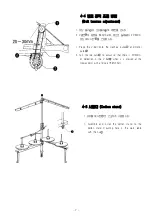
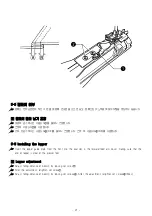
                                          (주의) 재봉천, 실의 종류 사용은 실제 봉목 길이를 일치시킨 상태에서   
                                                바늘 받침대가  바늘과  약간  접촉하도록  조절하면,  좋은  결과를   
                                                얻게 됩니다.


9-4 Need le guard  adjustment

                                  [In  case of mo vin g ne edle bar  gu ar d]


  The  clearance  between  the  needle  guard①  and  the  needles②     

                                              should  be  0.2mm  when  the  stitch  length  is  at  the  minimum      

                                              setting and the loopers are moving toward the needles.

                                           1. Adjust the stitch length to the minimum setting. 
                                              (Refer to page 12)
                                           2.  Turn  the  machine  pulley  toward  yourself  to  aligh  the  loopers       
                                              with the centers of the needles.
                                           3.  Loosen  the  set  screw③,  and  then  raise  or  lower  the  needle       
                                              guard①to the points of the needles is 1-2mm.
                                           4. Tighten the set screw③.
                                           5.  Loosen  the  set  screw④,  and  then  move  the  needle  guard①      
                                              to  the  left  or  right  to  adjust  so  that  the  clearance  between      
                                              the needle guard and the needles is 0.2mm.
                                           6. Tighten the set screw④.
                                           NOTE :
                                              For some materials and threads, the best results can be obtained  
                                              if the needle guard and the needle are touching slightly when the  
                                              stitch length is adjusted to the actual stitch length.

Summary of Contents for DT6-H892?3

Page 1: ...2 3 OPERATION MANUAL DT6 H892 3 Twin Needle Three Needle Feed off the Arm Double Lock Chain Stitch Machine...

Page 2: ......

Page 3: ...symbol at left means beware of injury This symbol indicates something that you must not do This symbol indicates something that you must do The picture inside the circle indicates the nature of the t...

Page 4: ...5 off A S 31 2 40 25 OFF A S A S...

Page 5: ...ore do not excessively bend the cable or secure it too firmly staples otherwise shocks could occur install the belt covers to the machine head and motor Be sure to wear protective goggles and gloves w...

Page 6: ...e bobbin and needle when not using the machine and when leaving the machine unattended If an error occurs in machine operation or if abnormal noises or smells are noticed immediately turn off the powe...

Page 7: ...ician to carry out any maintenance and inspection of the electrical system Turn off the power switch and disconnect the power cord from the wall outlet at the following times otherwise the machine may...

Page 8: ...on the labels at all times when using the machine if the label have been removed or are difficult to read please contract your nearest UNICORN dealer The positions of the labels may vary slightly dep...

Page 9: ...is forwarding it has adjusted completely but when test working clutch lever pedalled and then manually operated change direction after please turn on 1 1 200 1 300 SPM At first the sewing machine rev...

Page 10: ...E SEWING 12 7 ADJUSTMENT OF THE THREAD TENSION CONTROL 13 8 CLEANIG AND OILING THE MACHINE 14 9 STANDARD ADJUSTMENT 15 9 1 ADJSTMENT OF THE NEEDLE BAR HEIGHT 15 9 2 ADJUSTMENT OF THE NEEDLE AND LOOPER...

Page 11: ...ed off the arm double chain stitcher Max sewing speed spm 4 000 S P M 3 500 S P M Max stitch length mm 1 4 4 2 mm 2 4 2 mm No of needles TV 64 12 TV 64 14 16 TV 5 22 Needle gauge 1 4 6 4mm 3 16 4 8mm...

Page 12: ...es as indicated in the illustration below A A Hole Chain hole B B Hole Motor mounting holes C C Hole Cotton stand hole D d Hole Ground hole MOTOR Select the correct mootor from those listed in the bel...

Page 13: ...installation should be carried out by two or more people Do not connect the power cord until installation is complete otherwise the machine will operate if the treadle is pressed by mistake which coul...

Page 14: ...shers 2pcs 2 Insert two bar cushions 2pcs into the holes in he the bottom of the bed 2 At this time install the two hexagonal bolts 2pcs so that they go as far as possible into the notches in the pull...

Page 15: ...with belt hole 4 2 2 2 4 After fastening cushions 2pcs to the machines bed and pulley cover base with set screws 2pcs fix them to the table with screws 2pcs Place the work table so that the machine h...

Page 16: ...r screws 2 Secure the ground wire to the sewing machine head with screw and washer 3 Pass the ground wire through the hole in the table 4 Connect the ground wire to the motor 4 3 Installing the pulley...

Page 17: ...ulley and motor pulley 2 Turn the two nuts to adjust so that there is 20 30mm of deflection in the V belt when it is pressed at the midway point with a force of 9 8N 1Kgf 4 5 Cotton stand 1 1 Assemble...

Page 18: ...le 3 Periodically loosen the oil drain screw to drain out any oil which collects in the front bed oil sump After draining the oil tighten the oil drain screw 4 Periodically wipe away any oil which col...

Page 19: ...ct the correct ones by referring to the table below Needle No Thread No Upper thread Lower thread Organ TV 64 11 12 80 Spun yarn 80 80 Spun yarn 80 14 60 Spun yarn 60 60 Spun yarn 60 16 50 Spun yarn 5...

Page 20: ...witch before threadling the lower thread otherwise the machine may operate if the treadle is pressed by mistake which could result in injury 10 5 3 Threading the lower threads Pass the lower threads a...

Page 21: ...witch before threadling the upper thread otherwise the machine may operate if the treadle is pressed by mistake which could result in injury 11 5 4 Threading the upper threads Pass the upper threads a...

Page 22: ...When not using the machine and when leaving the machine unattended Do not touch any of the moving parts or press any objects against the machine while sewing as this may result in personal injury or...

Page 23: ...n properly by turning upper thread adjusting screw 2 Adjust the presser foot pressure by turning lower thread adjusting screw 7 2 Presser plate pressure adjustment Adjust the presser plate pressure by...

Page 24: ...nterclockwise 8 CLEANING The following cleaning operations should be carried out each day in order to maintain the performance of this machine and to ensure a long service life 8 1 Daily cleaning Clea...

Page 25: ...open the forward feed arm cover 2 Draw up all of the lubricating oil inside the machine into the oil bottle 3 Fill the machine with oil until the oil level reaches the point in between the reference l...

Page 26: ...p is set in the way described above the distance between the points of the needles and the top of the needle plate will be 8 5mm for thin material or 10 3mm for medium heavy material 4 Remove the set...

Page 27: ...ls of the loopers 8 Close the belt cover plate and then tighten set screws 2pcs 9 Install the presser foot needle plate and feeddogs 9 3 Timing of loopers running clear of needles 0 05 1mm 1 2 2 3 0 0...

Page 28: ...the needle guard and the needles should be 0 2mm when the stitch length is at the minimum setting and the loopers are moving toward the needles 1 Adjust the stitch length to the minimum setting Refer...

Page 29: ...ion 2 Loosen the looper thread guard bracket and bed screw 3 Adjust the clearance between the needles and the needle guard to anywhere from 0 2 0 3mm by moving the needle guard 4 After adjusting insta...

Page 30: ...t adjustment 1 2 4mm 3 Adjust the thread release shaft so that the thread tension discs loosen when the presser foot is raised and tighten when the presser foot is lowered 1 Loosen set screw 2 Make an...

Page 31: ...the forward feed arm cover making sure that the end of lapper is clear of the presser foot Lapper adjustment Adjust felling distance of point by loosing set screw After the adjustment retighten set sc...

Page 32: ...22 10 1 13 19 2 9 16 16 20 16 3 13 19 4 19 13...

Page 33: ...rectly Adjust the lower thread take up timing correctly 20 Is the clearance between needle and looper incorrect Adjust the clearance between needles and loopers correctly 16 3 Seam position is incorre...

Page 34: ...24 5 9 9 10 11 13 20 9 16 6 9 9 16 18 9...

Page 35: ...just the tension plate clearance of the upper thread nipper correctly 20 Are the needle eyes too small for threads Refer to the section on Needles and threads 9 Are the loopers damaged Replace loopers...

Page 36: ...588 21 SHINSA DONG KANGNAM KU SEOUL KOREA TEL 02 3446 4083 4 FAX 02 3446 5144 BUSAN FACTORY 1521 2 DADAE DONG SAHA GU BUSAN KOREA TEL 051 265 4508 9 FAX 051 265 7910 588 21 TEL 02 3446 4083 4 FAX 02...

Reviews: