- 23 -
11. 고정칼과 이동칼의 설치방법 / Removing the fixed and movable knives
조 정 / ADJUSTMENT
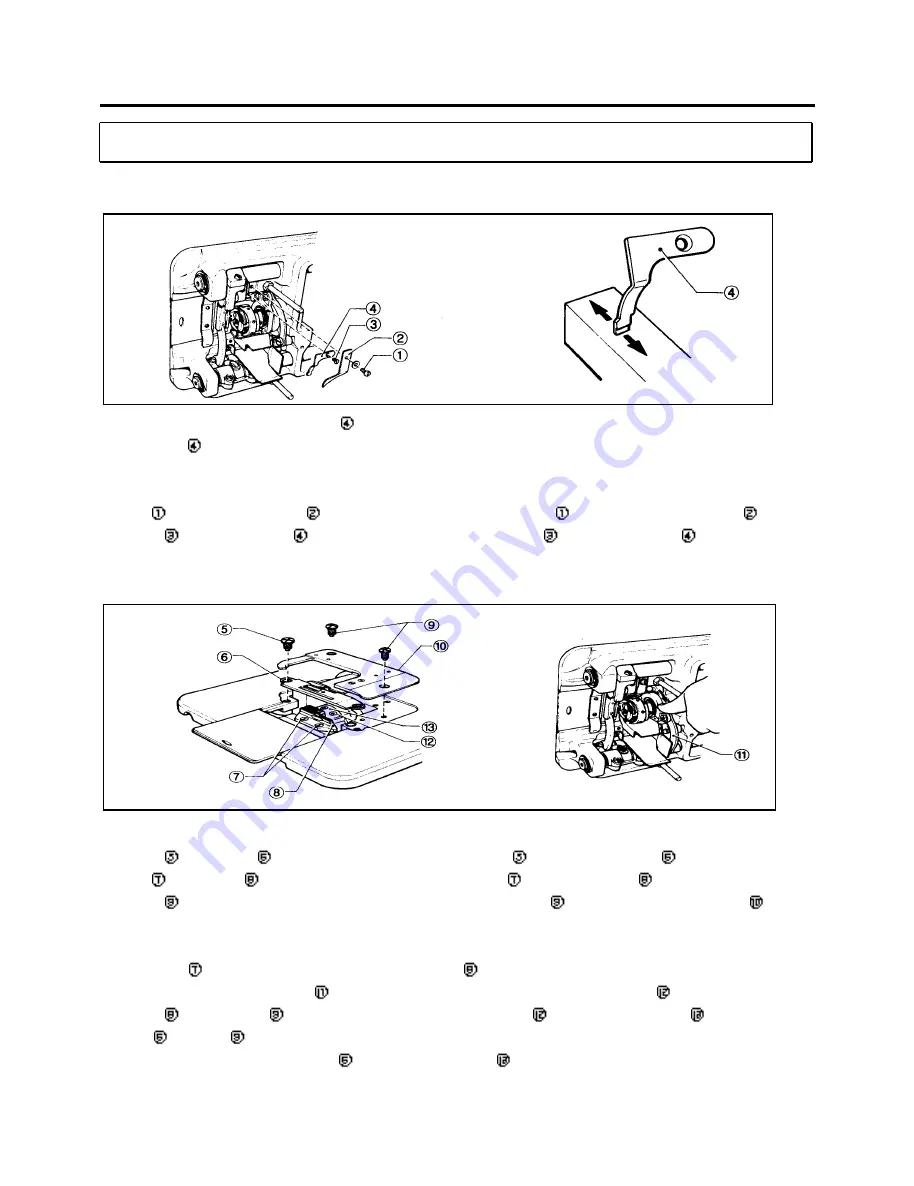
1. 고정칼의 빼내는 방법 / Removing the fixed k nife
◎
실의 잘림이 나쁘게 되었을 때 고정칼④을 위의 그림과 같이 갈아주십시오.
(If the knife ④ becomes dull, sharpen it as shown in the figure above.)
1 전원스위치를 OFF 해주십시오. (Turn off the power.)
2. 미싱을 눕혀주십시오. (Tilt the machine head until it stops.)
3. 죔나사①을 풀어내고, 밑실처리판②를 빼내어주십시오. (Remove the screw ① and the lower thread finger ②.)
4. 접시나사③을 풀어내고, 고정칼④을 빼내어주십시오. (Remove the screw ③ and the fixed knife ④.)
1. 이동칼의 빼내는 방법 / Removing the mova ble knife
1. 올림대로 노루발을 올려주십시오. (Raise the presser foot using the presser bar lifter.)
2. 침판나사⑤를 풀고, 침판⑥을 빼내어 주십시오. (Remove the screw ⑤ and the needle plate ⑥.)
3. 죔나사⑦를 풀고, 톱니⑧를 빼내어 주십시오. (Remove the screws ⑦ and the feed dog ⑧.)
4. 접시나사⑨를 풀고, 보조침판
ꊉ
ꊒ
을 빼내어 주십시오. ( Remove the screws ⑨ and the auxiliary needle plate ⑩.)
5. 미싱풀리를 돌리고, 침봉을 최상위치에서 고정해 주십시오.
(Turn the machine pulley until the needle bar reaches its highest position.)
6. 사절연결로드⑦을 손으로 화살표 방향으로 누르고, 고정나사⑧의 보이는 위치에서 고정해주십시오.
(Press the th read trimming rod ⑪ by hand in the direction of the arrow until the screw ⑫ can be seen.)
7. 침판나사⑧을 풀고, 이동칼⑨을 빼내어 주십시오. ( Remove the screw ⑫ and the movable knife ⑬.)
주1) 침판⑥ 및 이동칼⑨을 빼내었을 때는, 바늘을 빼내어 주십시오.
(Before removing the needle plate ⑥ and the movable knife ⑬, remove the needle)
주2) 설치는 역순서로 해주십시오. (Reassembly is performed by reversing the above procedure.)
All manuals and user guides at all-guides.com
Summary of Contents for LS2-H550
Page 2: ...All manuals and user guides at all guides com...
Page 4: ...5 off A S 31 2 40 25 OFF A S A S All manuals and user guides at all guides com...
Page 35: ...25 4 4 16 15 15 15 4 4 4 6 6 6 2 All manuals and user guides at all guides com...
Page 37: ...27 4 4 1 4 4 15 15 15 6 6 All manuals and user guides at all guides com...
Page 39: ...29 6 6 6 6 puff 15 19 23 4 22 19 23 19 All manuals and user guides at all guides com...
Page 41: ...31 6 1 22 6 24 24 24 24 All manuals and user guides at all guides com a l l g u i d e s c o m...
Page 43: ...33 All manuals and user guides at all guides com...


